5 Tips for Better Lighting on Location with Michael Anthony
Want more information on this article? Get access to video content and additional supporting images. Launch the July issue of the magazine by logging in or signing up for a free account by clicking here. Shutter Magazine is the industry’s leading professional photography magazine.
Being a location portrait photographer has its drawbacks. We are often at the mercy of our environment, which means we are going to be faced with lighting challenges. If your schedule is busy, you won’t always have the luxury of planning all your sessions at sunset.
A few years back, we had to start stacking shoots in our calendar to accommodate all our clients. We had to book shoots at 1 or 2 p.m., in less than optimal lighting conditions. Being forced to learn to overcome these situations, I picked up a few skills that are sure to help any photographer overcome bad lighting on location.
Come to your shoot with a plan.
First step, know exactly what the lighting needs are going to be at your shoot prior to the day of. This means that you may need to make a quick scouting trip if it’s a new location. After doing this a few times in your local area, you will have a clear idea of the lay of the land. If this is a wedding day, you could even offer to do a site visit with your clients beforehand.
Knowledge is power, and knowing what you would need for your shoot will help you to be efficient when the time comes to get out there and take amazing photos. Every time we have a shoot, I think about all the possible scenarios that we would encounter, and I pack accordingly for the session so I am not bringing equipment that I don’t necessarily need.
For typical sessions, I bring three lenses: 135, 24–70 (or 50mm) and 11–24. I bring two cameras, and leave one locked in my car.
Lighting equipment changes depending on the situation, but I usually bring one B1 or B2 flash, a soft light modifier, a reflector and a gel kit.
If I am on a commercial shoot or a wedding day, the needs are totally different; now I bring speedlights, video lights and different modifiers.
For this recent shoot in San Francisco, I knew we would be working with cloudy weather all day, so I didn’t see the need to bring along the extra weight of the B1 flash, and brought the B2 system instead, saving some weight in my carry-on.
Purchase high-quality, reliable equipment for all situations.
A professional photographer should have the right tools for every job. By doing so, you will be best equipped to handle any situation. You will need to purchase artificial lighting at some point if you want to master all situations. We use three diverse types of artificial light in our kit. From lightest to heaviest, they are low-powered, mid-powered and high-powered.
These are the tools of your trade, and they need to be reliable, durable and future-proof. There has been a rush to buy imported knockoff flashes lately. I did it early in my career to save a few dollars, and had terrible experiences repeatedly: flashes not firing or syncing, and even one that exploded after just a week. I was embarrassed to explain to my clients why my flash head was smoking.
I have learned that it is just not worth it to buy equipment from non-name brands. While there are certainly higher-end brands for strobe gear, there are other reliable ones that are moderately priced. Find flashes that are TTL- and HSS-capable to help you get to the shot quicker.
Regarding modifers, for location shooting, you will want to look for gear that is portable and easy to set up and break down when moving from spot to spot. I don’t want to have to break down a softbox to walk 25 feet because my hands were full. I love photographic umbrellas. I prefer the silver umbrellas with the diffusion fabric to soften the light when needed. This allows you to get a little more specular output from your flash. You can also use it as a soft light at the same time. Profoto makes excellent umbrellas.
Bring an assistant.
This can be a tough one. I have had good and bad experiences with staffing. But the best thing that has helped me create beautiful images quickly and efficiently is a voice-activated light stand, or human monopod. Having someone who adjusts the light position when I ask means more time to interact with my clients and less time running back and forth between them and the light.
An assistant can hold a reflector or scrim, making it easier when you’re starting out with multiple-light setups. You can have your assistant hold your keylight and keep your kicker on a stand somewhere.
But how do you find a good assistant, and how much do you pay them?
Looking for seasoned photographers in your network to assist you is a fruitless effort. For whatever reason, many photographers view assisting as a stigma. I never understood that, and it was the most problematic issue I ran into early on.
Look for talent in local schools. See if there are any students looking to enter the photography industry who would like to learn from you. Don’t stop at just one, since it will be hard to sync up your schedule with theirs. Hire three assistants so you can choose between them whenever you need someone. Book them at least seven days out and compensate them hourly after they have proved they are reliable.
Look for natural light first.
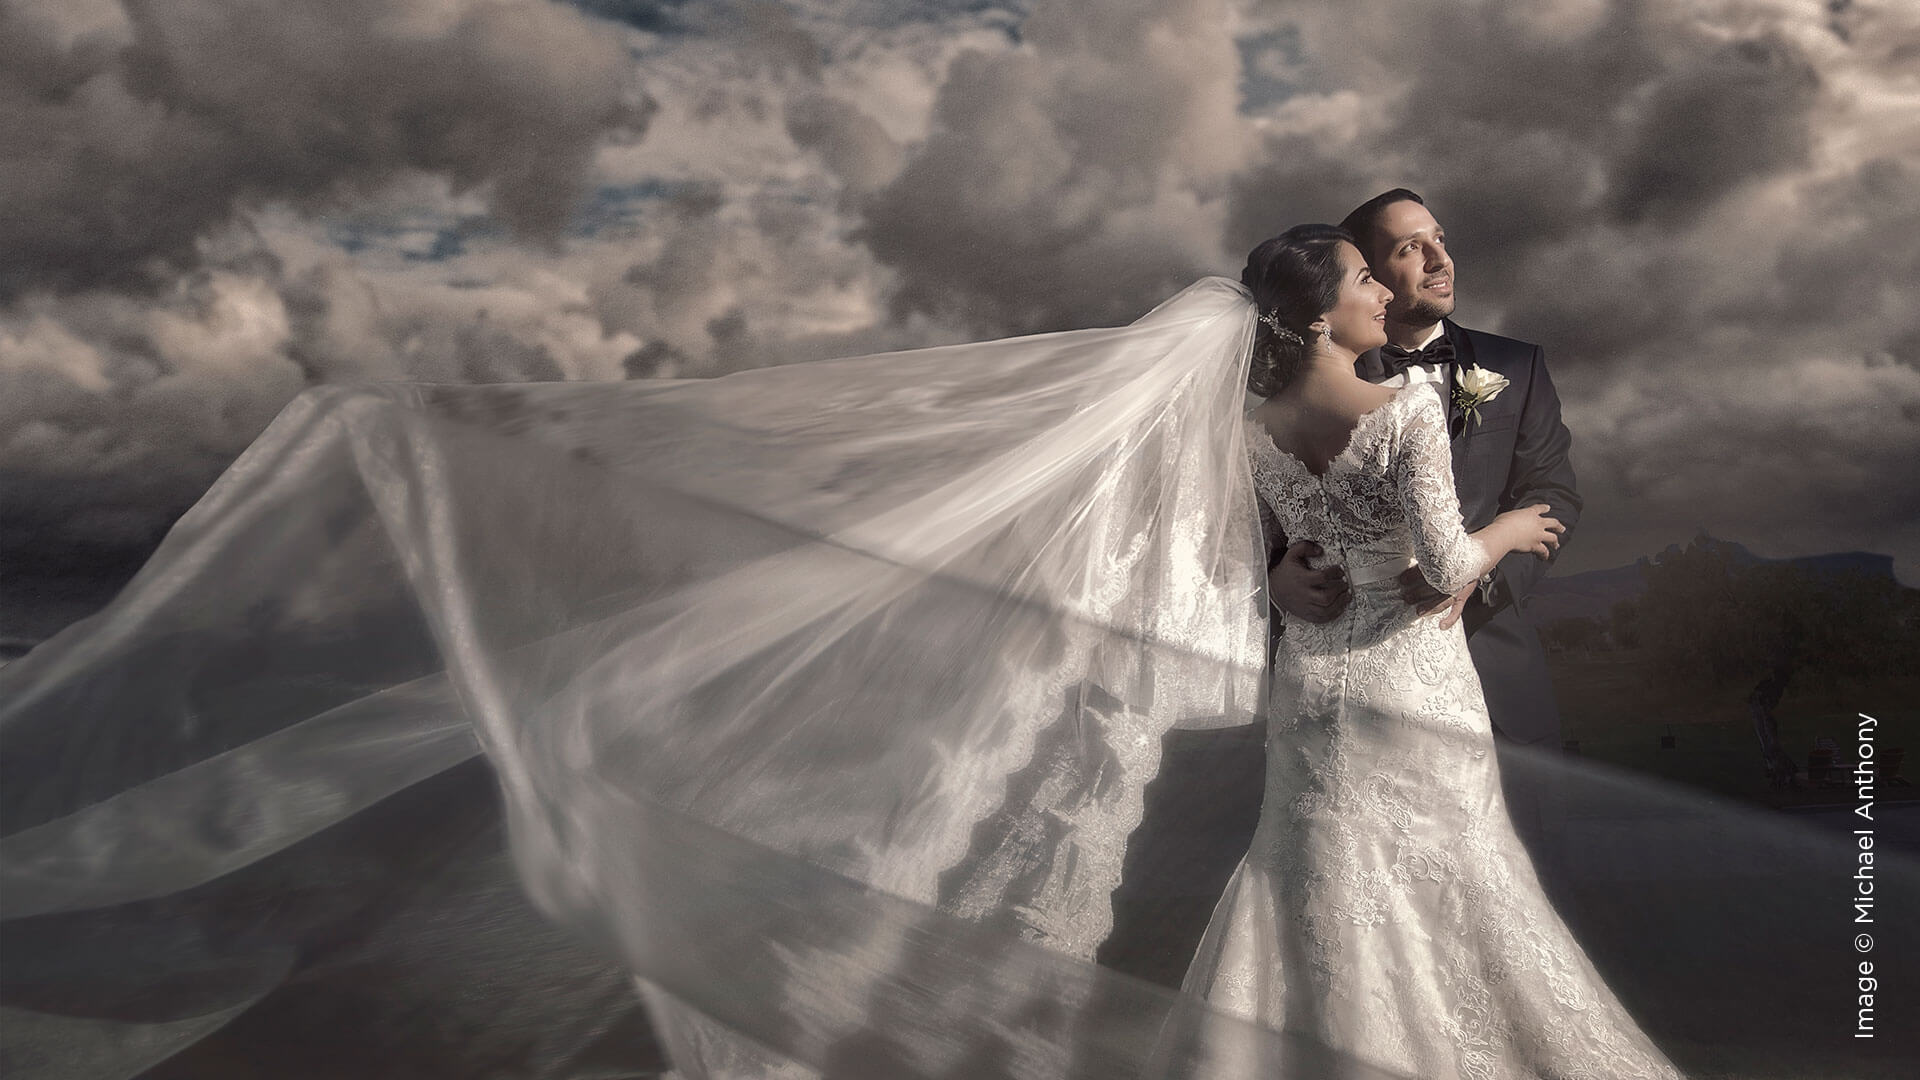
If you have read my past articles, you know that I always say good light is about proper balance. Balance could mean anything related to the situation you are photographing in. When we are not shooting our signature-look portraits, we are shooting natural light, about 99 percent of the time. This means we look for good reflective surfaces in our environment to create directional light on our subject.
You can see in this image a neutral-colored wall with direct sun on it. My bride was standing in the shade in front of me, which allowed me to make her the brightest part of the image, as the light reflecting off the building fell off gradually into the background. There are surfaces like this in almost every environment. The key is knowing where to use them.
Look for interesting shapes created by natural light. Use those to create patterns that shape your compositions.
Use gels to create fake sun flare or turn day into night.
I have talked about these techniques in depth in Shutter articles dating back to 2015. You can use either a half CTO gel, or a full one to mimic sunlight or to light a background. You can also use a creative white balance trick to turn day into nighttime using a CTO gel and the white balance settings in your camera when the light gets low.
To fake sun flare, place a high-powered flash like a Profoto B1 in the same direction that the sun would naturally be coming from. Placing it behind foliage creates a believable look that looks great. Next, use a half CTO gel on your flash, and expose your scene for natural light. From there, you can get a beautiful golden-hour sun when it isn’t golden hour or when you aren’t in the best position to take advantage of the early evening light.
You can also use your flash gels to light your background and create pretty silhouettes of your subjects. Place a speedlight on the floor facing upward, close to your background. Select the widest zoom on the flash and place your subjects in between the flash and the camera.
Lastly, to turn day into night when it gets late in the day, underexpose your scene by two to three stops. Set your in-camera white balance to 3200k. Place a CTO balanced flash to turn the light on them back to white. Optionally, place a bare flash behind your subjects to give them a beautiful blue glow. If you have a bit of the early dusk sky in the frame, you will get amazing results with this technique.
Location lighting doesn’t have to be intimidating. You just need to have the right tools and knowledge.