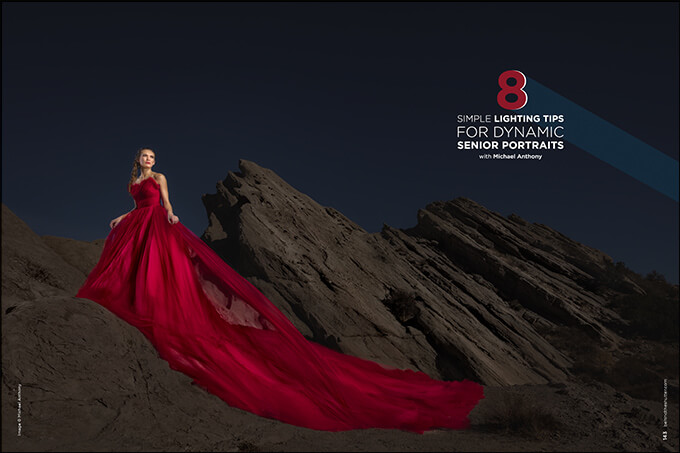
8 Simple Lighting Tips for Dynamic Senior Portraits with Michael Anthony
Want more information on this article? Get access to video content and additional supporting images. Launch the March issue of the magazine by logging in or signing up for a free account by clicking here. Shutter Magazine is the industry’s leading professional photography magazine.
It’s no secret that high school senior photography has changed over the last five to seven years. As with all genres of photography, our style of shooting must always adapt to the trends. Our studio has grown in the wedding market, but this year I set out to grow a new line of business for us: senior portraits.
Running a senior portrait session is a big departure from how we typically run a wedding shoot, but the lighting principles are the same. Our approach is very similar to how we photograph brides. The big difference here is that during a wedding day, we are photographing primarily for our clients; during a senior session, we are photographing both for the senior and her parents.
The thing about a senior session I love (as opposed to a wedding day) is that we have as much time as we need to create the perfect shot. I knew that I did not want to photograph the same boring portrait sessions that I see all over my Facebook feed. Instead, I wanted our senior portraits to have the same edge and fashion flare that helps us stand out among the hordes of photographers our clients can choose from.
Now, our style focuses on our use of light, and how we use it to shape and post our subjects. Light determines the outcome of our shoot. We have seen examples in our studio how, when a shoot departs from our house style, we end up with unhappy clients, even if the shoot would be considered a success by other studios.
To impress your clients, you can use light as the anchor for any photograph. Here are our tips for creating dynamic senior portraits.
Use Profoto for Speed and Efficiency
This is not a sales pitch. Here’s why I love Profoto’s B1 and B2 systems more than any other lighting option.
When setting up a shot, nothing can kill the interaction you have with your client more than taking 35 test shots to dial in your lighting. One reason I love Profoto is that it is the only lighting company that offers a hybrid manual/TTL mode on strobes.
This is how it works. First, dial in your ambient exposure in camera. This should take all of five seconds. Next, zoom in close and fill the frame of your viewfinder with whatever you intend to light, typically the subject’s face. The entire frame needs to be filled.
Now, with your Air-TTL remote in ETTL mode, take a test shot. The air-remote will dial in the power automatically and accurately. Switch the remote over to manual mode without touching anything else, and you are done. The variances in the scene will not affect your flash, as is common with shooting in TTL. You need to have the latest firmware installed for this to work.
Always Be Aware of Light Direction
This applies when you are shooting natural light. If you pay attention to the direction of light and find a background in your scene that is darker in tonality than your subjects, you will instantly create an environment where your subject is the brightest part of the image. This rule can be broken; one rule that should never be broken is that your subject needs to be at least as bright as the brightest part of your image.
All natural light, even open shade, has a direction to it. Once you find that direction, you can use it to light the face of your subject, specifically the eyes. To determine the direction of light, put your hand in front of your face. Pay attention to the grooves between your fingers. As you turn your hand left and right, watch how the light changes.
Find the Right Light for Your Subjects
I have used directional light as one of the key elements of my style of photography, but directional light isn’t the best for every subject. Directional light, or light coming from the left or right of your subject, emphasizes texture. If you pose your subject correctly, you can use this to create a slimming or three-dimensional effect. With seniors come blemishes, so you may be better off using flat light or beauty light.
One of my favorite tools for getting the must-have headshot from every senior session is the Westcott Omega Reflector. The reflector, designed by Jerry Ghionis, features a hole cut in the center that allows you to shoot through. This creates incredible catchlights in your subject’s eyes and hides any imperfections in their skin. The design of the Omega was well thought out, the placement of the cutout carefully considered. Don’t try making one of these at home—in my experience, it won’t work.
A reflector is my best friend on a senior shoot. One of the most liberating things for me, coming from a wedding background, is that we are working with one subject. This allows much more flexibility in light placement. You will often see me directing my assistant all around to different sides of my subject to find the best placement.
Vary Your Modifiers
I love soft light. I use the Profoto or Westcott 3-foot softboxes on many of my shoots. With seniors, I use bare flash for dramatic portraits. The key in choosing a modifier that looks appropriate for any scene is to match the natural light. On an overcast day, the natural light is soft, so use a soft light modifier. When shooting in the California sun, you will find us using Profoto’s Zoom Reflector to match the hard light in the scene. This rule can be broken, but if you are in a pinch, it is a good one to follow to create natural-looking images.
Watch Your Light Spill
The first thing that screams amateur about off-camera flash is light spill. There is nothing worse than a beautiful image with bad light placement. Remember, your eyes are drawn to the brightest part of an image, and if you are lighting the floor in front of your subjects, it takes the eyes out of the scene. Grids offer the easiest way to control light spill. Profoto makes grid options for monolights, while Magmod owns the market for speedlight grids. Both high-quality tools are always in our bag.
Make Sure Your Color Is Accurate
If light spill is the best indicator of an amateur strobist, unbalanced color is its little brother. If you are shooting at sunset, the light temperature will be very warm. You need to use gels to match the color of your flash to the scene. As above, this rule can be broken, especially in the case of color shifting (see my article in the 2015 Lighting Edition of Shutter). Overall, though, it should be followed if you want to create natural-looking photos.
Balance in Lighting Is as Important as Location in Real Estate
Using the proper ratio of ambient light to flash is critical to creating images that look natural and not too “flashy.” Properly balanced flash looks like natural light and appeals to most eyes. Everyone’s aesthetics are different, and even if a client hires you because they love your style, to create sellable portraits, your images need to appeal to them. Natural images appeal to a broader spectrum of people than images that are more stylistic. Have you ever submitted images to sites like The Knot or WeddingWire and been turned down because the images didn’t fit their style? It happened to me a lot when I started in photography.
I could not figure out why we continued booking clients while every magazine was turning us down. This is because the magazines publish images that appeal to the broadest set of readers, rather than smaller groups that like our colorful style. Just this week, I was asked to resubmit images to a large publication with a more natural-looking style of post-processing. No thank you.
Go Big to Create Your Standout Image
This tip seems obvious. Unique images equal happy clients, large sales and more referrals and social media engagement. On every shoot, focus on creating one image that is portfolio-worthy. This means that everything needs to come together—light, pose, scene, clothes, expression. Once you have this shot, double- and triple-check it to make sure it’s perfect before continuing.
Our signature shots are done with a wide angle, 12mm or so. They are lit with two off-camera lights, and usually showcase the scenery. If we get great attire or incorporate something special to the senior, even better. Just remember, light is the anchor to your photo, and even if all the other elements come together, if your light sucks, the image will too.
Summing Up
Good light allows you maximum manipulation of your images in post-production, where the magic happens. We have Lightroom presets for every image that will become one of our signature shots, and they require perfect light to work. This helps us create a consistent product that we can deliver to every client, which has fueled our referrals to help us get this new line of business off the ground.
Want more information on this article? Get access to video content and additional supporting images. Launch the March issue of the magazine by logging in or signing up for a free account by clicking here. Shutter Magazine is the industry’s leading professional photography magazine.