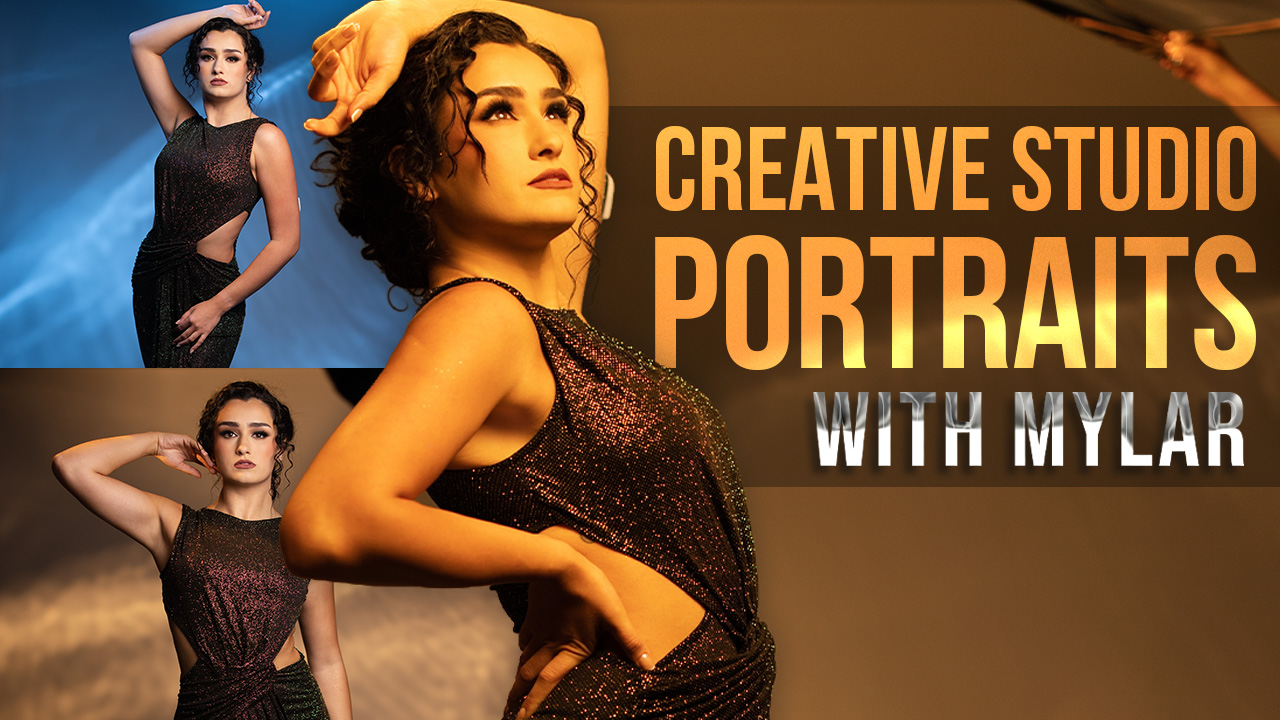
10 Things I Wish I Knew Before I Started Using Strobe with Michael Corsentino
The saying goes that hindsight is 20/20. Never has this been more accurate than when describing my 40+-year learning curve with all things strobe. When I began my journey down the road to a better understanding of flash, images were captured entirely on film. Film that needed to be processed before any of the exposures made could be seen. There was none of the instant feedback we now have with today’s dSLRs, there was no TTL flash mode, there was no YouTube to seek out tutorials, there was no Creative Live offering online classes, there was no Shutterfest conference, and there certainly was no Shutter Magazine! Things have come a very long way since the first three-light set of Bowen’s strobes I scrimped and saved for so many moons ago as a teenager, a set of lights that I ended up selling in frustration, abandoning strobe for years because I didn’t know how to control them.
The problem was I didn’t know 10 key things that would have gone a long way to explaining how to effectively and confidently use flash. Since then, through much trial and error, I eventually mastered and incorporated flash as an integral part of my photography. Now I’m able to share these 10 things with you and hopefully shorten your learning curve and help you avoid the same frustration and confusion I experienced. Using strobe in the studio and on location is now second nature for me, and it can be for you too. I think you’ll find once you understand strobe it opens up a whole new world of exciting creative possibilities. Here are the 10 things I wish I knew before I started using strobe.
Lighting Is a Game of Modifiers.
It would be inaccurate to say lighting is entirely about modifiers, but it’s damn close. The modifier you choose controls the quality of light created, broadly speaking hard light vs. soft light. Combined with the direction and distance of the strobe in relation to the subject, the right modifier makes all the difference in the tenor and mood of the lighting. Hard light is defined by a rapid transition between highlights and shadows and results in a crisp, contrasty light, a.k.a specular. For this quality of light, the best choices are smaller reflectors, soft boxes and octabanks with interiors finished in highly reflective silver fabric. The basic rule of thumb is the smaller the modifier and the further away its placed from the subject, the harder the light. Conversely, soft light is defined by a gradual transition between shadows and highlights. It’s typically a more diffuse, broad light. The best modifiers for soft light are large octabanks and soft boxes with white interiors and several layers of diffusion fabric. The basic rule of thumb for soft light is the larger the modifier and the closer it is to the subject, the softer the resulting light.
Less is more.
For many people starting out with strobes, budget can be an issue. Good lighting equipment doesn’t come cheap, but keep the following things in mind: light is light, and one light rules. As much I’m a buy-it-once-and-keep-it-forever proponent, if brands like Profoto or Elnichrom aren’t in the budget, don’t fret. We lighting geeks are fond of saying that light is light, and it’s true. Regardless of which strobe you invest in, they all do essentially the same thing—they create light, and light is light. Also, don’t feel constrained if you can only afford one strobe. Truth be told, I own a dozen or so strobes of various power and feature configurations and end up using just one flash much of time. You can do a ton of amazing things with only one strobe, and simple, uncomplicated lighting is a very good thing. Remember the sun and/or a reflector is always available as a free or low-cost second light for accent or backlighting.
More People Equals Better Results.
I know we want to be self-sufficient, but know this—you can only take your lighting so far operating as a one-man band. Try rigging and controlling an 8×8 scrim over your subject while shooting and making sure the soft box you’re using for a kiss of fill flash doesn’t blow way! I could go on. The more people you can bring along to help and allow you to focus on doing what you do best—being a photographer—the better the results will be. Think in terms of a team: model, hair and makeup artist, stylist, assistants, photographer. Each person plays to their strengths and brings their best to the shoot. In my experience, a combined effort always results in superior images compared with a singular effort. I know that you’re thinking—“I can’t afford assistants.” Don’t worry, that’s where interns, high school students, spouses, kids, etc. come in. Trust me on this, it’s more than worth the effort.
Four Principles of Light.
There are really only four things to consider when it comes to using strobes: quantity of light, quality of light, direction or light, and distance of light. Quantity of light simply means how much light you want from your strobe. It’s as simple as more light or less light. Dial the strobe power up for more light and down for less. Quality of light is all about modifiers, as outlined above. Choose the modifier best suited for the quality of light you want to create. Direction of light governs the amount of shadow introduced by your lighting. The further you move the light around your subject, the more shadow is created. Shadow creates volume, drama and dimension. This is one of the main reasons to take your flash off your camera and give your light some direction! Distance of light is the final but equally important concept. The closer you place your strobe and modifier to your subject, the larger its perceived size and the softer its light. Conversely, the further away you place your strobe, and modifier the smaller its perceived size and the harder its light.
Shutter Speed Doesn’t Matter in the Studio.
When using strobe in the studio, flash is often the sole and dominant light source for the exposure. Despite overhead constant studio lights, with the camera settings typically used in the studio (f11-f16, 1/125 second, 100 ISO), shutter speed is basically immaterial—you set it at your camera’s maximum sync speed and forget it. Once your shutter speed and ISO are set, you simply decide which aperture works best for your subject matter. For me, that’s usually between f11 and f16, but you can use a wider setting if desired, then just dial in a flash power that matches the aperture you’re using. This is easiest with a handheld flash meter, though you can also chimp your way to a proper exposure.
Multiple Light Zones.
Working with multiple strobes allows you to add extra dimension and sophistication to your lighting. Today’s leading wireless triggers typically permit lights to be assigned and controlled independently in up to 3 groups. Think about lighting with multiple strobes in terms of zones. Key light zone, fill light zone, accent light zone, etc. Each light is controlled separately using a wireless controller typically mounted in your camera’s hot shoe. I recommend working one light at a time. I set the key light first and work from there one light at time. This way I can clearly see the contribution each light is making to the overall exposure.
Balancing Flash & Ambient.
This is something I know a lot of people struggle with, but there’s no need for that struggle to continue if you follow these simple guidelines. First and foremost, remember you’re working with two independent light sources, flash and ambient, each controlled separately. In ambient and flash scenarios, ambient light is the dominant light source. You control the amount of ambient light contributed to the exposure by adjusting your shutter speed setting. If you want a dramatic, dark and moody sky, you simply use a faster shutter speed. If, on the other hand, you’d like more ambient light for an open, airy-looking lighting, you’ll need to use a slower shutter speed. It’s really that simple. When it comes to flash power, it’s as easy as dialing it up or down. Typically I start by finding a proper ambient-only exposure and then and only then turn on my flash and adjust it as needed. I leave my aperture alone as I’ve set it where needed for the desired amount of background information. In the case of TTL, you’ll simply use Flash Exposure Compensation to control flash power in +/- 1-3 stops.
Where to Start With Manual Flash Power.
This one is a head scratcher for a lot of people. Manual flash is really very simple, and that’s why I recommend people start with it rather than TTL. With manual flash, it’s all about dialing in more or less power to create the amount of light desired. There is no right or wrong place to start, you just have to start somewhere. For me, that depends on the power of the strobe I’m using and its distance from the subject. A good rule of thumb is starting at 50% power. From there, you simply dial it up or down intuitively or with the aid of a handheld flash meter. See below for more about flash meters.
When to Turn Off the Flash.
I may be putting the cart before the horse here, but at some point you’ll be so comfortable with strobe and enamored by what you can do with it that you’ll likely never want to turn it off. It’s happened to me! Using strobe is all about creating the light you want rather than being held hostage by the light you’re given by Mother Nature, unless that’s the quality of light you wanted. Remember to assess the light, think about the quality you want before you leave for your shoot, make a plan, bring the tools you need to achieve that plan, and stay flexible. Sometimes, the light on scene is better than anything you can create artificially, and other times it requires your intervention. The main takeaway is as much as I love strobe, it’s a means to an end, and you don’t always need it.
Why a Flash Meter Is So Valuable.
I’m a big advocate of using a handheld flash meter! Why? Because a flash meter does things your camera’s meter simply can’t. As good as it is, your camera’s meter is unable to measure manual flash, unable to determine the ratio between a key light and an accent light, and unable to take an incident reading. Built-in camera meters take only reflective readings. Incident readings measure the light falling onto a subject rather than the light reflected from it. Because of this, incident readings are more consistent and more accurate. Flash meters allow you to work quickly, consistently, accurately, and with repeatable results every time. With a light meter, you simple match the shutter speed and ISO settings used on your camera and measure the light from your strobe until it matches your aperture setting. This way, your first exposure is rock solid. There’s no guesswork, no chimping, and no wasted time. I call that a win!