2 Lighting Patterns You Need to Know with Michael Corsentino
Whether you’re working with strobes or constant lights, on location or in the studio, the placement of your main light along with its angle relative to the subject are both crucial elements in the overall lighting you create. Your main light, also known as the key light, and its placement and vertical angle, directly affect the amount of shadow introduced, where it falls, and the quality of the resulting light. Learning where to place your key light and what angle to give it is easy using the six foundational lighting patterns photographers rely on for consistent results. These six simple, yet highly effective, lighting patterns are the go-to guide for an endless variety of predictable, repeatable lighting effects. In fact, one of these lighting patterns, Rembrandt Light, has been in practice since the master painter Rembrandt first used it.
The six foundational patterns and a few key variations should be on your radar. They are, in no particular order: Butterfly Light/Clamshell Light, Loop Light, Rembrandt Light, Split Light, Broad Light and Short Light. We’ll discuss Broad Light, Short Light and a few key variations below. I’ve included examples of each of these lighting patterns, because they’re an important part of the overall lighting picture. Every photographer should know how to identify them and put them into practice when needed. However, that said, I’m going to focus on the two lighting patterns that I feel have the most versatility and utility. These are the ones I keep coming back to and using for the majority of my work, albeit in vastly different ways and with vastly different results. It’s this versatility, flexibility and ability to be seasoned to taste that make these two lighting patterns so useful. In a word, they are my desert island lighting patterns—the ones I simply couldn’t live without. Master these two patterns, and the lighting world will be your veritable oyster, guaranteed.
BUTTERFLY/CLAMSHELL LIGHTING
The first of my two desert island lighting patterns is a variation of Butterfly Lighting called Clamshell Lighting. In this lighting pattern, the key light is placed above the camera position, angled downward at approximately 45 degrees toward the subject. A bird’s-eye view has both the camera, the key light, and the subject at the twelve o’clock position (see diagram). The height and angle of the light relative to the subject are both crucial in the creation of a bright spot in the eyes, known as a catch light. Properly placed catch lights give a lifelike appearance to a subject’s eyes. If you don’t have catchlights, something’s wrong—simply adjust the key light’s height and angle one at a time until you do.
Thus far, what we have is known as Butterfly Light. The introduction of a second light source placed below the subject’s face, typically around the midsection or lower, is when the lighting pattern becomes an over/under arrangement referred to as Clamshell Light, as it resembles an open clamshell. Depending on your desired effect, the second light source can be either a reflector, a strobe or an additional constant light. For subtler effects, I use a white reflector, progressing to a silver reflector for stronger effects, and finally a second light for the strongest. Clamshell Lighting is amazingly versatile used alone or in combination with accent lights for a variety of applications, ranging all the way from headshots, to beauty/glamour images, to fashion, to edgy athletic portraits. Clamshell truly does it all and does it really well. You can cover a ton of territory with it. This is your go-to lighting pattern when you want nearly shadowless light that flatters all subjects. Remember, the absence of shadows equals the absence of wrinkles and other facial imperfections. Bingo!
Keep in mind that with any lighting pattern, light placement and angle are only half the picture. Distance of the key light relative to the subject and the light modifier also play pivotal roles in the quality of light you create. Don’t underestimate the power of a modifier and its distance from your subject to completely transform the quality of light. It’s the combination of all of these elements—lighting pattern, modifier and distance—where the magic and versatility of these lighting patterns happens.
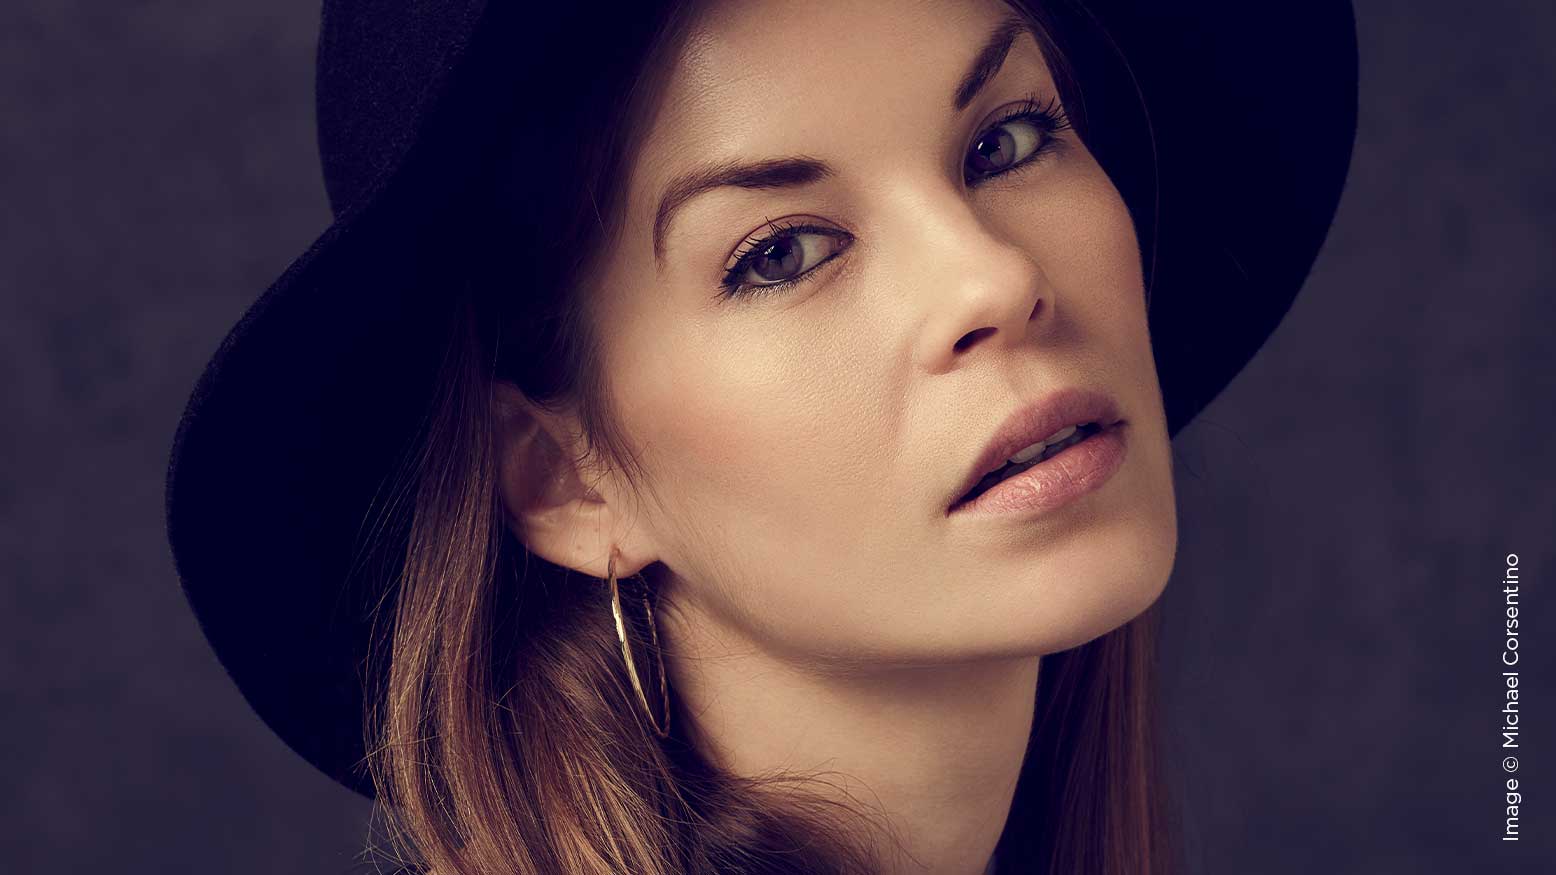
REMBRANDT LIGHTING
Number two on the lighting pattern hit parade is Rembrandt Lighting. This is directional light at its best. Add direction to your key light, and you add shadow to your subject. That’s a good thing! Shadows add drama, volume and dimension to your images. Think about it—photographs are comprised of highlights and shadows, so without them, I’d argue you’re leaving a lot on the table. There’s a time and a place for everything, but given my druthers, I’m a shadow guy. With Rembrandt Lighting, your key light is placed approximately 45 degrees to the right or left side of your subject, and angled down approximately 45 degrees toward the subject, creating a shadow that extends from the nose to slightly above the lip. The key light height will dictate the length of this shadow, so adjust accordingly. The same catch light guidelines outlined in Clamshell Lighting apply here, only now from a key light placed slightly to the side of the subject. See the included diagram for placement. Rembrandt Lighting is classic portrait lighting, and extremely versatile. Use it on its own with one key light for a dark and moody effect, or add in a white or silver fill reflector opposite the key light for an open, airy look. This will bounce light from the key light back onto the shadowed side of the subject’s face. All of this is season-to-taste. If you want an even brighter look, make the fill an additional strobe or constant light. If you want a darker look and an even more moody effect is the order of the day, add a black subtraction panel opposite the key light to deepen the shadows. It’s as simple as that! Rembrandt Light is one of my favorite patterns by far—super useful, classic and versatile. This lighting pattern can be used for myriad portrait styles, from editorial to corporate to fashion. Experiment with different modifiers and key light distances for endless fun and effects.
When it comes to directional light such as Rembrandt Lighting, it’s also worth including a discussion of Broad Light and Short Light. These terms are shorthand for describing which side of a subject’s face is being illuminated relative to the camera position. Broad Light refers to situations where the side of the subject’s face that is facing the camera position is illuminated—the broadest part is being lit. Conversely, Short Light is the opposite, and refers to illuminating the side of the subject’s face that is facing away from the camera position, leaving the side facing the camera in shadow. Why is this relevant? Both Short Lighting and Broad Lighting create a different sense of volume or fullness on a subject’s face. Therefore, the basic rule of thumb, and it’s only that, is that with heavier-set subjects, you may want to Short Light them in order to create a slimmer appearance. This is good to know, but it’s completely up to you. I end up using Short Light on all sorts of builds, slim and otherwise, more for creative effect than anything else, as it creates a more dramatic, backlit effect.
With these two lighting patterns, you’ll be able to tackle virtually anything that comes your way. Add accent lights here, swap modifiers there, and you’re off to the races. One popular iteration I use with Rembrandt Light is the addition of a second accent light opposite the key light diagonally and behind the subject to create Cross Light—I’ve included an example. This arrangement works equally well in the studio or on location.
As always, have fun, swing for the fences, and keep creating. See you next month!