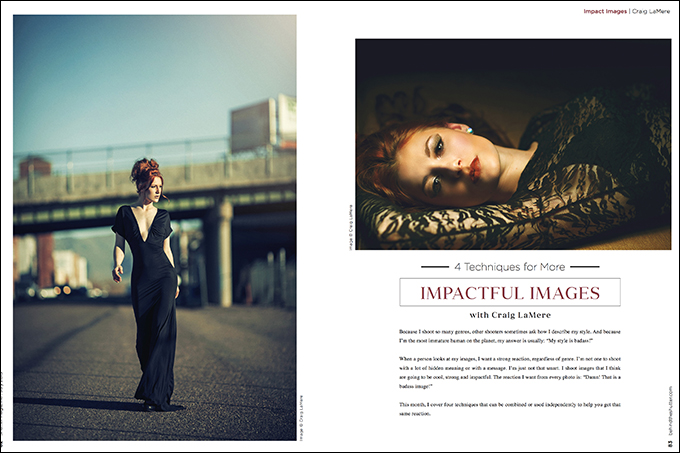
4 Techniques for More Impactful Images with Craig LaMere
Because I shoot so many genres, other shooters sometimes ask how I describe my style. And because I’m the most immature human on the planet, my answer is usually: “My style is badass!”
When a person looks at my images, I want a strong reaction, regardless of genre. I’m not one to shoot with a lot of hidden meaning or with a message. I’m just not that smart. I shoot images that I think are going to be cool, strong and impactful. The reaction I want from every photo is: “Damn! That is a badass image!”
This month, I cover five techniques that can be combined or used independently to help you get that same reaction.
Black and White
When I first started shooting, before I had any clue what I was doing, I would pretty much point, hit the button and hope for the best. Then, after the session, I would look at my images and assess the damage I had caused. For the most part, of the thousand images I would take at a shoot, five were good, 20 were average and the other 975 were pretty much poop for one reason or another.
In the bad images, the colors were off because I didn’t know anything about white balance or color temperature. For these images, I would do the one thing that was almost guaranteed to save any image, as long as it was in focus: convert it to black and white.
At the time, black-and-white conversion meant going to the Image tab in Photoshop and hitting the desaturation button. As I got further into photography, I started to understand tonal range and channels in black-and-white images. Soon I started to love black and white, and not look at it merely as a last resort or a fix.
Nowadays, I often shoot specifically in black and white. I shoot with tones in mind, not with a color palate. I’m looking for very strong contrast between light and dark. You are still capturing images in color, but you should be envisioning them in black and white.
As I said before, the way I would create black and white was to merely take all the color information out of the image and call it good. While this will give you an image that is black and white, you are not maximizing your image’s potential in the least.
There are many black-and-white converters out there. I use Nik Software’s Silver Efex Pro 2. It lets me manipulate each of the specific channels and assign different depth of contrast to each. It’s the contrast that gives your images impact.
Posing
Of all the questions I get asked, the majority of them fall into two categories: lighting and posing.
There’s a reason the old tried and true methods for posing have survived for years and years. The three most basic things I advise people are:
- Stick to your rules.
- If it bends, then bend it.
- Pose guys into C’s and girls into S’s.
If you stick to these three things, you will be fine 90 percent of the time. But when I want to pose for impact—especially with women—I pose for power, strength and confidence. There really is not a lot you have to do to pose women for power and strength, but the results of a few little tweaks are really amazing.
Tweak 1. In standing poses, do not let clients bend their legs. When posing a woman, you can have the hips pointed away from the camera and the knees slightly bent, which softens up the pose. Have your client take a slightly wider than shoulder width stance and hip to one side. By keeping legs straight, you are creating hard lines that play very well for impact.
Tweak 2. Create hard triangles with arms and legs. When you are posing women for power and strength, make sure the elbows and/or the knees are bent at a 90-degree angle—and even a little more if you have a client with very long arms or legs. You want to close the pose as much as possible to create a sense of rigidness.
Tweak 3. When using an S curve, keep the head in a straight-on position, without a lean, creating a full S curve. This reveals the femininity of the curvature of your subject’s body, while the head being straight gives your image strength—and impact.
Cropping
The way you crop can make or break an image’s impact. Whether you crop in-camera or in post, your crop is the trail you lay down to lead your viewer to your point of interest.
There are two basic cropping philosophies. The first I call the competition print crop. This style best fits the standards for print WPPI, PPA or pretty much any other standard print competition. Probably the most prevalent crop rules for print competition is not chopping people at joints or the head, and using the rule of thirds.
Which brings us to the second philosophy of cropping: breaking those standard competition rules. It is very important to understand all aspects of print competition, but once you do understand the rules, you can venture away and get more creative than the rules allow you to.
I’m such a nut for keeping my point of interest in one of the far thirds of an image. Because I’m a portrait shooter, the eyes of my subject are usually my point of interest. To get the eyes where I want them, I often chop the tops of heads. When I’m shooting full length or three-quarter, I chop off hands, feet, arms and legs in the final crop in order to get my point of interest where I want it. You might lose some of the image, but less is more, and to me it is worth losing some of an image to focus the attention on what is really powerful.
Location
If you come from a town like mine, where every field, alley and graffiti wall has been shot over and over again, you are faced with the task of making highly shot locations new all over again. When I shoot locations, I consider two lighting options: natural or strobe. Here’s how I shoot both in hopes of making any location my own.
Natural-light locations are about colors and tones, and how I can use them to complement my subject. I like to shoot between 85mm and 135mm, and as wide open as I can with my f-stop. On my 85mm, that would be f1.2, and on my 135mm, it would be f2. I like to do this so I can compress the image, pretty much completely blur the background and create a lot of separation. When shooting like this, my goal is to make shallow depth of field shine the spotlight on my subject. With this technique, you can render any location almost unrecognizable.
Strobe-light locations are about making the environment as important as the subject. I pretty much shoot only my 24–70 L 2.8. I shoot at 24mm 99 percent of the time so I can take in as much of the location as possible. I shoot in the exact opposite way as I do in natural-light locations: I shoot closed down at f13 to f16; I do not want any compression of the image; and I want to be certain everything will be in focus. In strobe locations, I always underexpose to bring out all the colors and the grit of the location, and then bring my subject out with the strobe.
This is one of the most impactful setups you can pull off, and one that will set your work apart.