Building Dramatic Fashion Lighting with Michael Corsentino
I’m a big fan of great lighting, especially dramatic lighting. Fear not, all you lovers of supersoft light—I’ll be covering that as well in an upcoming issue. I write often about the different methods and tools used to create various lighting styles. This month, I want to dig more deeply into the creative process and give you a step-by-step demonstration of exactly how to create dramatic light.
I certainly could have cut right to the chase and shot my previsualized concept first, but that would have defeated the purpose of showing you how various light distances, positions, modifications, background color choices and additional tools make the difference when you’re building lighting effects from no drama to maximum drama. With this approach, my hope is that the reasons behind the choices made, techniques employed and their results become much clearer.
The difference between dramatic lighting and lighting without drama lies in the shadows and contrast created, or the lack thereof. Introducing shadows immediately infuses an image with more drama, and the harder the transitions between shadows and highlights, the more contrast and drama created.
I began with one bare bulb strobe placed above my camera, angled down at my model Kat. I photographed her on a white background to demonstrate what is nearly the flattest light possible. And I wanted to give you a point of departure for the forthcoming looks, where I’ll introduce direction, various distances and several different modifiers to increasingly ramp up the drama. As you can clearly see, without any direction to the light relative to the model, there’s very little in the way of shadows. This causes a flat look because, without shadows, there is nothing to give the subject a sense of volume and depth. This look is our baseline no-drama lighting look.
Small changes create big results. By simply moving the light (still a bare-bulb strobe) to the right side of my model (from the camera position), I’ve introduced a significant amount of shadow to the image. I’m still using the same white background, but by repositioning and adding direction, the image now looks completely different. It has more drama and impact, and the subject is considerably more dimensional than in the previous flat-lit image. With one simple change and no modifier, I’ve gone from no drama to major drama.
The next step in the evolution toward uber-dramatic lighting is the introduction of a modifier to help shape and control the light from the bare-bulb strobe. I’m still shooting on white seamless with the light in exactly the same position as the previous image. But for this third look, I’ve added a 7-inch reflector with a silver interior. As you can see, this dramatically changes the characteristics of the illumination, creating a more defined, punchy, specular pool of light. Consequently, shadows are now deeper and the transitions between highlights more rapid. It’s another step forward in our dramatic lighting journey.
It’s safe to say that shaping and controlling light is really is all about modifiers. Building a vocabulary and understanding of which modifiers create which effects, and knowing when to use them, is the key to creative freedom. For this fourth look, I kept the position of the light and background the same, but I’ve swapped out the 7-inch silver reflector for a focusable zoom spot Fresnel modifier for the strobe. This tool is all about drama. With it I can create basically any shape I want, with soft or supercrisp edges, like I’ve done here. Again, the drama you’re seeing is a result of light direction and modification.
The distance of your light from your model and the background also plays a key role in the quality of light created. In the previous series of images, the keylight was approximately 10 feet from the model. For this fifth look, I moved the keylight close to my model and background, still a white seamless, and used a Mola Rayo to modify the light. The shape and interior finish of the modifier impact the shape, contrast, falloff and efficiency of the light. The Rayo’s long conical shape and silver interior create deep shadows and a specular, punchy pool of light with rapid falloff. The small changes made in each of the successive looks have had a large impact on the overall quality of light and the drama created.
Grids, both fabric and rigid grid spots, are go-to tools for creating dramatic light. Lighting is all about placing pools of light where you want them. Grids excel at helping you do this. They confine the light from a strobe or speedlight to a narrower beam, eliminating any light spill that might be contaminating a background or another part of the image. For the sixth look, I’ve added a 7-inch silver interior reflector with a 10-degree grid spot to the strobe. This replaces the Mola Rayo used in the last look. Everything else has remained the same. The background is still white and the position of lights hasn’t changed, but the quality of the light is vastly different. That’s the power of modifiers. When you need to eliminate unwanted light on a background, grids are your tool of choice.
Tone also plays a vital role in imparting drama to an image. For the next look, I’ve swapped the white background used in all the previous images with a dove-gray seamless. I’m using exactly the same lighting setup as the last look: a 7-inch silver interior reflector with a 10-degree grid spot close to the model. Yet again, we’ve achieved a completely different look simply by changing the tone behind our model rather than changing our lighting. Don’t underestimate the impact of tone and color (more to come on the role of color in the final concept).
You can’t beat a black background when it comes to a canvas for creating dramatic lighting. Again, the choice of the background color makes a huge difference, as you can see here. Moving from gray to black and using the same lighting setup as the previous image—a 7-inch silver interior reflector with a 10-degree grid spot—amps up the drama quotient even more.
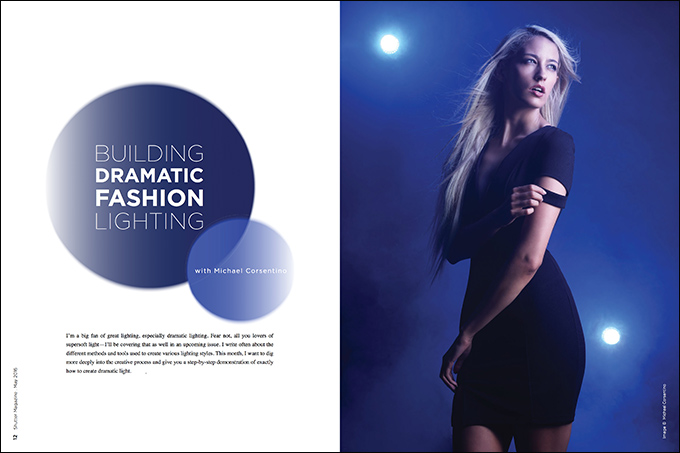
For the final look, which was my original previsualized concept, I kept the background black, added two lights and colored gels, changed the modifier and brought in some fog and wind for added effect. This gave me three lights: two behind the model gelled with Rosco Primary Blue and facing the camera, and one light camera right, half-gelled with Primary Blue, serving as the keylight. The reason I half-gelled the strobe inside the strip bank was that I wanted the keylight to contribute mostly white light but still deliver a hint of blue.
The background lights were bare bulb with gels tapped over them, and the keylight was a large Elinchrom strip box with a 40-degree Lighttools egg-crate grid to keep the light off the background. On a cautionary note, when you’re using gels in direct contact with strobes, be sure to turn off the strobe’s modeling light. If you don’t, your gels will quickly melt. One other important step I took for this setup was to mask the light stands supporting the two background lights with black gaff tape. Otherwise, the light from the strobes would have illuminated their silver finish, requiring a lot of work to get rid of them in post.
For the final touches for my dramatic lighting concept, I employed a Rosco Vapor Machine to create a moody fog effect to diffuse the background lights and create a wash of color; a wind machine added a sense of motion to the model’s hair. It takes a minute to get used to working with fog, finding the right amount of fog and the right direction, but once you get the hang of it, fog can add a lot to your repertoire.
I hope walking you step by step through the process of creating dramatic lighting has piqued your creativity and given you a better understanding of how to control, shape and work with light, color and tone. See you next month.