
Classic Black & White: Recreating Old Hollywood Headshots with Phillip Blume
In a departure from my usual articles, today I’m inviting you to come into the studio with me and follow step-by-step as I experiment to create a self-portrait in a genre that’s outside my wheelhouse. Our goal is to recreate a classic, black & white, Hollywood-style headshot. Because many of us shoot the same brand of photography every day, this really is a reminder to all of us that photography should be fun! One of my favorite photographic exercises, which stretches my skillset, is the reverse-engineering of photos that other photographers have created. We all do this as beginners. Remember? Back then, you looked at others’ work all the time, trying to figure out, How is it lit? What settings did they use? But too often, we don’t keep up the habit. Even as an experienced professional photographer, when I experiment with an historic genre like classic Hollywood headshots—something that few people shoot today—its uniqueness puts me back into a student’s frame of mind. It ensures I’m still learning, and it keeps me fresh, so I don’t fall into lazy patterns of doing the same thing all the time.
To re-create the classic Hollywood self-portrait, we will first analyze and reverse-engineer some portraits from that time and style. Next, we’ll choose what kind of lights and modifiers to use. Then, finally, we’ll position those lights and take the shot to see what results we get.
To research, I like to begin with a broad online search of Pinterest or Google Images. I mark my favorite examples of the kind of images I’m looking for, then collage them together on a piece of paper, as shown. In this case, I looked for men’s portraits so I, as the subject, could pull off the look accurately (though I’m sure I would’ve looked equally smashing in long white gloves and a birdcage veil). My favorite portraits from the era were mostly of Humphrey Bogart, and his portraits clearly shared at least five key characteristics common in old Hollywood: 1. Loop light pattern, 2. Hard light quality, 3. High contrast, 4. Moody environmental backgrounds, and 5. Classic headshot posing. Let’s look at each in turn!
Loop light pattern
To determine the lighting pattern used in a portrait, you must simply reference the shadow on the dark side of a subject’s nose. Notice that the shadow cast by Bogart’s nose in the sample photos virtually always drops 45 degrees below his nose, yet stops short of meeting his lip or the shadow on his cheek. It’s a clear “loop” shape and, therefore, an example of the loop lighting pattern. (In other common lighting patterns, such as Rembrandt light or butterfly light, the nose shadow would either connect to the cheek shadow or fall directly below the nose, like a mustache.) In sample photo #1 (my favorite image, which I’ll try to re-create), Bogart’s face is half-darkened (almost a “split lighting” pattern). This makes it harder to define, but the loop still appears subtly.
Hard light quality
The “hard” light in old Hollywood portraits is remarkable! Most of what I shoot these days in contemporary commercial work is very soft. But look at the stark difference here. There are deep shadows you can’t even see into, and highlights that appear nearly blown out. Every highlight meets its accompanying shadow along a razor-sharp line. That’s textbook hard light.
High contrast
Related to the hard light—but not quite the same—is contrast. I’m referring to the ratios of how different parts of the photo are lit. How dark are the darkest bits? How bright are the lightest bits? For example, you can certainly create a hard-light portrait, yet use a fill light or reflector to lessen the depth of the shadows. Not here! So I’m not going to bother with a reflector or fill light. Also, I usually want to light my subject brighter than the background, so they “pop off the page.” But isn’t it unique what they did in these samples instead? The “properly” (over-exposed) highlights along Bogart’s hat and jacket—and in some cases even the background—are the brightest elements. Yet the subject himself is underexposed. His eyes, which we know are the most important facial element to light, are hidden in darkness, with no catch light. My gosh! Didn’t those Hollywood photographers know their craft?
Honestly, yes, they were masters. You see, the result of the lighting is a gritty, realistic environment—a perfect example of breaking the rules in order to create something original that still works to tell a story.
Moody environmental background
All of these portraits, and the movies they represent, inhabit a dark, moody scene. Thus, their backgrounds are mostly dark and often even messy. Even sample photo #2, with its bright wash of light framing Bogart’s head, begins dark on the left side before this limited spotlight is added. In line with this, I’m not going to make a tidy, “glowing” background for my recreation. I’m going to leave it messy and “real,” even if some stray bits of light end up there.
Classic head posing
It’s easy to overlook the pose, since it’s “just” a headshot. But there are a few important details that are consistent almost throughout. For one, this is a classic example of a two-thirds headshot; while his nose does not intersect the edge of his profile, you only see one of his ears. With rare exceptions, one ear is hidden, and we don’t get a full view of his neck. Bogart’s neck falls behind his chin, partly from his leaning forward and partly from the slightly higher camera angle. I want my recreation to have a distinct jawline for sure. Finally, Bogart is always looking away from camera—even if just barely over the lens. “Spiking,” or looking at the camera was a cardinal sin in Hollywood for decades. With rare exceptions (from ground-breaking directors like Alfred Hitchcock), actors never wanted to “break the fourth wall” and appear camera-aware.
Selecting lights and modifiers
Now all we have to do is choose the lights. A light is a light. You can use almost any flash here, whether a quick pocket flash or studio strobes. I’ll use the bigger strobes at my disposal, but what really matters is the modifier. That’s how we create the shape of light we want.
We said we want hard light and high contrast. I usually love soft boxes in studio for a softer and more modern look, where you focus on the subject and don’t really think about the light. It just looks clean! But classic Hollywood is all about the mood—the mystery and the emotion. So instead of a soft box, which spreads light onto the subject from every angle to fill shadows, I can start with a bare light.
Now, a fully bare strobe is useful for the background in commercial shoots. It can disperse light everywhere, imitating the omnidirectional effect of sunlight that fills a space completely. But we want a darker background, not for light to illuminate everything. So how do we accomplish that while still creating a hard light? Start with a dish (standard hardware for strobes) to limit the light coming out at the edges. Even with the dish, the light spread will be around 120 degrees, so I will need to control it even more with a grid. I don’t own honeycomb grids for my strobes (small, hard grids that fit just right); I just don’t use them enough. So I got creative on this shoot—I borrowed my huge, soft box grids made of fabric, then I simply taped them to my strobes with gaffer’s tape!
Now I can really focus the light almost laser-like in one direction, illuminating myself as the portrait subject right where we want to create those shapes along my high collar and hat, creating that edgy look.
In terms of placement, I ended up with a three-light setup (see the behind-the-scenes photos). I chose not to use a separate light on the background, although you could do something creative like shine a direct light there. Instead, using a small wooden modeling doll as my test subject, I set my exposure to darken the entire studio. Next, I set my backlight strobes strongly enough (about 1/4 power) to create overexposed highlights on my hat and jacket shoulders. I didn’t even turn on my key light …
In the sample photo of Humphrey Bogart, his right cheek is lit by the key light. But in my case, my “good side” is my left. Most everyone’s nose tilts to one side or the other, and my nose really tilts to the left quite significantly. So if I light the right side of my face heavily in a high-contrast photo, you’ll see a very bright nose that passes the center point of my face and looks broken. To lessen that unpleasant effect, I’ll light the left side of my face; then it looks like a smaller bit of nose, and the “big” side falls into shadow, where it’s less distracting.
I want to draw the brim of my hat, too, to fully shadow my eyes. Usually, we’re putting light into the eyes, but this is a whole different genre. So it’s okay to create a bright hotspot on my cheek while everything else goes dark.
Finally, I adjusted my lights much higher than usual. Remember, what we’re going for is basically stage-lighting. Old Hollywood was barely removed from the theater and stage plays, so they still lit scenes almost as if they were onstage. Higher lights gave my hat a nice highlight, while keeping everything beneath the brim dark. On the other side, the key light created balance by lighting my lower face.
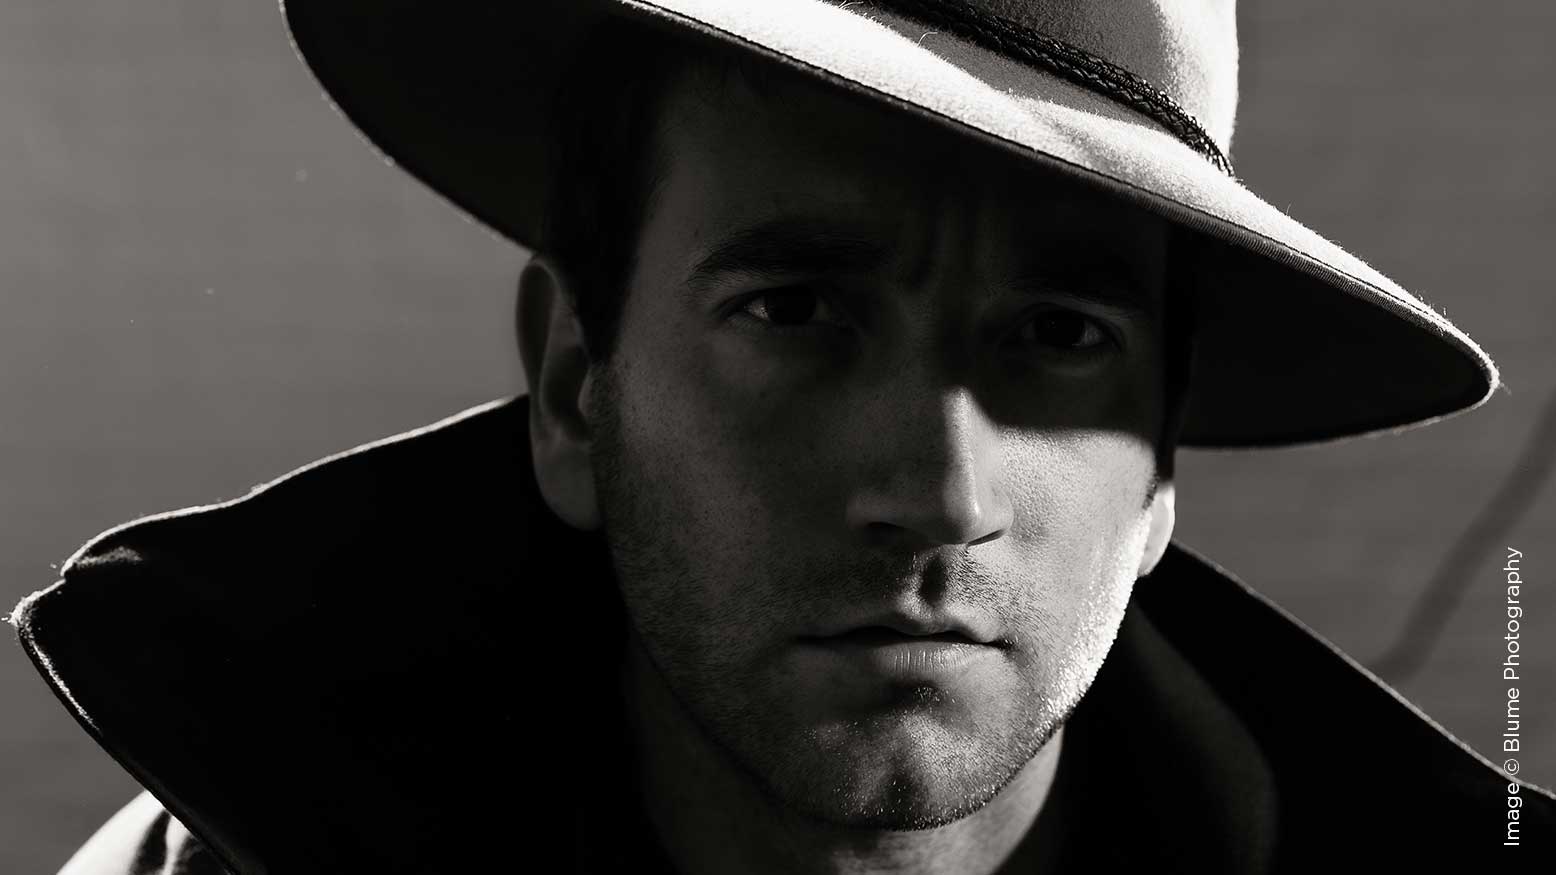
The most important aspect here is the key light. Usually, my work puts the key light somewhere out in front, adding extra light to the whole face of my subject. In this case, I have light at a 90-degree-angle beside my face. It will barely light anything other than the left side of my face, and I’ve got it up a little extra high to make a subtle loop light. Normally, I would have this light just above eye-level. But I’ve got it nice and high so the brim of my hat shadows my eyes. All that’s left to do is press the trigger. What do you think of the results? Now go and try it yourself!


