I love a good lighting puzzle, or what I like to call “decoding light.” Reverse-engineering the light you see in images is a great way to learn how it was achieved. This way you can try to replicate it, incorporate it into your work and eventually make it your own. The catchlights in the eyes and the placement and quality of the shadows are a few of the tell-tale signs to look for. I do this all the time, and encourage you to do the same if you’re just learning lighting or simply looking to add a few cool new techniques to your lighting bag of tricks.
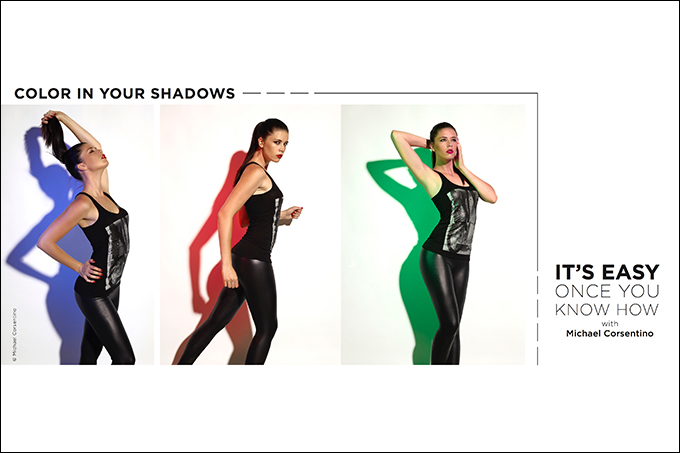
Readers of this column know I’m a big fan of gels. There’s a ton you can do with them, from corrective to creative. During recent Google searches, I repeatedly came across several images that left me scratching my head. The images had a subject lit in what appeared to be relatively white light, seemingly from one strobe, yet the shadow being cast behind the subject was a completely different color. This was a big mystery to me. How was this possible? Where was the color coming from? How could the subject be in nearly white light but the shadow they were casting directly behind them be another color entirely? I couldn’t see any other light sources aside from the keylight, no secondary catchlights in the eyes, no double shadows to give away an additional light source. Definitely intriguing.
After some digging, I found a few clues and set about recreating the effect myself. I set up my mannequin Roxanne in the studio in front of a white seamless background, and began trying to replicate the effect. Figuring out how to create colored shadows, a cool look for both fashion and catalog work, was tricky but fairly simple once I figured it out.
It turns out that the secret is the use of a second light to create the color in the shadow. The devil is in the details. The placement of this gelled light makes all the difference. If it’s placed next to the keylight, you’re likely to get double shadows, which isn’t what I was after. I wanted one crisp, well-defined colored shadow. Placing the light on the opposite side of the keylight, pointed directly at the shadow, did the trick. The shadow still lacked the crispness I was after, but this was easily remedied by increasing the distance between the keylight and the subject and using a different modifier. What you’re doing here is filling the shadow; avoiding crossing shadows by keeping the power under the output of the keylight; and sidestepping any secondary catchlights in the eyes via the position of the light.
Creating Crisp Shadows
The qualities of shadows are governed by several factors, starting with distance. The distance of the keylight from the subject and the distance between the subject and the background will both dramatically affect the level of crispness achieved in the shadows being cast. The more distance there is between the keylight and the subject, the harder the quality of light will be. Hard light is a great fit if you’re after a deep, hard-edged, crisp shadow. The darker the shadow, the more color saturation you can introduce into it and the more defined the shadow will be, creating a more dramatic “crisp” effect. Remember with this technique in addition to a keylight used to illuminate the subject and cast a shadow, a second gelled light is used to fill in that shadow with color.
The Keylight
The next equally important factor is the modifier used for the keylight. The keylight used was a Profoto ProHead connected to a 7A 2400WS pack and modified with a Profoto Magnum reflector. The Magnum is a great light-shaping tool for creating contrasty, punchy light with crisp shadows due to its relatively small size, silver interior and deep shape. Because I wanted the crispest possible shadows, I placed the keylight approximately 10 feet high and 15 feet from the subject. The combination of distance from the subject and the properties of the light and modifier all contributed to the hard quality of light I wanted, and provided enough coverage for three-quarter and full-figure work.
The Fill Light
For the fill light, I used a medium-size strip box fitted with a 40-degree egg-crate grid and powered with a Profoto B1 Air. This light was placed close to the background relative to the keylight, about 5 feet away. The grid was used to tightly control the spill of light and confine it as much as possible to the shadow being cast on the backdrop by the keylight and subject. Inside the strip box, behind the internal baffle, I taped one different-colored gel at a time over the light head. Be careful doing this; modeling lights can easily get too hot and quickly melt your precious gels. Gels are also available in large rolls that can easily be used to cover the outside face of a softbox and avoid issues with modeling lights altogether.
Less Power Equals More Color
Working with gels and strobes is a little counterintuitive. Gels behave differently when held in front of constant lights than they do in front of strobes. In front of constant lights, many gels can throw a lot of saturated, vibrant color. With strobes and, to a lessor extent, speedlights, it’s a case of less is more. You get much better, more-saturated results using the lower end of the strobe power range than you do with higher output. Gels don’t seem to like a ton of light; they quickly appear washed out and lose their punch. My gelled fill light was two stops under the key for each of the three finals. So again, less is more.
The Fill Light Modifier
If you’re ready to take it to the next level and create the crispest hard-edged shadows possible, you’ll want a Profoto ZoomSpot with four interior cutters. This modifier’s built-in Fresnel lens allows users to control a light’s spread from wide to spot, while a second sliding knob can vary the light from soft to focused. The cutters allow endless shapes to be created with the light. This is a super-versatile yet extremely niche tool best suited to fashion, beauty and the occasional portrait application. I use the last-generation ZoomSpot, which I picked up on eBay for $650. Considering the new version, with its built-in 4800ws head, is $10,500, I’d say I got a big fat bargain. Elinchrom and other manufacturers also have adequate and much less costly solutions, and there’s always renting. When it comes to creating super-hard-edged shadows with a ton of control and custom light shapes at your disposal, nothing comes close to a ZoomSpot. I prefer Rosco gels for their quality and variety; they’re available in rolls as well as cut sheets for both strobes and handheld flash.
Whether you use strobes or speedlights to achieve this technique, it’s a great way to add sizzle to your images. So crank up the intensity in your images—gels offer the prefect way to do it.