Conquering Obstacles on Location with Craig LaMere
Want more information on this article? Get access to video content and additional supporting images. Launch the December issue of the magazine by logging in or signing up for a free account by clicking here. Shutter Magazine is the industry’s leading professional photography magazine.
This month I show you how I choose lenses, light and modifiers in a challenging real-world shoot to overcome obstacles and create the images I want for my clients.
The Consult
I have a supercool client whose sons are boxers. I’d shot the older son a few years before, and it was time to schedule the shoot for Austin, the other son. A lot had changed with my studio and how sessions are planned since the shoot with her first son, so we met at the studio to talk.
The best business on earth is repeat business. You are familiar with your clients, and they are familiar with you. One thing that’s really important when dealing with repeat clients is the amount of time between shoots and the changes in your business since the last shoot.
If there has been a large gap in time since the last shoot, it is vital to bring your client up to speed on any changes. The most important is any change in your pricing model. Your repeat clients do not take into account your growth, and remember only what they paid the last time. Your repeat clients want a similar experience, and when you drop the new bill on them, it can be a not so fun experience if you have not prepared them. This is one of the many reasons it is so important to have a presession consult.
We covered the changes, and my client was cool with it, so we planned the shoot.
Getting the Lay of the Land
I’m a firm believer in preplanning shoots and scouting locations so you have a game plan. Sometimes in the real world, though, you do not get that opportunity. This was the case with this shoot. My client wanted to do the shoot in a boxing gym her son worked out at. I asked to get into it before the shoot, but I couldn’t.
I arrived at the gym and started assessing what I could do and what I could not do in the space. The images that popped in my head when thinking about a boxing gym included high ceilings with a few rings scattered around, heavy bags hanging in open areas and speed bags in the corners. I was thinking of the scenes in Rocky. That’s not quite what I found.
The gym was not open at all; everything was in very tight quarters. The ceilings were low, with florescent banks of lights. They had used the space the best they could by cramming in as much equipment as they could, which is great for a gym but not so great to shoot in. There were some challenges and decisions to be made.
Gear
I brought what I thought would be good modifiers to give me the looks I wanted. I brought 7-inch sliver pan reflectors with grids, two strips lights with grids, my 22-inch beauty dish and my 16-inch beauty dish. The commonality among all the modifiers is that they are made to control light precisely and produce a more specular light. With the environment and the subject, I knew I was not going to shoot any soft diffused images. I don’t shoot speedlights, so I brought mono heads, power packs and extension cords. For lenses, I had my Nikon 14-24 2.8 G ED, Nikon 24-70 2.8 G, Nikon 85 1.4 G and Nikon 58 1.4 G.
Ring Shoot
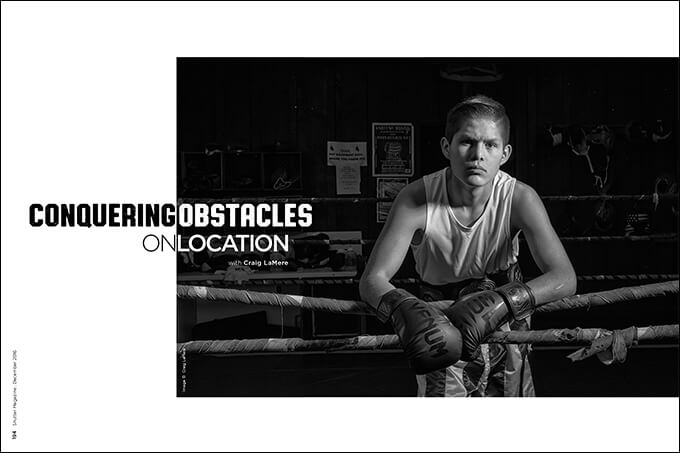
The room the ring was in was small. It was about the same size as the room, and there was access to the ring only from the right side and the front. That limited the angles I could shoot. The back wall and the side wall were close to the ring, so I knew I would not be able to get any real depth of field if I wanted to shoot Austin in the back of the ring with an inside-the-ring perspective. If I wanted any kind of depth of field, I had to stay to the front of the ring and shoot from the outside looking in. There were two ring shots I wanted. The first was to have him in the corner of the ring, surrounded by the ropes, which I would use as leading lines. The second was him at the front and inside the ring, leaning on the ropes.
The first shot I set up was the corner shot. Because the walls were so close and they were pretty rough, I thought it would be cool to pull them in and make more of an environmental portrait where the background told part of the story rather than a regular portrait focused just on Austin.
Because I was in such tight space and I wanted to see as much of the room as I could, I shot my 24-70 at 24mm. At first, I wanted to shoot the image with one light and use my 22-inch beauty dish. But it was just too big a light source for the area, and kept making hot spots on the walls.
I moved to my 16-inch dish and put the grid on it to contain the light. It worked great for Austin, lit him up just the way I wanted, but it was not enough light spill for the rest of the image. The dish was just too small to make up for the lack of ambient in the room. The solution was to bring in another light to add fill. The ring was brighter on one side than the other because of the front door. I had to pick a modifier that let me pinpoint the light better. I used a strip light with a grid. It worked well. I was able to mix the light enough to get it to fill in what I needed, but it wasn’t too specular on the background.
The front of the ring shoot was pretty straightforward. I still wanted directional light with a lot of contrast, but because I didn’t want to use two lights, I used a strip light with grid. The strip light gave me the latitude to shoot whatever pattern I wanted. I shot some images with the strip, but in the end, I liked the ones shot Rembrandt the most. The front of the ring was close enough to the windows that there was plenty of ambient light, so all I had to do was move my shutter down to whatever speed I wanted to give me the amount of fill I wanted.
Heavy Bag Portrait
The heavy bag area was the hardest area in the gym to deal with because of the height of the ceilings, the height of the lights and the gaps between the bags. When I first looked at the room, two types of images came to mind. One was a pretty standard portrait and the other was more of an action shot.
I wanted to shoot some wide shots to take in all the cool equipment and showcase the environment, and I wanted to shoot closer to be more traditional portrait style. I tried my 14-24 lens first to take in most of the area, but it was just too wide below 24mm and started to distort the edges and bend them too much. I went to my 24-70 and stayed around 24-30mm. Because the room was so dark at the wide angle, I needed to have more separation between Austin and the background.
In most cases, if I want separation, I throw a kick on the background, but because I wanted the image to be badass, I decided to rim-light him and slow the shutter down to pull more light in to bring the background out. When I rim-light in my studio, I use a strip, but in this situation, with the gaps between the bags and how I had to place the light in the tight area, when I was at 24mm, I could see the strip in the shot and I was getting spill from the light in the lens.
My next choice was to use my 7-inch silver pan reflector and put a grid on it. I used a 20-degree grid, which is tight but still open enough to cover your subject almost full length. The other good thing with this setup is you don’t get the flare like you do from strips. Once I had the accent light worked out, it was easy to pick the main. I used a 22-inch beauty dish.
I used the same setup for the closer portrait images, and just shot at 70mm.
Speed Bag and Heavy Bag Action
I wanted to capture Austin laying into the heavy bag. I wanted to rim-light him for drama, even more than for separation. There was enough ambient for the background to be seen. I used the 7-inch pan reflector and grid again for the same reason I used that combo in the last shot. For the main, I used a gridded strip light; instead of keeping it vertical, I turned it horizontal so I could get the most coverage width-wise. I wanted the most width so the light would spill the least on the ceiling.
I told Austin to go crazy on the bag, and I would freeze the movement. When you are freezing movement with strobes, you have a couple of limitations. The first is sync speed. Sync speed is how fast your camera and flash work together. With most bodies, max sync is somewhere between 1/200th and 1/250th of a second.
The second and maybe the more cumbersome limitation is the recycle time of the flash you are using. The more power you have to use to get proper exposure, the slower the power source will be in regenerating to the correct power level. When I’m freezing movement, I know I will be making some adjustments in how I shoot to give my strobe and power source the best opportunity to keep up with the speed I am shooting at. I adjust the power and the ISO of my camera until I get the perfect marriage of speed and power.
I start by moving the power down to about quarter power. At quarter power, your battery pack should be able to recycle almost instantaneously. The trick is to move the ISO up until you get the f-stop you want. Once I meter to about f4 to f5.6, I’m golden. Most of the time, I am somewhere between ISO 320 and ISO 500 to get the right combination. With today’s bodies, shooting at ISO 500 to ISO 2000 is no biggie for noise and image breakdown.
The last shot I wanted was Austin hitting the speed bag. We shot some images the same way we shot the heavy bag. That was cool, but I wanted something different that conveyed movement. I slowed the shutter way down. I still shot the strobe, which would freeze an instance in time, but by keeping the shutter open, the camera would record what was moving. The reason the camera would record the movement of the speed bag beyond the duration of the flash is because there was enough ambient light in the room to fully see the bag without introducing artificial light. The effect was a cool blur that gave the image a feeling of movement.
In the end, I was happy with the shoot and the challenges I had to overcome. Every shoot is a learning experience.
Want more information on this article? Get access to video content and additional supporting images. Launch the December issue of the magazine by logging in or signing up for a free account by clicking here. Shutter Magazine is the industry’s leading professional photography magazine.