Creating Colored Shadows With Gels with Blake Aghili
There are multiple ways to utilize color gels in your creative process. In this article, our goal is to create colored shadows on the background without painting the models’ face in different colors.
To achieve this, we need to first know some basics about color models and color theory, so let’s start from there and work through the making of the image.
Color Models
A color model is a mathematical representation of how a color is being created using three or four values. We have additive color models and subtractive color models. RGB and CMYK are two well-known color models.
CMYK (cyan, magenta, yellow and black), used in printing, is a subtractive color model. RGB is an additive color model.
The color white is the additive combination of all primary-colored lights. Black is the absence of light. In the CMYK model, it is the opposite: White is the natural color of the paper or other background, while black results from a combination of colored inks.
Primary and Complementary Colors
Complementary colors are any two colors that, when combined, cancel each other out.
This means they produce a grayscale color like white or black.
In the RGB model, our primary colors are red, green and blue. The primary-secondary complementary pairs are red-green, blue-orange and yellow-purple.
To find a complementary color, search the internet for images of color wheels or buy a printed one.
A-ha Moment
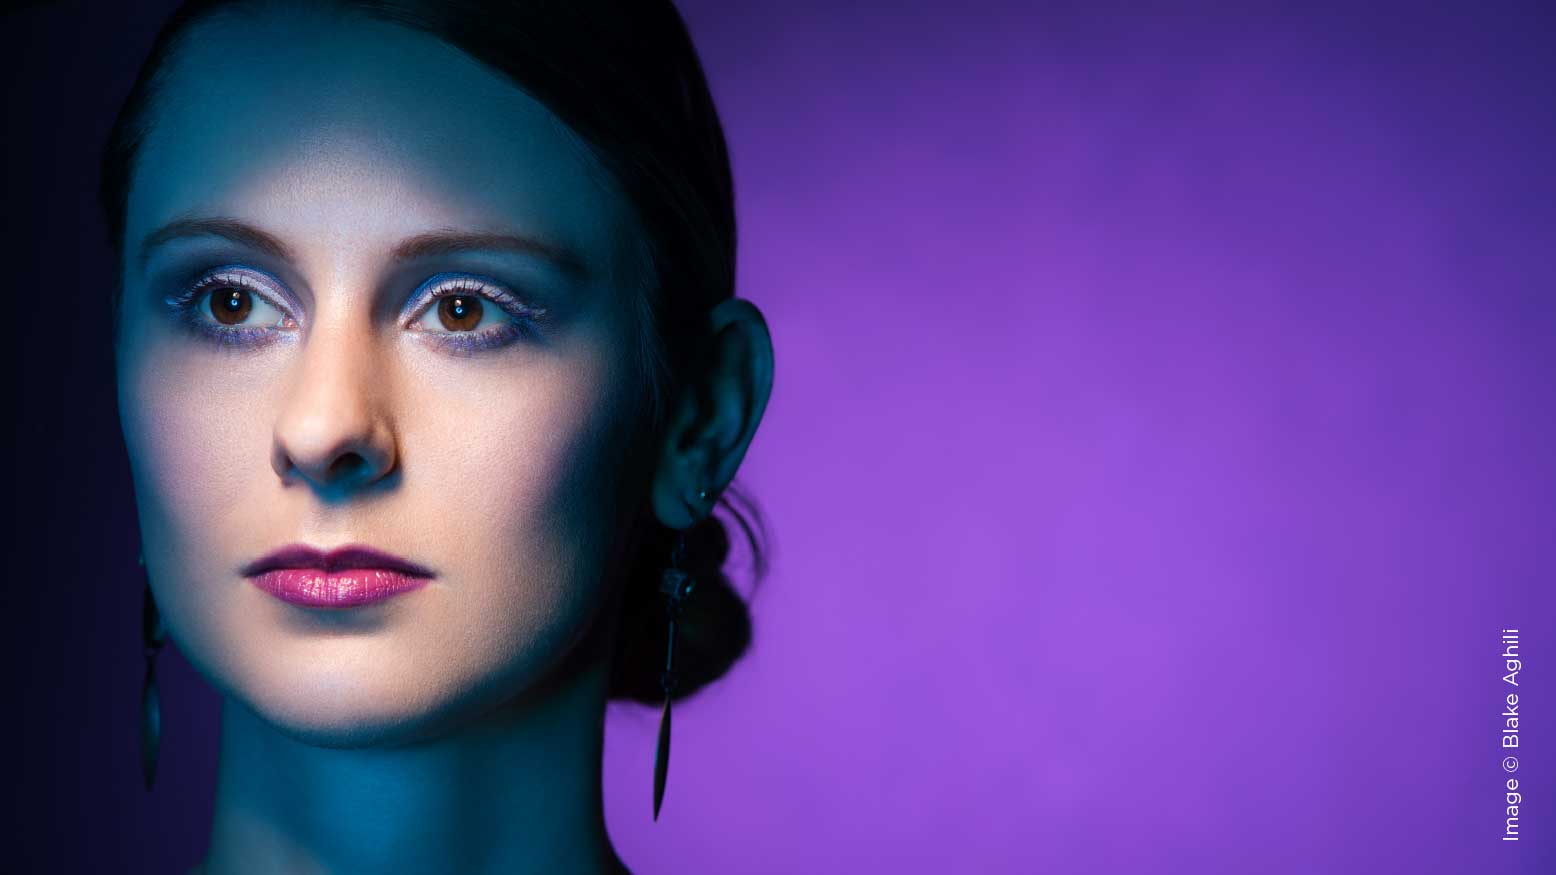
If I want to use color gels on my main lights and I don’t want to actually paint the model’s face with unnatural colors, one way is to use complementary colors. Red and orange combined at full intensity make white light since two complementary colors contain light with the full range of the spectrum. If the light is not fully intense, the resulting light will be gray—and how would I know what color to pair with what color? The answer is in the color wheel above.
Let’s go to the studio and pick up some color gels. Pick two colors that cancel each other out.
For lighting modifiers, I went with something that creates a more harsh light, which gives me sharper-edged shadows. I chose a Profoto zoom reflector and a barn door.
If I put a blue gel on the zoom reflector and light the subject with it, everything is blue. The other flash head is turned off. If I put a red gel on the zoom reflector and light the subject with it, everything is now red. The other flash head is turned off.
Considerations
When you try this, remember that some adjustments will be needed.
- Be careful—the modeling lights on strobes can get quite hot, so make sure your gels are not melting.
- Remember that in order to combine these colors, we should put them at right angles and at a distance that they have enough room to merge together so if the model’s face is still colored, you can experiment with moving the model back and forth or adjusting the light angles so they merge together in the right spot where the model is standing.
- Notice the intensity of colors that comes out of your gels. Try to make them equal. The color density of your gels might not be equal, or maybe one of your strobes is more powerful than the other one, which can make it difficult to match the colors.
Be patient and experiment in the studio. It usually takes around 30 minutes to get it working.
Bonus Tip 1:
Shadow areas in your image pick up the colors better, so if you want to use color gels on a subject, use them on the show areas of her face.
Bonus Tip 2:
If you need a red background, use a black background and make it red with a red color gel. It will make a richer red.