Creating Great Light with Michael Corsentino
What is great light and how do you create it? First, learn how to think about light and develop a lighting vocabulary. This will help you make informed decisions about tools and techniques. When you’re developing an understanding of lighting, the fundamental concept to embrace is that there is no one-size-fits-all solution for every situation or subject matter. In fact, that kind of shotgun-style lighting creates a homogenous—that is, boring—look. Different subjects call for different lighting treatments—lighting a band’s edgy promotional images versus lighting a soft, feminine editorial portrait, for example. Learn how to tailor light to your subject matter. Your options are limited only by your imagination.
Developing a lighting vocabulary is all about being able to define, identify and create the quality of light you want for a given situation. Every lighting choice you make results in a different effect and look. Applied thoughtfully and wisely, these effects should support the feeling you’re trying to convey about your subject matter. This creates images with a tailored look for the emotional impact appropriate to the subject matter. An image with lots of contrast and deep shadows conveys a different visual feeling and emotional impact than a flatly lighted image.
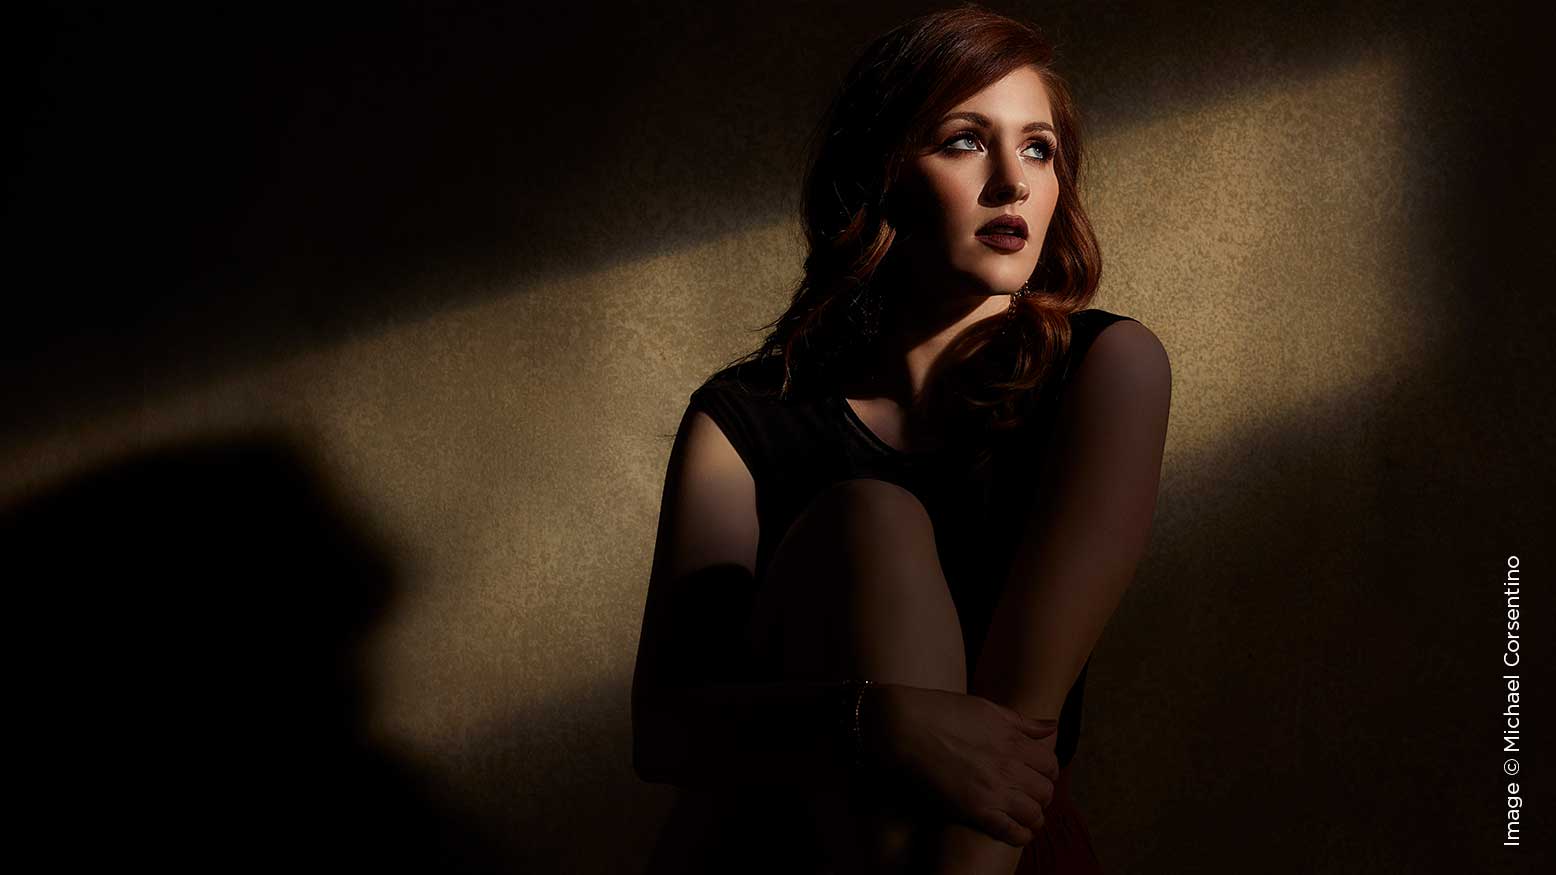
Two of the most common terms used to describe photographic lighting are hard light and soft light. These terms identify the way shadows and highlights transition from one to another. In soft light, shadows gradually transition into highlights, resulting in a soft, pleasing effect. Hard light’s transitions from shadow to highlight are rapid and sharp. This creates an edgy, specular (contrasty) look.
Now let’s talk modifiers. Their size, shape, interior finish (silver or white) and optional diffusion all play a roll in the quality of light created. Fine-tune light into a tight beam with add-ons like grid spots and egg-crate grids.
No discussion of modifiers would be complete without talking about distance. The distance between a modifier and the subject plays a key role in quality of light. The rule of thumb is the larger the modifier and the closer it is to the subject, the softer the quality of light. Conversely, the smaller the modifier and the farther away it is from the subject, the harder the quality of light.
The interior finish of a modifier impacts the quality of light. White interiors create a softer, less contrasty light. Silver interiors create a more specular, contrasty effect with added luminance (light output). Optional interior and exterior diffusion fabrics allow for further fine-tuning. Diffusion fabrics can be added and removed in stages, starting with either interior or exterior fabrics. Less diffusion increases illumination on the subject with harder, more direct light. Adding diffusion creates a broader, softer effect by reducing light.
The next piece of the lighting puzzle is the position of the light and modifier in relation to the subject. The easiest way to think about this is to imagine an invisible circle around your subject from front to back. Directly in front of the subject and facing the camera position is the 12 o’clock position. A strobe and modifier placed at the 12 o’clock position, typically above the camera, angled down approximately 45 degrees, creates the flattest light. The lighting effect is nearly shadowless, perfect for beauty and some portrait applications. An absence of shadows reduces the appearance of wrinkles and facial imperfections.
Continuing with our imaginary circle, the farther left or right along that circle that you position your keylight and modifier, the more shadows will be introduced. This is known as directionality. Giving your light direction in relation to your subject introduces shadows, and shadows create dimension and depth. Shadows can be intimidating for the uninitiated, but trust me, they’re your friend.
Photography is the visual representation of shadows and highlights. Shadows add drama and create more compelling images. Avoiding them is a mistake. Use them judiciously to your advantage. When your light is placed on one side of the subject’s face, the other side of the face will fall into shadow. The shadowed side of the face can be too extreme and lose important shadow details. This is easily remedied by adding a reflector to the shadowed side of the face. This adds fill light by reflecting light from your keylight back onto the subject’s face. White fabric produces softer light and silver fabric produces harder light with more contrast and power.
The position of your strobe and the side of the subject’s face that’s illuminated in relation to the camera is noteworthy. When the side of the subject’s face that’s facing the camera is the shadowed side of the face, this is known as short light. When the illuminated side of the subject’s face is toward the camera, that is referred to as broad light. Short light creates a thinning effect in the subject, while broad light results in a fuller effect.
All of these techniques apply in equal measure whether you’re in the studio or on location. If you’re mixing ambient and flash, you need to control each source separately. I’ve covered this recently. The big takeaway is that shutter speed controls the amount of ambient light contributed to an exposure, while flash power and aperture control the amount of flash contributed.
If you’re after dark, foreboding skies, increase your shutter speed, which reduces the ambient light. High-speed sync allows you to use shutter speeds of up to 1/8,000 of a second. If you are after a more open, airy effect, use a slower shutter speed for more ambient light. Keep in mind that in ambient and flash situations, the ambient light is typically your dominant light source. Flash control in these scenarios is simple: Dial it up or dial it down.
To assure great results, always have a plan. When you know what you want—hard light or soft light, flat light or shadowed light—you can map out the tools and techniques you’ll need. I can’t emphasize enough how important this is and how much better your lighting will be if you adopt this practice. Previsualize lighting and create a lighting roadmap for great lighting.