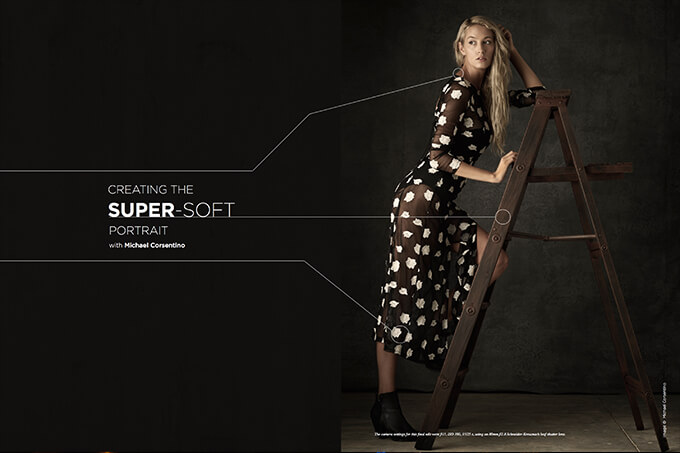
Creating the Super Soft Portrait with Michael Corsentino
I love soft lighting, but I don’t use it very often, so I was looking forward to creating these images and having a chance to flex my soft-light muscles. My design concept for this series of portraits called for a classic, elegant, soft editorial look with super soft lighting, elegant wardrobe and natural-looking makeup and hair. I also knew that I wanted a painted backdrop and a few props to add to the overall editorial quality I was after. Based on these guidelines. I was able to reverse-engineer the technical requirements and determine the right tools and techniques needed to get the job done.
Having a solid idea of what you want to accomplish before you shoot provides an invaluable roadmap for you, your models and clients. I encourage you to deviate and step outside the box.
But start smart, with a plan.
The Backdrop
It’s no secret that when it comes to backdrops, I’m a snob. I typically opt for clean and classic seamless colors like white, dove gray and black. For my money, these are far more timeless than much of the printed fare I’ve seen. The custom-painted Oliphant backdrops that I do lust after don’t come cheap, at around $1,600 each. You’ve seen them in the pages of Vanity Fair, and countless other publications and ad campaigns by iconic photographers like Annie Leibovitz. One day in the not-too-distant future, one of these will be mine.
In the meantime, I’ve found an amazingly high-quality close second that’s a fraction of the cost. Emily Soto’s “Eleanor” hand-painted canvas backdrop was the perfect fit for the classic editorial look I had in mind when I was designing these portraits. It’s available exclusively though Seamless Photo.
Props
My concept for this series included two props. I recently added a couple exciting new items to my inventory of studio posing props: a set of distressed apple boxes and a vintage A-frame ladder. These are perfect for a variety of posing applications. I hired a New York City prop house to create the apple boxes, and an online garden supply company provided the vintage ladder, which I had custom-painted. Both of these props provide myriad options for standing, seated and floor-based posing.
Gear
Okay, let’s geek out on all the technical stuff. One light and the largest modifier you can get your hands on is really all you need to create beautiful soft portrait light. There are numerous ways to approach this style of lighting, some that include multiple lights, overhead scrims, etc. As long as it delivers the desired effect, I like to keep things as simple as possible. This way I can more easily focus on the concept, posing and being creative rather than getting caught up with an overly complicated setup.
My modifier of choice for this look was Elinchrom’s 74-inch Indirect Octabank (Model EL26158, now discontinued, but replaced by the new 75-inch Elinchrom Indirect Litemotiv Octa Softbox Model EL28000). I chose this modifier because of its size, shallow profile and the indirect orientation of the strobe inside it. These three characteristics create a soft-light trifecta that produces gorgeous soft portrait light when placed close to your subject.
Remember, the larger the modifier and closer it is to your subject, the softer the resulting light. The indirect light orientation is an added bonus. For the strobe inside the Octa, I used an Elinchrom ELC 1000ws digital head.
At this point in my career, I’m kind of a nut about rigging and grip. Good grip equipment is worth its weight in gold for the obvious safety reasons but also from a usability standpoint. Two of my favorite and most useful pieces of grip equipment in the studio are Manfrotto’s 387XBU wind-up stand and the Mega Boom 425B I use for my keylight. Using the wind-up stand means I don’t have to muscle my light and modifier up and down as I make height adjustments, while the Mega Boom allows me to control the keylight’s angle, pitch, direction, etc. via four-way geared cranks. Wireless triggering was accomplished with Elinchrom’s new digital Skyport HS controller, and I used Sekonic’s new L478 DR EU to meter and wirelessly control keylight power in 1/10 stop increments. This is a sweet meter, the first to offer wireless control of Elinchrom strobes; it also puts a complete strobe control center in the palm of your hands.
Images were captured using my Phase One IQ250 medium back, DF+ camera body, and 80mm f/2.8 and f/3.5 150mm Schneider-Kreuznach leaf shutter lenses.
Creating Super Soft Light
The first thing you’ll need to create soft light is the largest modifier you have at your disposal. For this shoot, I used a 74-inch Elinchrom Indirect Octabank. Repeat after me: The larger the modifier, the softer the light. This modifier has several other factors that make it the perfect candidate for soft light. Its shallow profile and indirect orientation of the strobe inside it (meaning it points away from the subject and toward the inside of the Octabank) reduce contrast and significantly soften the light produced. As you can see, choosing the right modifier plays a pivotal role.
The way the keylight is positioned is also an extremely important factor in creating this soft lighting effect. As illustrated in the included lighting diagram, the keylight is positioned at a 90-degree angle from the subject and camera position, rather than the 45-degree angle associated with Rembrandt lighting. This angle creates a wider dynamic range and softer, more gradual transitions between the highlights and shadows. The front-to-back position of the keylight relative to the subject dictates the amount of triangle created on the subject’s cheek, one of the hallmarks of Rembrandt light.
Creating soft light is all about—you guessed it—working with soft light. Feathering is a required technique when working with the softest part of the light coming from a modifier. The light at the edges of a softbox or Octabank is the softest light possible, and it’s truly beautiful. Shoot a few tests, and you’ll quickly see for yourself. Try one shot with your model illuminated by the center of your modifier and then another lit by the light coming from the edge of your modifier, and you’ll immediately see the difference. There’s no comparison. By moving backward and forward—again, relative to the model—you’ll be able to modulate the amount of feather and find your lighting sweet spot. So get your feather on.
You’ll also need some mechanism for fill light if necessary. This can be a second light, a reflector or a white foamcore V-flat like the one I used for the finals from this shoot. The amount of fill you use—and the decision to use it at all—is subject to taste and context.
The amount of fill light can be modulated by simply moving the reflective surface being used closer or farther away from your subject and keylight. You’ll need to experiment and find your sweet spot, just as you did when establishing the amount of feather to give your keylight.
Soft Light, Get Your Soft Light!
At the end of the day, you can achieve gorgeous super-soft lighting with a wide variety of modifiers. Ideally, you’ll want the largest softbox or Octabank you can get.
Once you have your modifier picked out, follow the tried and true guideline: The closer the light source is to your subject, the softer the quality of light will be. To further heighten this effect, orient your light and modifier at a 90-degree angle relative to your subject, rather than the more common 45-degree angle you may be used to. This increases the dynamic range between the shadows and highlights, and creates gradual, smooth, beautiful transitions.
Lastly, if you can use a modifier with an indirect strobe orientation, make that your go-to, like I did here. Using an indirect modifier—one with the strobe facing in and to the back instead of out toward your subject—produces even softer, more pleasing light.