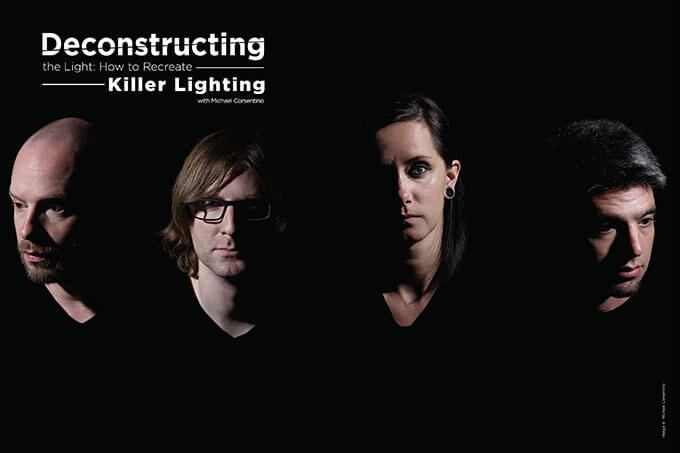
Deconstructing the Light: How to Recreate Killer Lighting with Michael Corsentino
If you’re like me, you’re a visual person and probably have childlike appreciation of the world around you. You’re excited by the wealth of visual content that surrounds you. Magazine covers, movie posters, movies, television, DVD and album art, advertising campaigns, online images and retail signage all provide a never-ending supply of inspiration. It’s all around us. This work is being produced by some of the best photographers, stylists, hair and makeup artists, and models working today. These creative teams know their stuff, and are an amazing resource for both technical and creative inspiration.
If the above description sounds like you, then you’ve probably found yourself on more than one occasion standing in front of an amazing image slack-jawed and asking yourself, “How the hell did they do that?”
Deconstructing and attempting to recreate the lighting used in the images you’ve seen is one of the best ways I know to keep learning and growing technically and creatively. So what do I mean by “deconstructing” the light? It’s actually really simple. Each image has a series of telltale signals and clues that provide insight into their creation and a general roadmap for re-creation. Figuring out what to look for to unlock the lighting secrets behind images is easy once you know how.
I look at it like a fun puzzle-solving creative habit that encourages practice. Sleuthing the clues behind the images you love will help you develop a visual vocabulary you can use not only to reverse-engineer images but also to bolster your own lighting skills. This way you can emulate and incorporate exciting new styles into your image making.
The beautiful thing about inspiration is that it sets you up for investigation and discovery. While at the outset your main goal might be to recreate what you’ve seen, in the end the process generally leads you in other new and unexpected directions. You’re essentially riffing on an idea. So you follow the inspiration, but then allow yourself the creative freedom and open mind to explore other directions based on that inspiration. That’s when the magic happens.
When you’re deconstructing light, you’re trying to figure out the tools, techniques and lighting arrangements used to create the effects you love. You’re looking for signals from the shadows—are they hard or soft? This tells you things about the modifiers used and the distance the lights are placed from the subjects. If the light is hard, with rapid, crisp transitions from highlight to shadow, it’s a safe bet a reflector, grid spot or bare strobe was used. It’s also probable the light may have been placed at a considerable distance from the subject (this isn’t always so, but it’s a good rule of thumb in most cases). On the other hand, if the light is soft, you’re likely dealing with a diffused source, such as a softbox or diffusion panel that’s been placed close to the subjects. This creates soft light with gradual, diffuse transitions between the shadows and highlights.
In addition to the quality of the shadows, you’ll want to pay attention to the direction, angle and depth of the shadows. This dictates light placement, angle and height. They’ll also provide clear-cut clues about what lighting pattern was used—Paramount, Rembrandt, split, broad, short, etc. Next are the catchlights in the subject’s eyes, which provide clues about the types of modifiers used and number of lights employed. So you can see with a little knowhow and a bit of educated guesswork, you can get a pretty good idea how the images you love were created.
The image that inspired this particular shoot was one I saw traipsing around Las Vegas during last year’s WPPI. It was a promotional image for the tribute act The Australian Bee Gees Show. Check out the video. (I love the Bee Gees, but I’d never heard of this show.) The image spoke to me and stopped me in my tracks. Enter my trusty iPhone—or, as I like to call it, my “inspiration catcher.” I have an entire library of drool-worthy images that I’ve captured on the go. It’s an amazing tool and a great habit to get into. I photograph magazine covers in the supermarket, ads on walls, movie posters, ads in magazines, signage, movie and TV screens, you name it. If it visually excites me, I’m grabbing it with my iPhone.
I really like the “deconstructing the light” format, so hopefully, if you guys are up for it, this will become a semi-regular feature for my lighting column. This shoot is the perfect place to get started because it is super easy, involves minimal gear and yields killer results. Using the guidelines above, I looked at the light in the image that inspired this shoot (again, check out the video to see that), and slowly broke down the various qualities of light to make an educated guess about how it was executed.
First of all, it was clear the image was produced using one light. It looked to me like a series of captures was made, one for each band member, and later those images were composited together onto one canvas to create the final image with the entire band. You could get close to the original final image with one capture, but it would require significantly more gear, a very small aperture (due to the staggered group pose), potentially requiring a more powerful strobe, and you’d also be looking into only one vantage point. This would present a problem. Looking at the group in the original image, I could tell that the band member in the center had been photographed from a position much lower than the rest of the band, who’d been shot from high above eye level.
I kept it simple and followed my gut about how the image was originally created. That meant using only one light, a 500WS strobe. This is a tool many of you have, so it’s something you definitely can try too. Next, I looked at the light coverage. It was clear that the illumination on the subjects was a very tightly confined pool of light, which meant one thing: grid. The other clue was the transition of the shadows to highlights, which was crisp and rapid. This was a clear indication that the source was a small point light source (undiffused strobe), creating hard light. I wasn’t sure what degree or kind of grid was used—grid spot or soft egg crate—but I was at least on the right path to get started. I ended up getting lucky, and the 20-degree grid spot I started with was the right tool for the job. The next clue came from looking at the shadows, their quality and direction, and what was happening with the catchlights in the eyes of the subjects. This gave me the clues I needed to properly place my light in relationship to my subject. When doing this, consider the direction, angle and height of the light.
I needed to capture separate images of each subject lit from both the right and left side to keep my options open when compositing in post. I wasn’t sure who would look better lit from the left or right, etc., or how the images would eventually lay out, so having options was essential. I also wanted to be able to transition quickly from one setup to the next, again using only one light. To do this, I metered the first setup, lit from the right, and shot everyone assembly-line style. Next, I used a measuring tape to determine the distance of the keylight from my subject position. I rotated the keylight from one side to the other, using the measuring tape to match the distance. Then it was simply a matter of a few captures and keylight position adjustments to create matching shadows. In a matter of minutes, I set about capturing each band member lit from the left.
This is an easy one to try for yourself, so I hope you give it a shot. Using the tips above, start getting into the habit of analyzing and deconstructing the images you love. If you do, you’ll be rocking some awesome new lighting techniques in no time.