Depth & Drama with Accent Lights with Michael Corsentino
Creating lighting styles is a lot like cooking. You start with an idea of what you want and season to taste, adding what you need as you go. Each step taken on the path to achieving the look you’ve visualized is a series of building blocks with an eventual whole that’s greater than the sum of its parts. Readers of this column know I’m a big fan of working with one light, but there are times when additional lights are called for. This month, I turn up the heat and show you what’s possible with four lights.
Despite using four times the number of lights, the level of complexity does not quadruple. In fact, it remains fairly straightforward technically. As I’m fond of saying, light is light, so whether you’re working with one light or four, it’s all still just light. The questions about how much light you want and what quality of the light each strobe should have are now simply applied to four lights. Think exactly the same way you’d approach the options you have when using only a keylight.
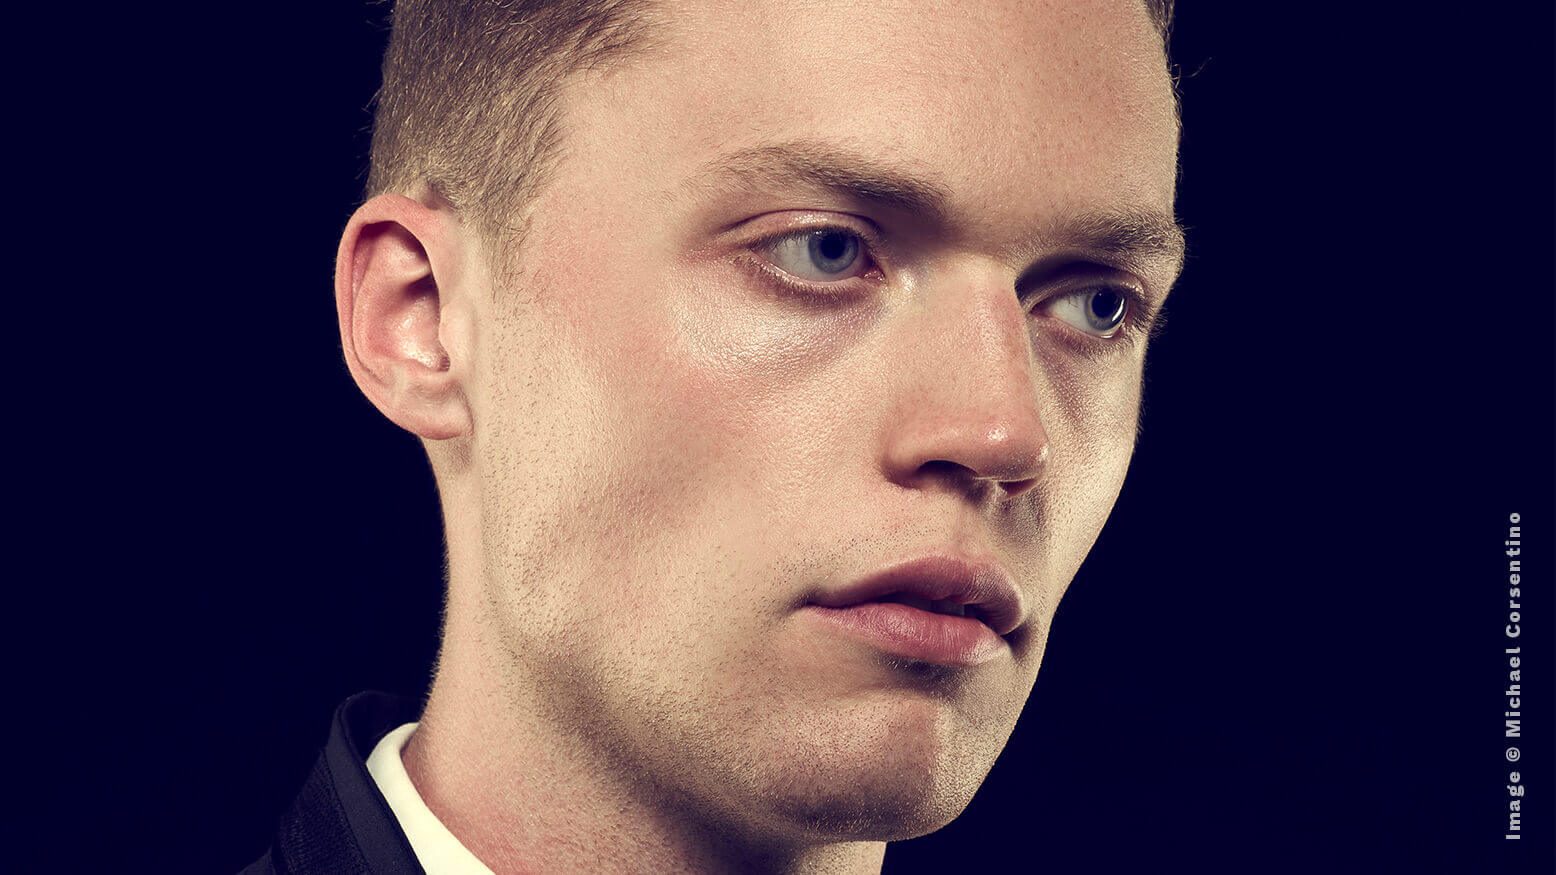
I’m still relying on the keylight to serve as my main source of light, just as we do when working with only one light. But, as you’ll see when I add accent lights on the left, right and above the model, I take the lighting from ordinary to extraordinary one light at a time. Each accent light functions like a sculptor’s chisel, bringing out new planes, facets and shapes in the subject. This creates more depth, drama, dimension and a sense of volume that can’t be achieved using just one light. This style of lighting is often used in the entertainment industry, although with considerably more punch than I’ve opted for here with these more editorial-style images. I’m avoiding a heavy-handed look, opting instead for subtlety. If you prefer the brighter accent lights often required for sports and promotional images, simply increase the power of the accent strobes, and you’re in business.
Each light is based on the output used for the keylight, so I started there. My first step was to measure the light output from the key using a handheld flash meter and adjust its power as needed until it matched my desired f-stop, in this case f/16. I used a Mola Demi beauty dish to modify my keylight and tried several different iterations—diffusion sock, bare, etc.—until I settled on using it paired with a 30-degree grid spot to confine the key’s light to a tighter circle. Next, I individually metered the left and right accent lights and set each to match the power of the keylight at f/16.
That’s the beauty of working with a handheld flash meter. I hadn’t even clicked the shutter, but I knew that when I did, as long my camera settings were exactly the same as those used on my meter—f/16, 125/sec, 100ISO—my first exposure would be bang on. I simply chose f/16 for the accent lights as a way to create a level playing field between all the lights. I planned to adjust their power up or down later as needed, but ended up liking all three lights at the same power. I placed an accent light above the model to accentuate his hair and dialed it in intuitively.
Ultimately, even at its lowest power, this 500ws strobe with 7-inch silver reflector was way too bright and caused my model’s blond hair to clip severely. Step by step, I knocked down its output even further with a layer of velum to diffuse and soften it and a double layer of neutral-density gel to lessen its intensity, which did the trick. The left and right accent lights were each Elinchrom 14×35 strip boxes. I had 30-degree egg crate grids ready to go just in case, but they were unnecessary.
Modeling lights are a big help in the studio. They allow you to visually access the effect each light has on a subject in real time. This makes adjusting the positions of your lights significantly easier and much faster than having to capture images, review and adjust as you go. By using the modeling light on each accent light, I was able to see how they affected my model’s face and roll them around until I found the prefect positions for each of them. The same is true for the height and angle of the keylight; the modeling light made it much easier to judge the lighting, place the catchlight and make focusing easier.
This is the tip of the iceberg of what’s possible when you add additional lights and thoughtfully season each to taste. The range of looks from low to high key is as wide and varied as your imagination allows. An accent light can be placed above your subject to provide extra illumination for the hair and separation from the background. A single accent light can add a fill from below your subject when used in conjunction with a beauty dish or other modifier from above. This fills in shadows in the eye sockets and under the chin. Double accent lights left, right and behind a subject can create edgy editorial sports-style images or high-key fashion portraits, depending on the modifiers and the lighting ratios you use.
There’s so much you can do by adding a few extra lights into the mix. You’ll quickly discover the magic they can add to your pictures.