Dog Photography: Lighting for Dogs with Allison Shamrell and Terran Bayer
Want more information on this article? Get access to video content and additional supporting images. Launch the August 2017 issue of the magazine by logging in or signing up for a free account. Shutter Magazine is the industry’s leading professional photography magazine.
If you’ve never photographed a dog before, it’s an experience fairly similar to photographing a toddler—except we think it’s way more awesome, because dogs give kisses and have wiggly butts. (And they’re sometimes better behaved, too!) But, we digress. Dogs and toddlers are similar in that they’re both always on the move, can be bribed with treats of all kinds and often have very little training. Yeah, we said training. Is that awful? It’s probably awful. But we’re dog photographers, and canine-speak is our language.
What makes photographing dogs different is that their bodies are low to the ground, they have fur of all colors, some listen better than others and, because of all these factors, we have to think a little differently about lighting.
Create Sparkly Catchlights
We all know that catchlights add life to any subject. Even if you’re well versed in creating beautiful catchlights with your human subjects, dogs can be a little challenging.
To start, dogs’ eyes are shaped differently than a human’s. Different breeds reflect light differently, and some dogs have eyes that are set very far back or they have bangs or heavy eyelids that make getting light into them a challenge. With each new dog you photograph, it’s important to pay close attention to how the light is reflecting in their eyes.
Your best bet for creating sparkly catchlights outdoors is to look for open skies to face the dog into; or, if you’re backlighting and don’t have open sky, think about adding a reflector or flash.
If a dog has bangs (like a schnauzer), we style them out of the way with some water. Otherwise, it’s not only hard to nail focus but the photos simply aren’t as impactful as those in which the viewer can see the eyes.
Indoors, a large light source is your best friend. Lights that create beautiful, well-sized catchlights in humans can look too small in a dog’s eyes. Of course, the distance between the light source and the subject is still paramount, and we try to keep the light at a comfortable distance to create those catchlights (usually 3 to 8 feet away).
If you’re photographing a dog up close, it’s important to pay attention not only to what’s in the background of your image but what’s behind you as well. Owners in bright-colored clothing, messy landscapes, parking lots or even your own clothes/silhouette may create distracting reflections in the dog’s eye. Our crew always wears black or neutral clothing to help keep the attention where it should be: on the dog.
Use Backlighting for Dreamy Sparkles
When out on location, one of our favorite ways to use sunlight to our advantage is to backlight our subjects so we can get the most beautiful, sparkly rim light all around the dog. Fur reacts to backlight the same way that human hair does—but we think it’s even better because it surrounds their whole body! Plus, dogs don’t have flyaways that require retouching.
We look for areas where the sun is filtering through trees or other natural surroundings. Combined with a wide aperture, telephoto lens and the sun at just the right angle, the background will be a sea of dreamy bokeh, allowing our subject to stand out.
A key point to keep in mind with backlighting is that the subject should still be properly lit. We achieve this through a few different methods, including use of a reflector, adding in a touch of fill flash or simply by positioning the dog at the edge of the shade, facing an open light source, such as a wide-open sky.
Using Reflectors on the Go
Reflectors offer a fantastic way to easily add light when you’re on the go—which is all the time with dogs. An assistant is necessary for shooting with a reflector, though, because you need someone to easily shift the light as your subject takes an unpredictable step forward or if the sunlight changes.
Another benefit of the reflector is that most dogs couldn’t care less about it as long as you don’t pop it open suddenly. The whoosh and sudden movement of a reflector shooting out of its case is scary stuff for a dog, who definitely didn’t see that coming. Anytime you’re working with animals, it’s important to take things slow, stay calm and not do anything that could frighten them. Be sensitive to what might be considered unexpected, and don’t treat your reflector like a fun new toy unless you want a few bite marks in it.
We typically use the silver and white sides of the reflector, but we’ve also been known to use the diffuser portion to soften some of the light falling onto our canine subjects. Reflectors reduce shadows and can help the camera capture detail (especially in brown and black fur) that would normally be lost in situations such as backlighting, side lighting or harsh lighting.
Reflectors are great for adding a sparkly little catchlight in the eyes. Just be mindful of where you’re holding it since catchlights are always more flattering higher than they are lower or to the side.
Also, consider the fact that most dogs have longer noses than humans (think Labradors, not pugs). That long nose can wreak havoc on your lighting. Forget about side lighting (unless that’s the specific look you’re going for) because a dog’s nose casts a major shadow on the opposite side of its face. But fear not. Enter the trusty reflector.
Another bonus of the reflector? Holding one is a great job to give a helicopter parent; dog moms can be just as overbearing as regular moms.
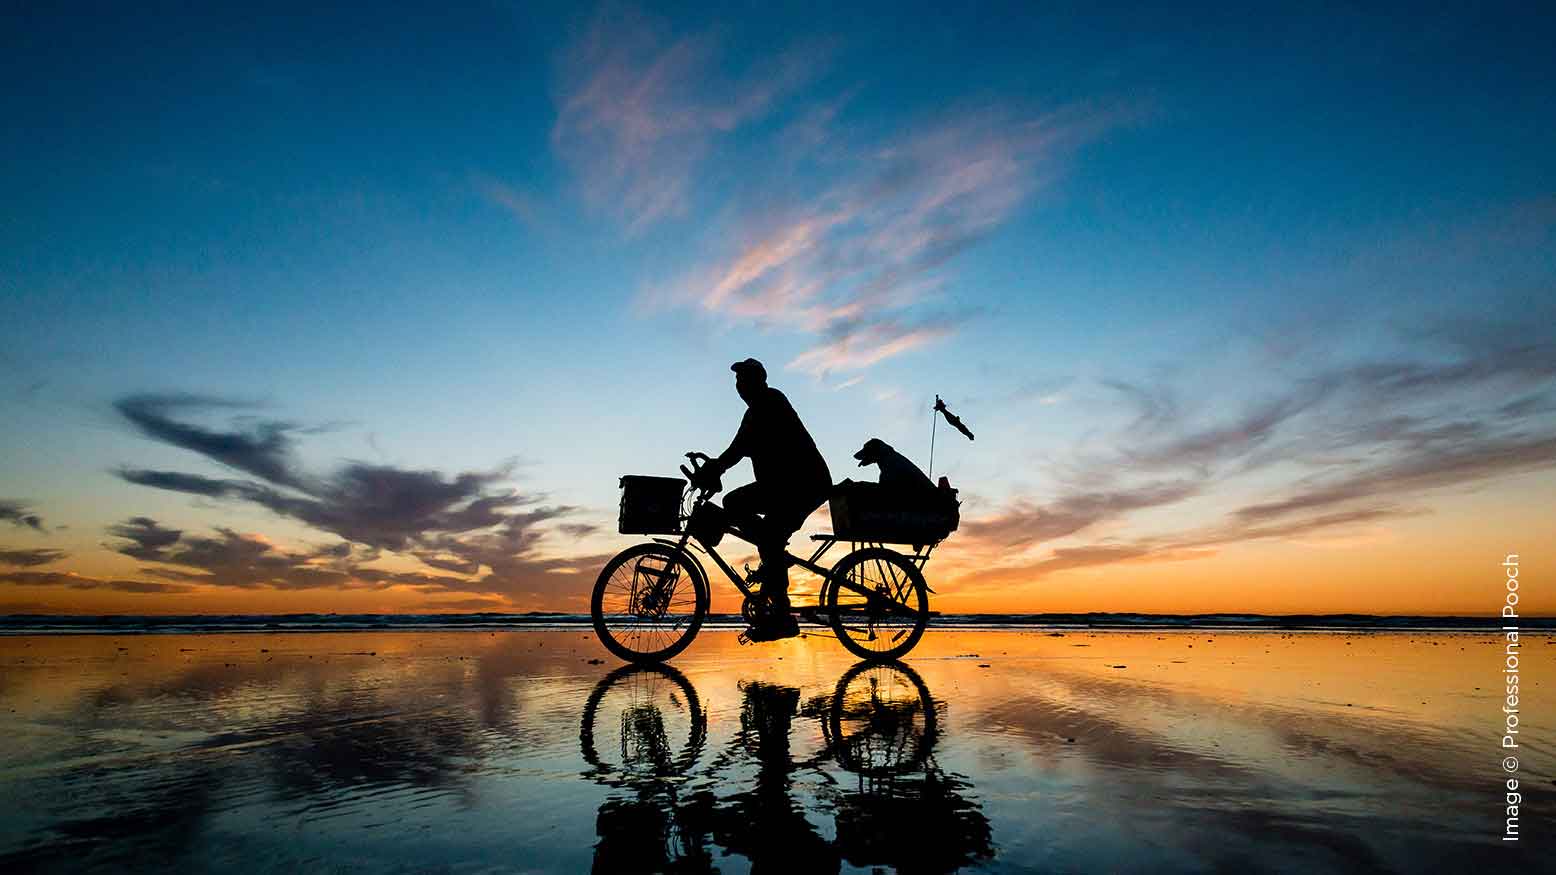
Memorable Silhouettes
Sometimes lack of light can create stunning results. When you have a beautiful sky, lots of color or interesting lines, a silhouette can create an extremely powerful image.
One of the toughest aspects of dog silhouettes is that the dog must have defined separation between its body, legs and the background. Dogs want to sit or stand square, which can create a big unidentifiable blob in the image. We always try to have some space between the subject’s legs (walking or running is great for this, since their legs naturally separate as they move) and have their head in a direction that lets us see their ears or profile, so the viewer can easily see that the subject is a dog.
Silhouettes can be tougher with dogs than with people because they’re so low to the ground and you need to be careful about where the horizon is hitting them. This often means putting the dog on something higher or getting down very, very low. We’ve both been covered in sand and soaking wet after lying on the ground to create silhouette beach shots, but that’s what it took to get the shot.
Quick and Easy Strobe Setups
When we use strobes, nine times out of 10, we’re in the studio. The vast majority of our canine clients have little to no training, and we can’t ask them to stand on a mark, turn this way or that, and look at the camera. Our strobe setups have to be versatile enough to capture them whether they’re smack-dab in the middle of our backdrop or completely ignoring us 3 feet away from where we wanted them.
We often opt for a slightly more head-on light setup to offer maximum flexibility. It’s always nice to have some shadows to add to the dog’s shape, though, so while our main light is just a bit camera-right or camera-left, we like to add a second light source, whether another strobe or a large reflector, on the side opposite side of our main light to make sure we’re capturing all the details.
Strobes can also be used outdoors, but it’s necessary to have a knowledgeable and quick-reacting assistant to hold and move the light if, for example, the dog decides the perfect place to sit is over there, not over here. Leashing the dog or putting it on an object, such as a rock or tree stump, can help keep it in one place, making strobe placement easier. This can be a tricky technique to master, with all of its moving parts, but it can achieve stunning results.
In Conclusion
Photographing dogs requires a shift in thinking and a good dose of patience to create gorgeous portraits that show off their personality. We hope these tips have helped you expand your knowledge and avoid the some of the major pitfalls of lighting dogs. With a little creativity and a help, you can create some stunning portraits of our furry best friends.