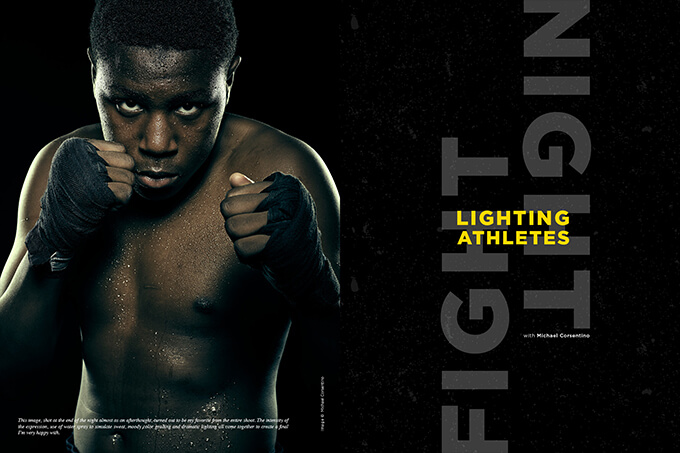
Fight Night: Lighting Athletes with Michael Corsentino
You can’t underestimate the power of planning. Being deliberate with your ideas, concepts and shoot plans pays massive dividends every time. Take time before your shoots to think about what you want to accomplish with your lighting. Make a detailed plan for the tools, techniques and logistics you’ll need to realize your vision. If you don’t, I guarantee the results will not be as strong was they could be.
If you want to take your photography to the next level, you need to understand that there are no one-size-fits-all lighting solutions. Each decision you make, each tool you use, each technique you employ results in a different end product and tells a different story. My first step is always research. What does the client want? What look is called for? What’s been done before? What tools and techniques will I need to pull it off? Next, it’s simply a matter of creating a roadmap to get there.
These fighter portraits are no different. Clearly they required a completely different visual treatment than a corporate headshot, beauty image or fashion editorial would. After deciding on a visual approach, I figure out which tools I need, which ones I have on hand and which I might need to rent or borrow. I formulate a logistics plan about how many assistants I’ll need, how they’ll be getting to the location and back, who’ll be helping with load in, set up and load out, and which assistants have the skills that match the tasks I need. This way, I know how to delegate so the shoot runs smoothly.
Expectations
Planning for your locations is equally important. Will you need a permit? Is your liability insurance current, and has your carrier been alerted about the shoot location and date? Are you planning to forgo a permit and shoot guerilla style? If so, what’s your backup plan in case that doesn’t work out? If there’s a point person in charge of the location—like the gym owner, in this case—have you set realistic expectations for them? Do they understand how long it will take to set up and break down, or how much time the shoot will take and how things will progress during the shoot? Do you have a clear understanding of what their expectations of you are?
If you’ve made promises, such as files and prints for access, follow through. This way, the next photographer is treated as well as you’ve been treated. If you’re shooting for your book and it’s not a job or assignment, don’t worry. You’d be surprised how many places will grant you access if you simply ask. Things like files and prints or the promise of a free shoot go a long way toward greasing the wheels.
The goal of this series of fighter portraits, shot on location at Gym Rat Boxing in Orlando, Florida, was to create images for the fighters and their promoters to use for promotions. I wanted to create lighting that accentuated how fierce these fighters are, a dramatic overall mood and feeling. This goal dictated the choices I made for the design of the portraits and the lighting plan.
Light, Gear, Techniques
I decided on a classic three-point light sports look, used frequently for athletes, combined with a reflector to open up the shadows from the keylight; a black background for drama; and color grading based on an image I found during my research and fell in love with.
For the key, I used a 1200WS head modified with a Mola Softlights silver interior Demi beauty dish. The choice of the silver interior beauty dish was made to boost contrast, produce a cold-toned light and create harder-edged transitions between the shadows and highlights than a white reflector could. To reduce light spill, produce a faster fall-off of light and confine that keylight to a very tight pool of light, I added a Mola 20-degree black grid spot to the front of the beauty dish. I placed the keylight in front of the subject (at the 12 o’clock position), angled down approximately 45 degrees and 5 feet away. It was essentially a classic Paramount lighting pattern. Below the keylight and just above the subject’s torso, I placed a Sunbounce Micro Mini reflector with silver fabric. This helped open up shadows cast from the key below the fighter’s chins and eye sockets.
To create the rim light on the left and right side of each of the fighters, I used two 500WS strobes, each fitted with an Elinchrom Rotalux 14×35-inch softbox and a Lighttools ez[Pop] 30-degree soft egg crate grid. This combination created a narrow shaft of light on each side of the subject. All lights were triggered using Pocket Wizard Plus III transmitters. Lights were measured using a Sekonic L-758 DR flash meter.
For the black background, I chose something easy to transport, set up and breakdown: a Lastolite white/black 5×6-foot collapsible backdrop and its companion magnetic stand.
Light stands were all Kupo Grip. I used one High Overhead Roller Stand and Baby Boom Arm for the keylight and two Master C-Stands for the kicker lights. For my tethering platform, I used a Runway Stand Base, a 20-inch C-Stand Riser Column and a Nine-Volt DigiPlate laptop platform. I captured the session using my Phase One DF+, IQ250 digital back and Schneider Kreuznach 80mmLS f/2.8 lens mounted on a Gitzo Series 5 Systematic 6X Carbon Fiber Tripod, with a Manfrotto MHXPRO-3W 3-Way Pan/Tilt Head (my absolute favorite tripod head).
I’m a big believer in making lists, assembling all your gear beforehand and testing everything to make sure all systems are go. I call this “pre-flighting your gear.” The last thing you want is to show up for your shoot and realize you’re missing one essential component or that one link in the technical chain of command is broken. The smallest technical hiccup can prevent your shoot from even getting started.
Light Metering
You’ll more than likely be tight on time, especially on location, where you’ll either be chasing the light or watching the clock. So having mechanisms in place that get you up and shooting in a hurry are key. First and foremost, learn how to use a light meter. I covered this topic extensively in previous columns and their companion videos. There’s no faster way to ensure your first exposure will be perfect than using a handheld meter. That means no endless chimping and wasted time fiddling with lights. Get your reading, make your first capture, season to taste, and boom—you’re off to the races. That’s how I roll.
Leave equipment assembled as much as possible. Setup time was limited for this shoot, so I left both softboxes assembled and fitted with their grids instead of packing for travel and unpacking them during setup.
Stand-ins, Tethering and Settings
Another key time saver is to use one of your assistants (whoever most closely matches the height and skin tone of your subjects) to stand in and help you get your lighting dialed in. This way, when your subjects step in front of your camera, you’re ready to go and at ease, a confident leader more focused on getting what you need from them than trying to solve lighting issues. Shooting tethered is another must, so find a way. It helps you see exactly what’s going on, and provides instant feedback for your subjects and clients. Subjects are excited to see proof they’re in the steady hands of a pro.
Dialing in the lights for this look takes time, so don’t get frustrated. The kickers take extra finessing to find the sweet spot where there’s a slash of rim light but no unwanted light on the tip of the nose. Again, this is where using an assistant as a stand-in is invaluable. It’s all about the placement, height and angle of the kickers. You’ll have to play with this to get it just right, so expect it.
Likewise, the keylight and fill reflector height will each need adjusting based on different subject heights and poses. You’ll need to have an assistant on hand to anticipate and make these changes on the fly so everything runs as smoothly as possible.
By following all of these guidelines, you’ll be able to concentrate on getting the expressions you want out of your subjects. They aren’t used to being in front of a camera. It’s your job to put them at ease and elicit the mood and feeling you’re after. If they’re fighters, it’s a good bet they want to look like badasses. As crazy as it sounds, they’ll probably need help figuring out how to do that. I coached each fighter to assume the stance they use for their leading hand and to look at me as though I were their opponent. Boom—enter fierce fighters! The change was instantaneous.
The settings for the finals were as follows: f/11, 1/125 sec, 100 ISO. Color grading was done in Capture One Pro 9, and each image was retouched in Photoshop CC2015.5 using Retouching Academy’s Beauty Retouch Panel. I took special care not to overdue the retouching and make these tough guys look too pretty.
Don’t be intimidated by the gear used to produce this shoot. I could have come pretty close using speedlights. Use what you have and shoot as much as you can. I can’t wait to see what you come up with.