Get Into the Zone! Gain Your Independence With Zones of Light with Michael Corsentino
Great black-and-white and color portraits both start with great lighting. In the studio or on location, it’s the same thing: The better your lighting, the better your result will be, and the less work you’ll need to do in post. What exactly is great lighting? It’s illumination that describes volume and shape, that contours, that layers and sculpts surfaces and planes, that heightens or reduces texture, and that helps create mood and drama—anywhere from soft and open to hard and edgy.
This article is all about helping you gain your independence by working with and thinking about lighting in terms of zones, which I also refer to as groups. This is theoretical as well as practical. A zone can be any source of light: the sun, one or more strobes or speedlights, or all of the above. The basic concept here is independent control of each light source, group or zone—the terms are interchangeable. It’s this independent control and separation that gives you the ability to craft the sophisticated, dimensional, finessed lighting I know you all want.
Why am I calling them zones rather than lights? Because a zone can comprise anywhere from one to several lights grouped into one singular source, area of illumination, group or zone. Whether it’s one light or several, you want to get into the habit of thinking about each area of illumination, keylight, fill light, accent light, background light, etc. as a separate entity, separately positioned and controlled. Just as we regard ambient and flash as two separate and discrete sources, each controlled independently, multiple off-camera strobes/speedlights also benefit from independent control.
Zones can be easily arranged into groups using the controls available on strobes, speedlights, their remote control units and radio transmitters such as the Pocket Wizard Plus III. Separating zones permits their power and other functions to be independently controlled, their positions varied and each zone independently modified for endless looks. When it comes to lighting backgrounds, knowing how to work with zones can be especially useful in reducing or eliminating spill from the keylight. Zones add up to an infinite amount of technical and creative control.
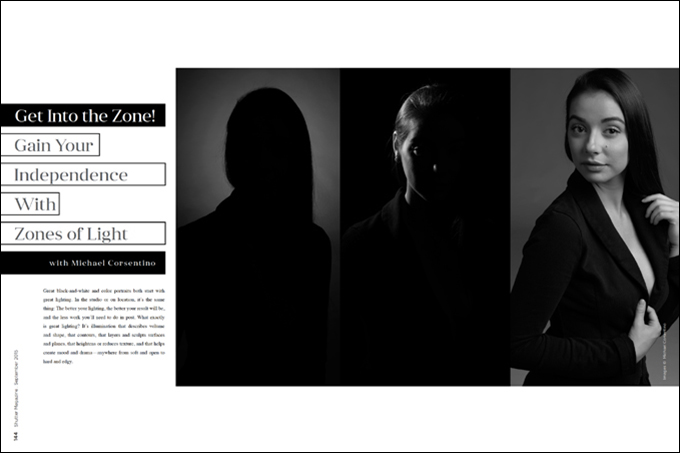
Classic three-point portrait lighting in a controlled studio setting offers the clearest way I know to demonstrate zones. In this clinical setting, it’s easy to illustrate the contribution made by each light zone by zone, their placement and why independent control is so helpful. This way, you can easily see, one light at a time, how a portrait evolves from flat and one-dimensional to a sophisticated three-light portrait with modeling and volume.
So, nothing super-fancy this month—instead, a clear, straightforward illustration of zones that hopefully leads to a few ah-ha moments. Keep in mind that these images were created in a studio, but that the techniques and concepts are just as applicable on location. Independence rules the roost in all scenarios.
Working with one light at a time allows you to eliminate the variables and clearly see the contribution each light or zone is making to the overall exposure. If all the lights are turned on from the beginning, it’s much harder to discern the role each zone is playing.
Once you start working with zones or independently controlled lights, meters become a very useful tool. Sure, you can work intuitively, but it’s considerably more time-consuming. There’s just no way to establish the exact values for each light—the keylight versus accent light, keylight versus background light, etc. A meter offers the only way to accurately and consistently understand the relationship between the output of each lighting zone.
Having a way to determine this information also becomes important if you want to replicate your lighting setup later. What was the power for the background light versus the keylight? Without a meter, there’s no way to tell. What’s easier, dialing and chimping over and over or using a light meter and getting it right first and fast?
One-Zone Lighting
You don’t need a ton of lights to gain an understanding of zones. So let’s start with one light.
I always begin with the keylight because the power of each additional light is based on its output—in other words, +/–1 stop over or under the keylight. This is where a light meter really shines. I’m using a 60-inch Photek Softlighter on the strobe to create a soft, pleasing quality of light. For me, the keylight is always zone A (or group A). You can use numbers or letters. Manufactures typically designate groups using A, B, C and D.
As you can see from the sample images, even with just one keylight, you can control the brightness of the background using distance. The closer the subject and keylight are to the background, the brighter it will be. This is both good and bad. It means you can achieve a fairly white background using just one light for both the subject and the background, but it’s not ideal because you don’t have a lot of control. Basically, you get what you get based on amount of spill from the keylight and the distance from the background. If you don’t have a lot of front-to-back space, you’re also limited in creating a darker background.
Pulling the subject and keylight away from the background and creating distance between them—and manipulating the angle of your keylight—is the only way to get a darker background in this scenario. A more acute keylight angle reduces the amount of light hitting the background, as does the use of a grid spot. The farther away from the background your subject and light are, the less spill from the keylight falls on it and the darker the background will be.
And that, my friends, is one-zone lighting. So if you have only one light, you’re limited, but you still have options.
Two-Zone Lighting
For my money, pulling the subject off the background so it can be lit using a separate zone is the way to go. This way, I can make the background exactly as bright or dark as I want. Once I’ve got the keylight and distance from the background set, I switch off the keylight and add my next lighting zone, typically the accent/rim light. You can see from the example images how working with only one light at a time helps you see exactly how much light that zone is contributing.
I set the output for the accent light using a flash meter to determine the ratio between it and the keylight. I’m looking for +1 stop with a brunette and –1 stop with a blonde. Those are just guidelines to get me into the ballpark; sometimes they’re spot on, and sometimes I need to adjust.
With the addition of this accent lighting zone, it’s safe to say the image has gone from flat to dimensional in one simple step. This two-light arrangement is our old friend “cross light,” aka “axis light.” In mixed ambient and flash situations, the accent light, zone B, could just as easily be the sun. I’ve modified the strobe used for the accent light with a 10-degree grid spot to confine its light to a tight beam that falls on the side of the subject’s head and shoulders.
The third zone in our lighting trifecta is the background light. I used a 10-degree grid spot on this strobe as well. This creates a circle of light with a gradual falloff behind the subject—a classic. This zone is all about creating separation between the subject and the background. Now that I’ve separated the background and foreground into two zones, I can easily control exactly how bright or dark I want it.
White Background and Final Words
I’ve also thrown in an example of a white background. Separate zones are key for evenly illuminated “blow-away” white background shots. The look is completely different, but the concept is the same.
Last but not least, I added a white 3 x 4 reflector on the opposite side of the keylight to throw some fill into the shadowed side of the face. While this isn’t a powered light source, its intensity can be controlled by varying its distance from the subject.
As you can see, separate zones rule. They allow precise control, help reduce or eliminate spill, and provide a clear indication of what each light is doing. Try incorporating zones and ample space between your subject and background during your next portrait session. You’ll be well on your way to killer lighting.