How I Got the Shot | Profoto A1 with Sal Cincotta
When it comes to wedding photography, I am not a fan of leaving anything to chance. This is probably why I would be a horrible photojournalist. At least I can be honest about it. My style of photography is very deliberate when it comes to location, lighting and posing. I feel that it’s the only way to ensure that the final shot matches what you are seeing in your mind. This month, we are going to dissect a recent shot of mine. I think there is a lot to be learned about everything from the way I saw the shot in my head, to the way we shot it, to the final edit. This is by no means meant as a definitive guide, but I believe it will give you some insight into how I work from vision to final creation.
CONCEPT
Something I love to do for my couples is craft an end-of-night shot. It’s the perfect way to finish the experience. However, here is the reality of the situation—the couple dropped a lot of bank on the venue, and their friends and family are inside partying. So, whatever you do, you’d better be quick.
I like to visualize the shot first, without the bride and groom. I will usually go outside and look for anything that would make for a visually interesting shot.
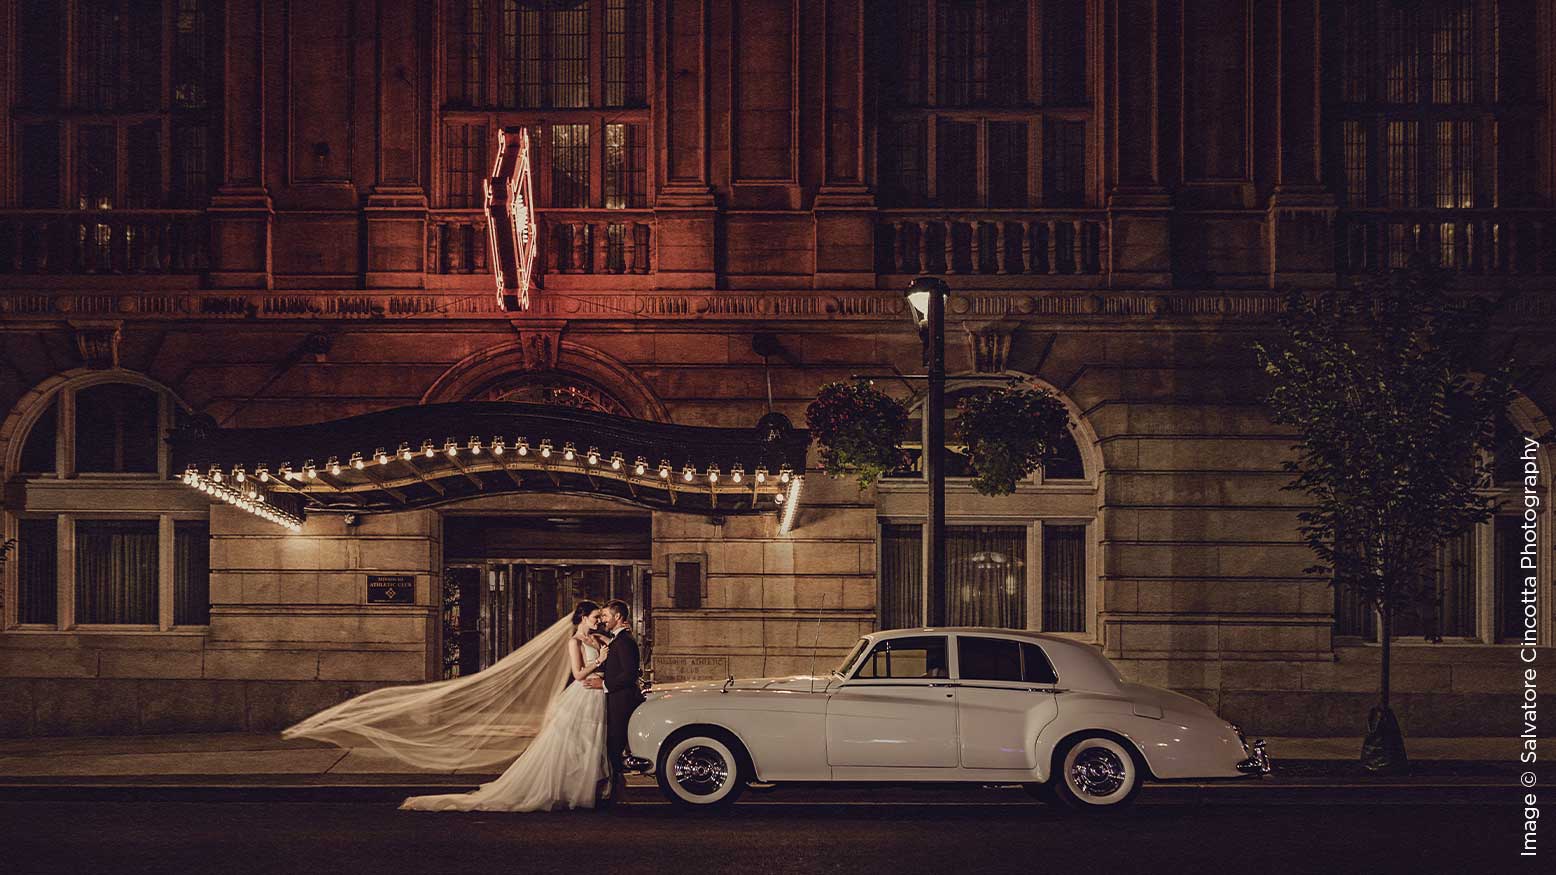
For this shot, I wanted to showcase the venue and the end-of-night getaway car. I knew this was going to be a composite shot right out of the gate. A composite shot is where we take several different shots and merge them into one (more on that in the coming sections). So, I knew I had to get all the elements right in order to pull the image off.
LIGHTING
On most wedding days, I don’t have time or space for a large footprint when it comes to equipment. I see photographers all the time running around with carts of crap. We don’t have time for that or hands for it either. We need to move fast. This was especially true with this shot. It was taken on Washington Avenue in downtown St. Louis. The street was incredibly busy, and we needed to move quickly.
My go-to lighting set up is the Profoto A1 with the dome diffuser. That’s it. I’m not running around with a light modifier and giant softboxes on the wedding day. My clients do not have patience for this.
Now, keep in mind, there are several things to consider with a shot like this.
Shot 1: The Scene
The ambient light from the scene is probably one of the most important elements to the shot. The building details and the sign are key elements to the final shot, and they are not being lit by flash, so we need to ensure the ambient light is correct. How do we do that? Take a shot without flash. Make sure your camera is exposed properly for the building and the sign. Once the scene is dialed in, you are ready to start building the shot from there.
Shot 2: The Couple
Once the scene is locked, more than likely there is not enough light on your couple. This is where flash comes into play. For this shot, Alissa was holding the A1 to light up the couple and get the correct exposure on them. Getting your couple exposed correctly is probably the single most important part of this shot. After all, if they don’t look good, they are not going to like the shot, no matter how cool you think it is.
Shot 3: The Car
Most of you would have probably lit the couple and called it a day. The car is a key element in this shot. The couple is your primary element, but the car is a strong secondary element that has to be lit well too. So, we took the extra step and took another shot lighting the car. You will notice, we are doing this all with a single light. This allows us to move very quickly to get what we need.
Shot 4: The Veil
If you want to add drama and some flair to any wedding shot, throw the veil. Brides love this shot. Now, I will tell you, getting the veil throw right is no easy task. We probably need a how-to on veil throwing, but we will save that for another day. Spend the time getting this right, even if it means throwing it 10 times. You are not going to be able to fix this in post-production, because there is a building behind the veil.
TECHNIQUE
Here is what you must be thinking: how will all these shots align in post-production? If you are not wondering that, then you have not been following along at all. You have two options. The first is to use a tripod, which I never do. I am not running around on a wedding day with a tripod. In addition, in most of the country, when you shoot with a tripod, you need a permit. Now, sure, a tripod would ensure that the building, the car, and any major objects don’t shift in the frame, causing problems in post-production when you try to align the frames, but it’s still not worth it.
The second option is to take all the shots without moving the camera from your face. This is something many of you will struggle with, because you just love to chimp. You know who you are. What I do is put my focus point on the couple and take each shot without moving and without adjusting the camera. This ensures that I can quickly get the four shots I need, and that they will line up in post-production when I go to merge them.
FINAL SHOT
The final shot is a composition of the four shots I took, using the key pieces from each shot and removing the various people and the lighting assistant to get the image you see. The Photoshop process is beyond the scope of this article, but I can assure you that in order for any editing to work and look realistic, your initial photography technique must be on point.
I hope you enjoyed the making of this shot. Get out there and create your own masterpiece.