
How I Planned the Shot: The Portfolio Shoot with Alissa Zimmerman
Shooting for your portfolio and expanding your skill set are the most important parts of building your brand and photography business. Never stop learning and pushing yourself to be better than you were yesterday. Trends and techniques evolve constantly in our industry, and it’s crucial to build your studio with one mantra in mind every day: Innovate or die.
The planning process that goes into creative photo shoots should be simple and painless. If it causes you stress and anxiety, you’re doing something wrong. I’ve talked about our three-part formula for planning photo shoots a handful of times, and without this outline for organization, the thought of planning a creative shoot will be enough to make you want to quit your dreams of being a photographer. Trust me, I’ve been there.
The portfolio shoot is anything you want it to be. Do you have a trip planned to an exotic location any time soon? Start researching the areas you’re going to be, and build a mood board of ideas for a shoot. Have a few days off coming up? Grab a few friends and plan a shoot in an area within driving distance. Portfolio shoots are meant to be fun, a time for you to take a step back from the computer screen and paperwork to practice new techniques and poses, and try out any new gear that’s been sitting on your shelf.
Okay, so you have a general idea of what you want to do. Now what? Use the steps below to start the planning process, and watch how easy it all falls into place once you figure out the big-picture items.
Last July we went to Iceland, where we got to see some of the most breathtaking landscapes I never even knew existed on this planet. Driving in Iceland somehow had me acting like an eight-year-old on Christmas morning—every 5 miles we drove was like unwrapping a new and even more exciting present from under the tree. We went from black-sand beaches to endless fields of blue bonnets to what looked like the surface of Mars, all within 30 minutes. If you ever get the chance to go to Iceland, just go. And give yourself at least two weeks to explore.
Step 1: Determine the goal of the shoot.
The shooting opportunities in Iceland are endless. We knew we wanted to walk away from this trip with at least 10 solid images we could submit to print competitions over the next year. We did our research on submission criteria for each competition. We also studied images that have scored and won over the past few years to see how we could focus our energy on making our shots impactful and as close to perfect as possible.
Luckily, the sun never really set while we were in Iceland, so we could spend as much time as we needed on every little detail of each shot. We have learned over the years to set one main goal for each shoot instead of trying to cram in multiple objectives. Doing things with focused purpose allows you to pay attention to what matters, to take a step back and breathe if something happens to go in a direction other than what was planned—which, of course, is what always ends up happening anyway (more on this later).
Step 2: Find a location.
A few months before the trip, I started digging into my mood board for Iceland. I gathered around 30 Pinterest images of killer photo spots. I shared this board with Sal and asked for his top five to 10 picks. The mossy lava fields were the first thing to stand out to Sal. We narrowed it down to 10 locations, and then I put together a plan for traveling to those places from our hotel.
Browse through the images in your Pinterest search and click on the ones that catch your eye. Place names are almost always included in the description.
Seeing isn’t always believing. It’s important to always fact-check locations on Pinterest. Make sure the place name is spelled right, and that the place even exists. You’ll figure out pretty quickly as you research if the information in the description is accurate.
This is when I turn into a travel agent of sorts to put together an itinerary. I plug in my starting address and final destination in Google Maps (this can be as simple as “Vik, Iceland,” the town where our rental house was, and “Laki, Iceland,” the name from the Pinterest description).
Wall No. 1: “Sorry, we could not calculate directions from Vik, Iceland to Laki.”
Now what? Pivot. If you can’t get to that exact spot, drag the destination pin to a spot that appears to be a road and is close to the location you’re trying to get to. This is the next best thing to do to get an idea of how long it will take you to get from point A to point B, and to determine if you will need to plan an entire day trip around it.
Step 3: Determine the concept or story you want your final image to tell.
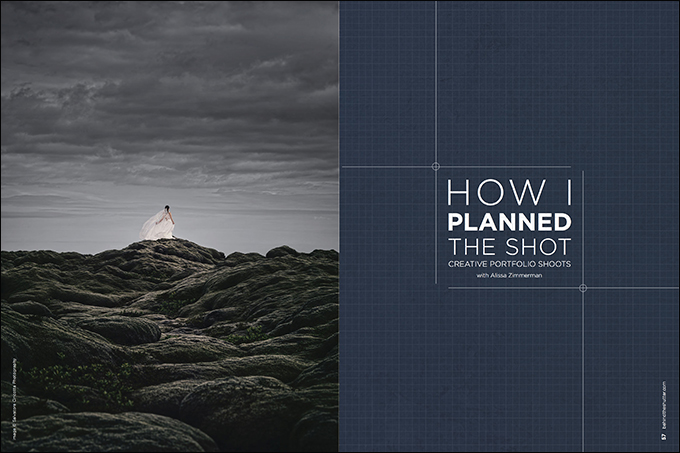
What’s the first technical thing you notice in these images? Leading lines. We knew we wanted to shoot from a low vantage point with the subject far in the distance so we could use the lines of the mossy lava to lead you straight to the subject.
We played around with the idea of doing a fashion shot here, but quickly realized there would be no real story. And trying to find a dress that didn’t compete with the uniqueness of the mossy lava would be a challenge. So we decided to go with a bridal shot.
Step 4: Decide if you need a model.
We have learned the hard way too many times about hiring models. We spent years trying to save money, and ended up with models who either never showed up, or did show up but looked nothing like their portfolio images.
If you’re going to invest a lot of time and money into a creative shoot for your portfolio, do it right. Hiring a model through an agency ensures you’ll get what you pay for: an experienced model who understands her body and face, someone reliable who will show up on time.
We have worked with top agencies around the world, and we haven’t had to drop $25,000 hiring through them. Reach out to the agency, explain what you’re planning and ask if they have any new faces that might fit your budget.
For the lava shoot, we wanted the weird rocks to compete with the model for viewers’ attention. We did this by making the model very small in the frame, with her back turned to the camera, which meant we didn’t have to hire a model—that’s me standing on those gorgeous alien rocks.
Step 5: Do your research.
I can’t stress the importance of diligent research enough. There’s nothing worse than planning an entire shoot around a location or monument that doesn’t actually exist or is impossible to get to without outside help.
After a lot of digging, I realized that if we wanted to get to Laki, we would have to book a day tour because we needed a special vehicle to get us where we needed to be. That was fine, but we didn’t want to be on someone else’s schedule on a tour with a bunch of tourists. We would need a custom day tour. It doesn’t matter what language you’re speaking—the word custom always translates to “way too much money.”
Next up, more digging. I found a bunch of blogs by people who have been to these places and had advice on where to go and how to get there.
One blog post titled “An Icelandic Adventure” is by a young photographer named Elizabeth Gadd. It’s as if she knew exactly what I was looking for. As I read through her self-portrait project, The Icelandic Red Dress Series, I found myself getting more and more overwhelmed with excitement and inspiration with every new spot she wrote about. Her post gave me insight into every question I had. Most importantly, she had photographed the mossy lava fields and wrote that these fields are right off the main highway on the southwestern coast, within 30 minutes of our rental house in Vik.
Moment of truth: Will Sal trust me enough to just drive and pull over when we see the mossy lava? Can we plan an entire day of shooting around some girl’s blog?
Working with Sal, it’s all about the pitch. Gather the information in a way that gets him excited. Show that there’s some inkling of a plan behind the madness, and he will be onboard. This one was a total crap shoot, but sure enough, 30 minutes down the road and a right turn off the main highway from our rental house, there it was: miles and miles of the most strange, unique, beautiful, mesmerizing landscape I’ve ever seen.
This shoot was an incredible experience, which is what it’s all about. As I’ve said many times, if you’re not having fun with the process and it’s creating a headache, you’re doing something wrong. Organization is everything in the planning process.
Do your research to help ensure the shoot runs smoothly so you’re able to create breathtaking images and memories that last a lifetime.


