Ready to light your portraits like professional photographers do? In this how-to lighting tutorial Sal talks about lighting ratios and how they can truly change the look and feel of your portraits. Portrait lighting is a crucial element in your arsenal to better understand how to create gorgeous professional looking portraits.
Equipment Used:
Camera: Canon EOS R5
Lens: Canon RF50 f1.2
Light: Westcott FJ200, Westcott Rapid Box Switch Octa-L, Westcott Rapid-Box Light Modifiers, Sekonic Light Meter
Equipment: Avenger C-Stand, Avenger Roller Stand
Backdrop: Dusty Blue Poppy 2 by BackgroundTown
Team:
Photographer: Sal Cincotta
Model: Layla Schwab
Ready to learn how to light portraits like the pros do? Let's get to it.
What’s up everyone? My name is Sal Cincotta, and I am a wedding and portrait photographer. Today we’re going to dive into lighting portraits the way professionals do. Now, the way professionals do, don’t hang on that term too harshly, if you will, right? We want to talk about lighting ratios. That’s really what it comes down to, and don’t zone out on me if you’re a natural light photographer or you don’t understand this stuff because I promise you it is not complicated. In fact, it’s quite simple. Look, we live in a world where everyone is a photographer. Everybody’s out there with their iPhones and they are photographers. Maybe not very good ones, but they are still photographers and everybody should enjoy photography. But one thing you’ll notice is with professional photographers, they know how to use light and shadow to create more dimension in their portraits.
And so, these lighting ratios, as they’re referred to, can be 1:1 where both lights are equal, 2:1, 4:1, or 8:1. And I’ll dive into what all those things mean. But most importantly, I’m going to show you the results of those, and you’re going to be blown away that they are not very difficult to execute on. So it just comes down to understanding basic theory, and then from there, like everything else, you season to taste. You’re the artist, you’re the photographer, but you have to understand the rules before you can break them. And this really came to fruition on one of my last trips to Italy. We were in the Vatican, looking up at the ceilings, if you’ve ever been there, and you could see all these paintings. They were brought to life by using shadow on a two-dimensional image to give it more depth.
And that really is the difference, I believe, between somebody who just rolls up with an iPhone or somebody who is, and I don’t mean this in a completely derogatory way, a natural light photographer. It just means you don’t understand how to control light. But once you understand the simple stuff that I’m going to show you today, it will change the way it looks.
1:1 Lighting Ratio
So the first thing we’re going to do is start with 1:1. And in a 1:1 lighting ratio, you have two lights or possibly three lights set up. They are evenly lit, meaning both lights are at the same power. I’m going to show you how we do it, and I’m going to show you the results. Why would I ever use this, Sal? If you’re telling me even light isn’t exactly advanced or something that a professional would do? Well, like I said in the beginning, that’s a little bit of a misnomer.
We use that type of lighting for beauty lighting. The minute we start adding shadows, if somebody has bad skin or wrinkles, it exaggerates it. Why? Because we’re creating shadows and drawing attention to those acne marks, wrinkles, and things like that. So flat lighting could be used for maybe some beauty work, maybe some fashion work, and maybe some product photography. But in the end I think you’ll agree, let me know in the comments, that as we start adding dimension it starts feeling like a different portrait.
So let’s get to it here. Everything I’m using today is down in the comments. So go in there and you’ll see those links for what I’m using. I’ll just run it for you real quick. I’m using two FJ200s, we don’t need much more than that in the studio. For my key light, my main light, I’m using an Octabox. Then for our fill, we’re just using a 1×3 strip box.
Now, I’m going to fire these and measure each of these lights independently. Remember we’ve got two lights here, and we are going to measure them independently. So I’m controlling it through the trigger and I’m going to end up getting both lights at F11. This main light is at F11. Now, we can put this main light to sleep from the trigger and activate the fill light so I can measure them independently. I think that’s pretty important to be able to do. So now we’re going to measure this secondary light, which is also hitting at F11. So now both lights are hitting at F11. This would be a one to one lighting ratio.
Now I’m going to set my camera up for that. I’m hoping you’ll agree that what I just did is not complicated. Both lights are set up to a power setting of 9, which is giving us F11. Now lights are additive in nature, so this will probably be F11 and a half and you just have to adjust your camera for that with both of them. So we’re going to take a test shot here, and I’m going to turn the main light back on.
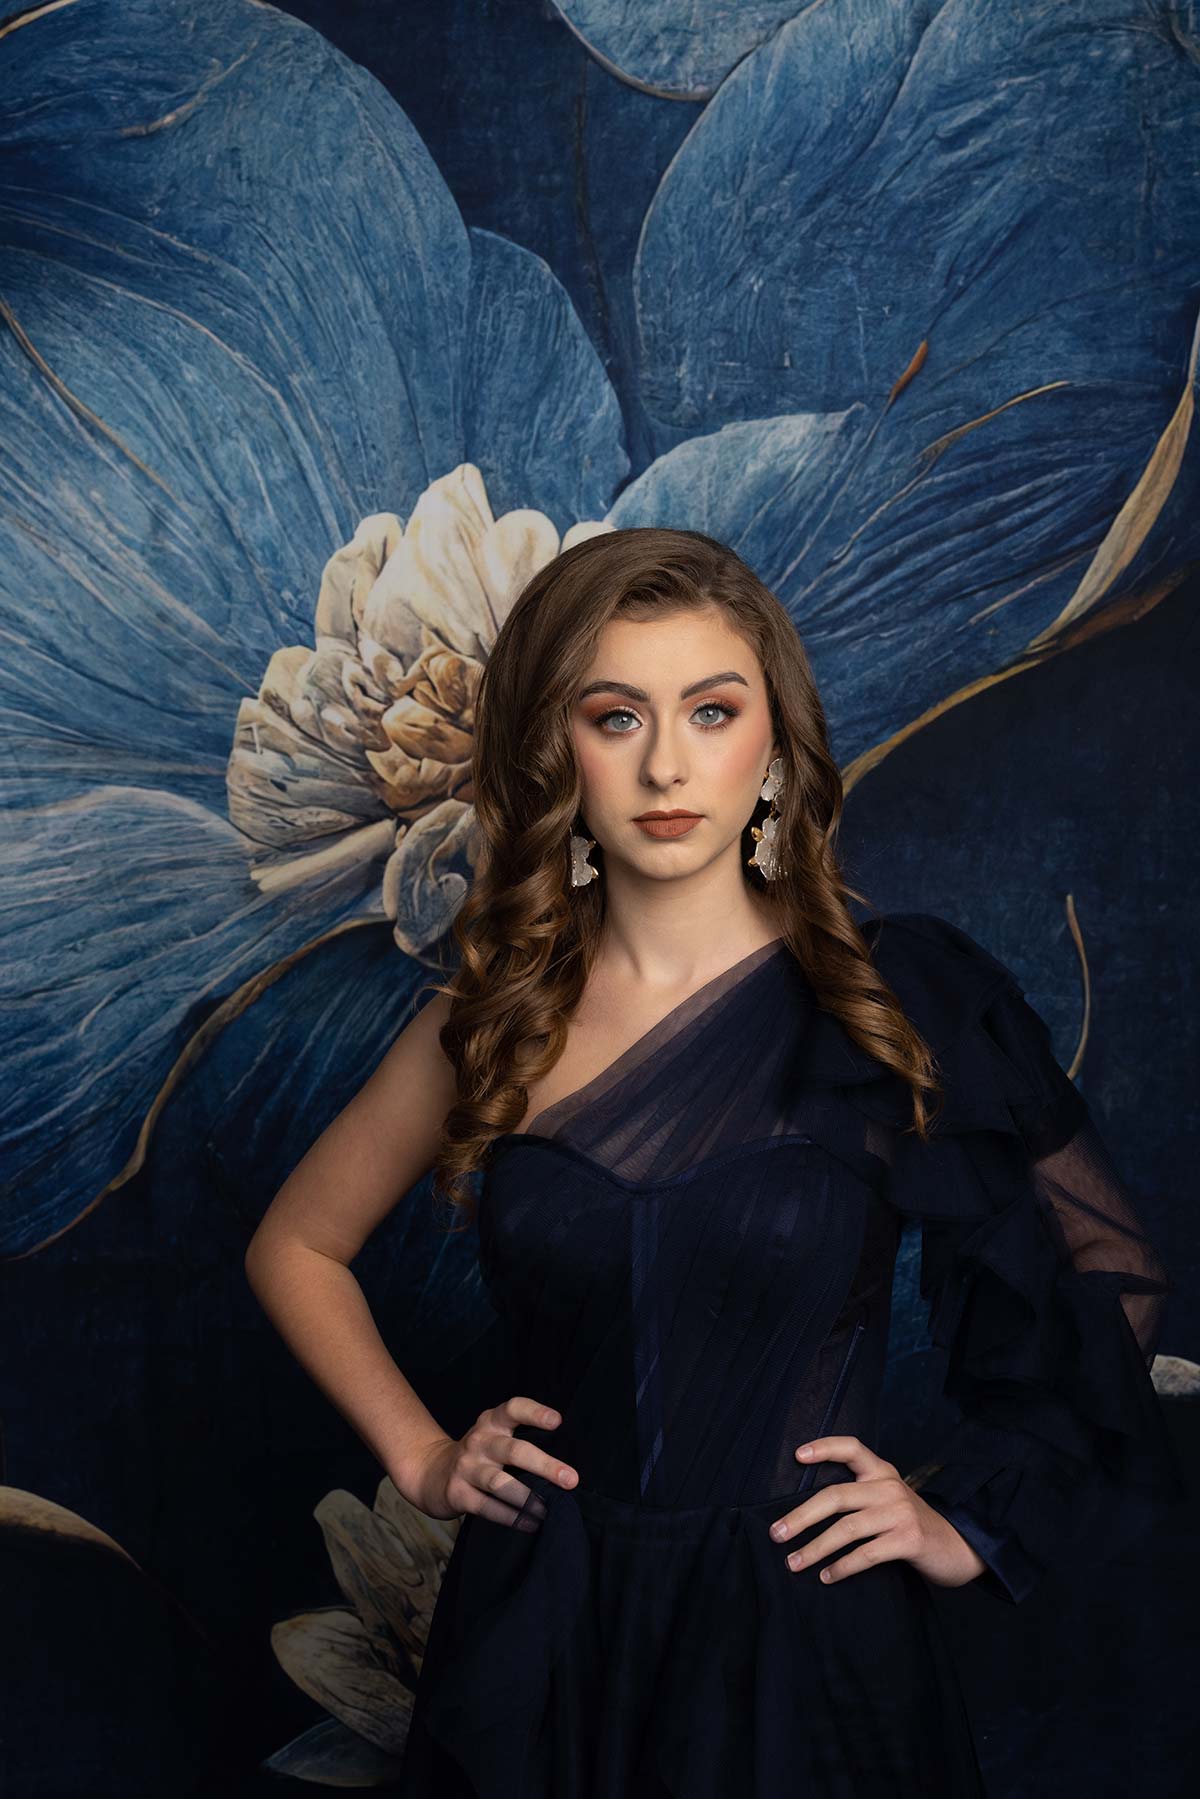
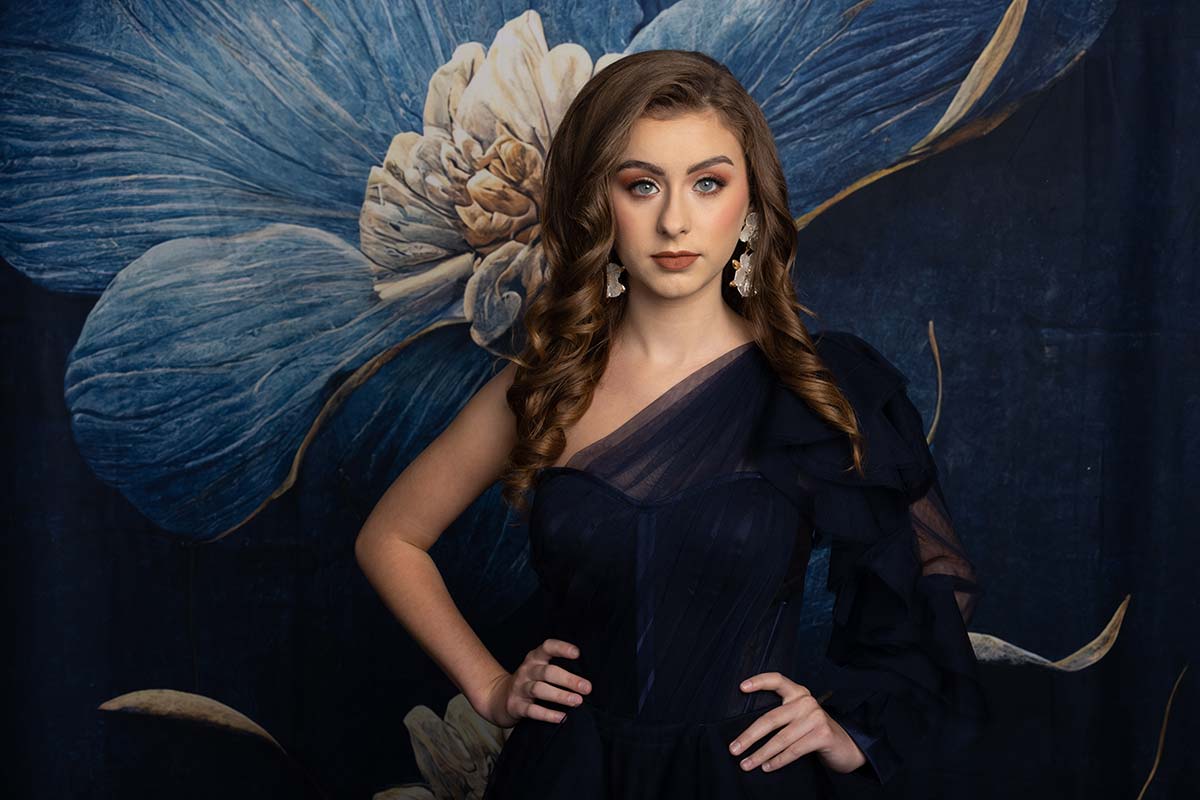
Okay, that’s a beautiful portrait. All right, so what you’re seeing here in the portrait is just straight out of camera, even light, very little shadow on her face, and subtle shadow under her chin. That’s a 1:1, more of a beauty light setup, but now we want to start adding dimension.
1:1 Lighting Ratio Portrait
Settings: f/11 @ 1/200, ISO 200
2:1 Lighting Ratio
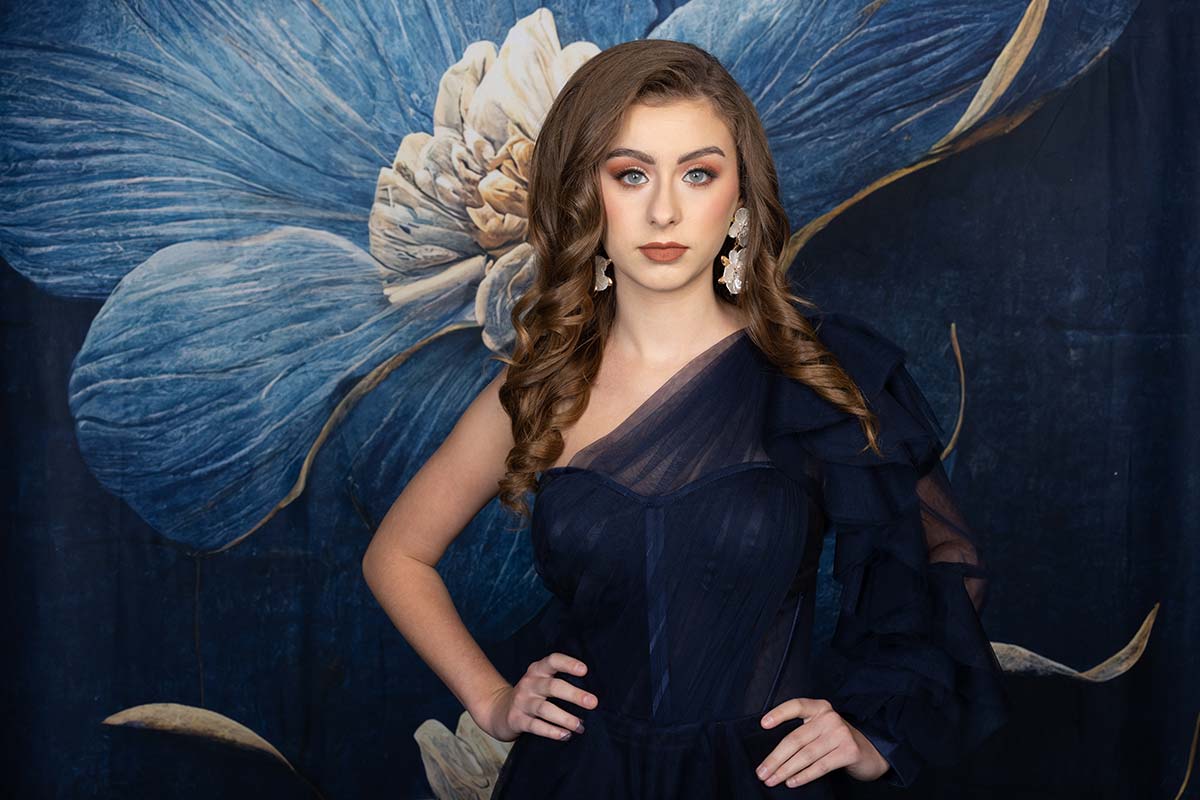
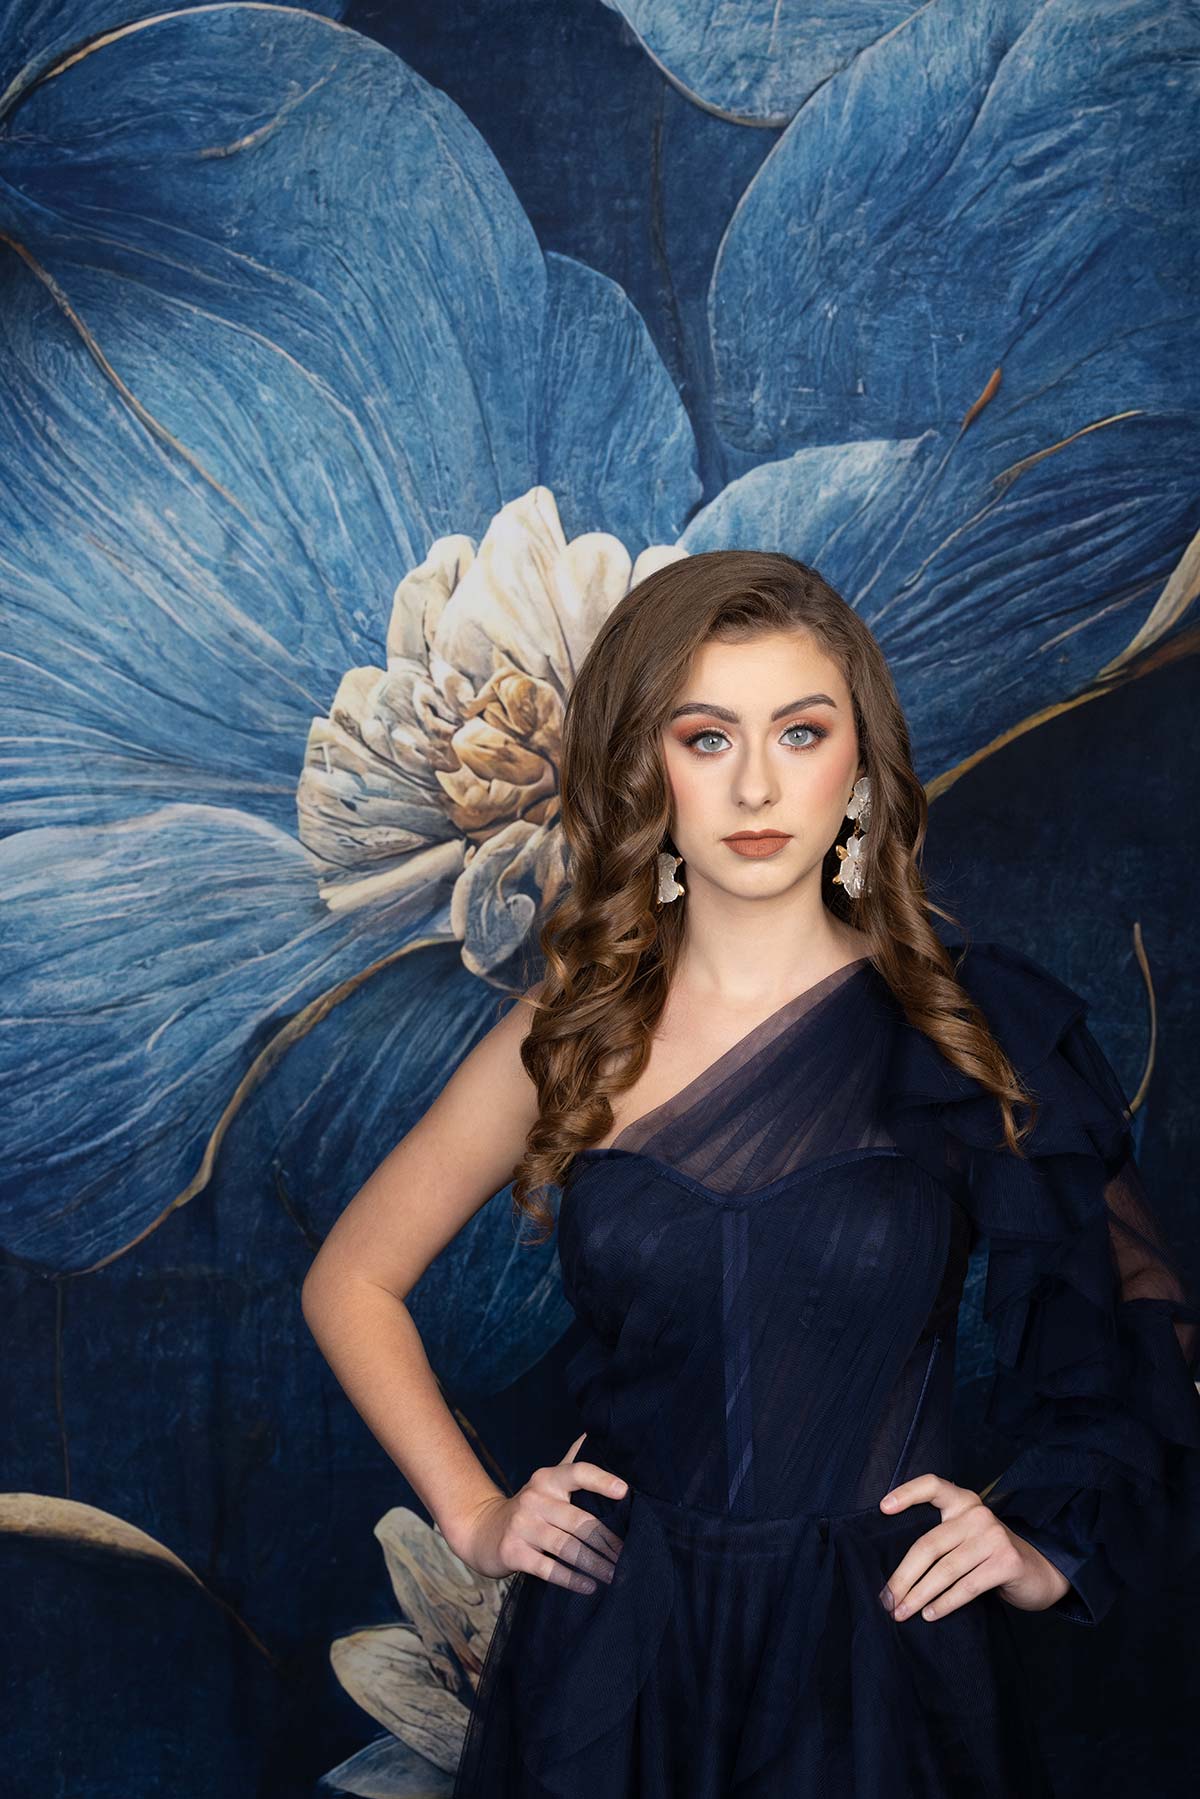
Now we’re going to move to 2:1. And in a 2:1 lighting ratio, there’s a one stop difference between your main, your fill, and hair. So all I’m going to do now is turn down the fill light by one stop. All I’ve got to do here, if you look on camera, is go from nine to eight. Now there’s a one stop difference between those two lights, so soft shadows will be there. Let’s take the same portrait. And now, if we look at the difference between those, we’ll actually start seeing some shadow. You’re going from no shadow to some shadow on the left side of her face.
2:1 Lighting Ratio Portrait
Settings: f/11 @ 1/200, ISO 200
4:1 Lighting Ratio
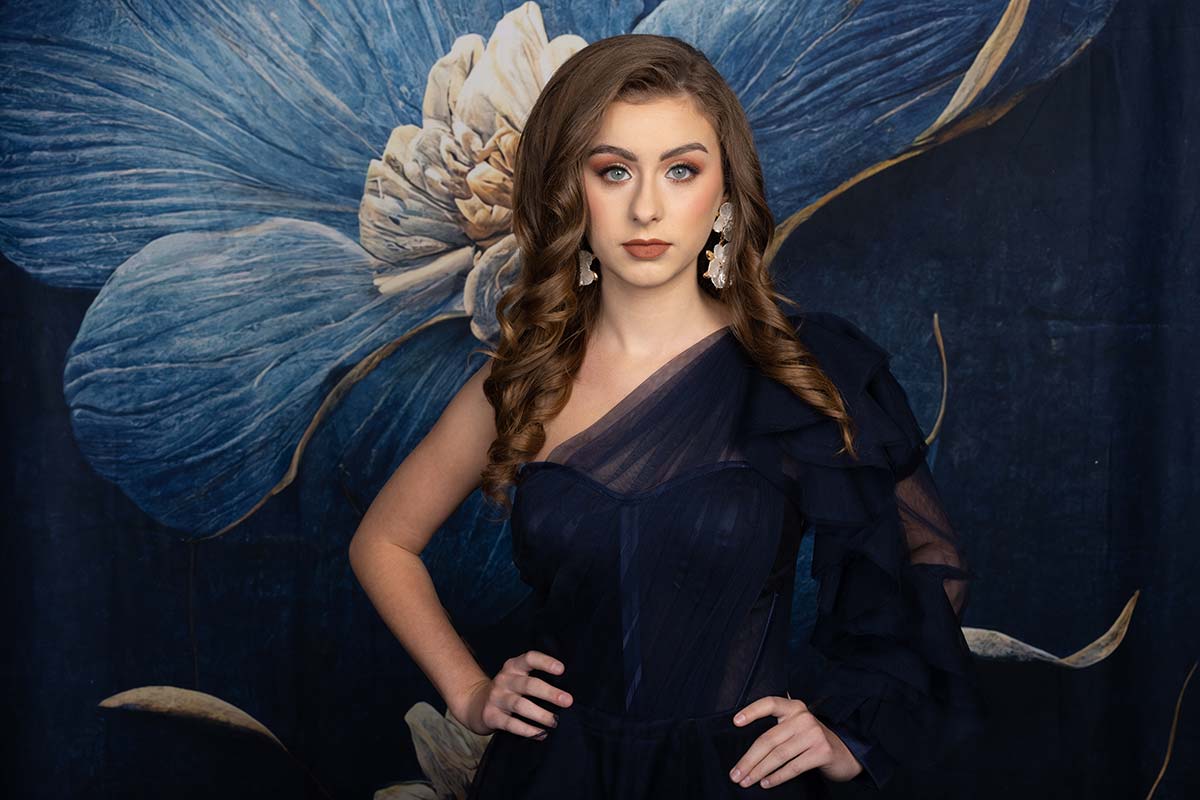
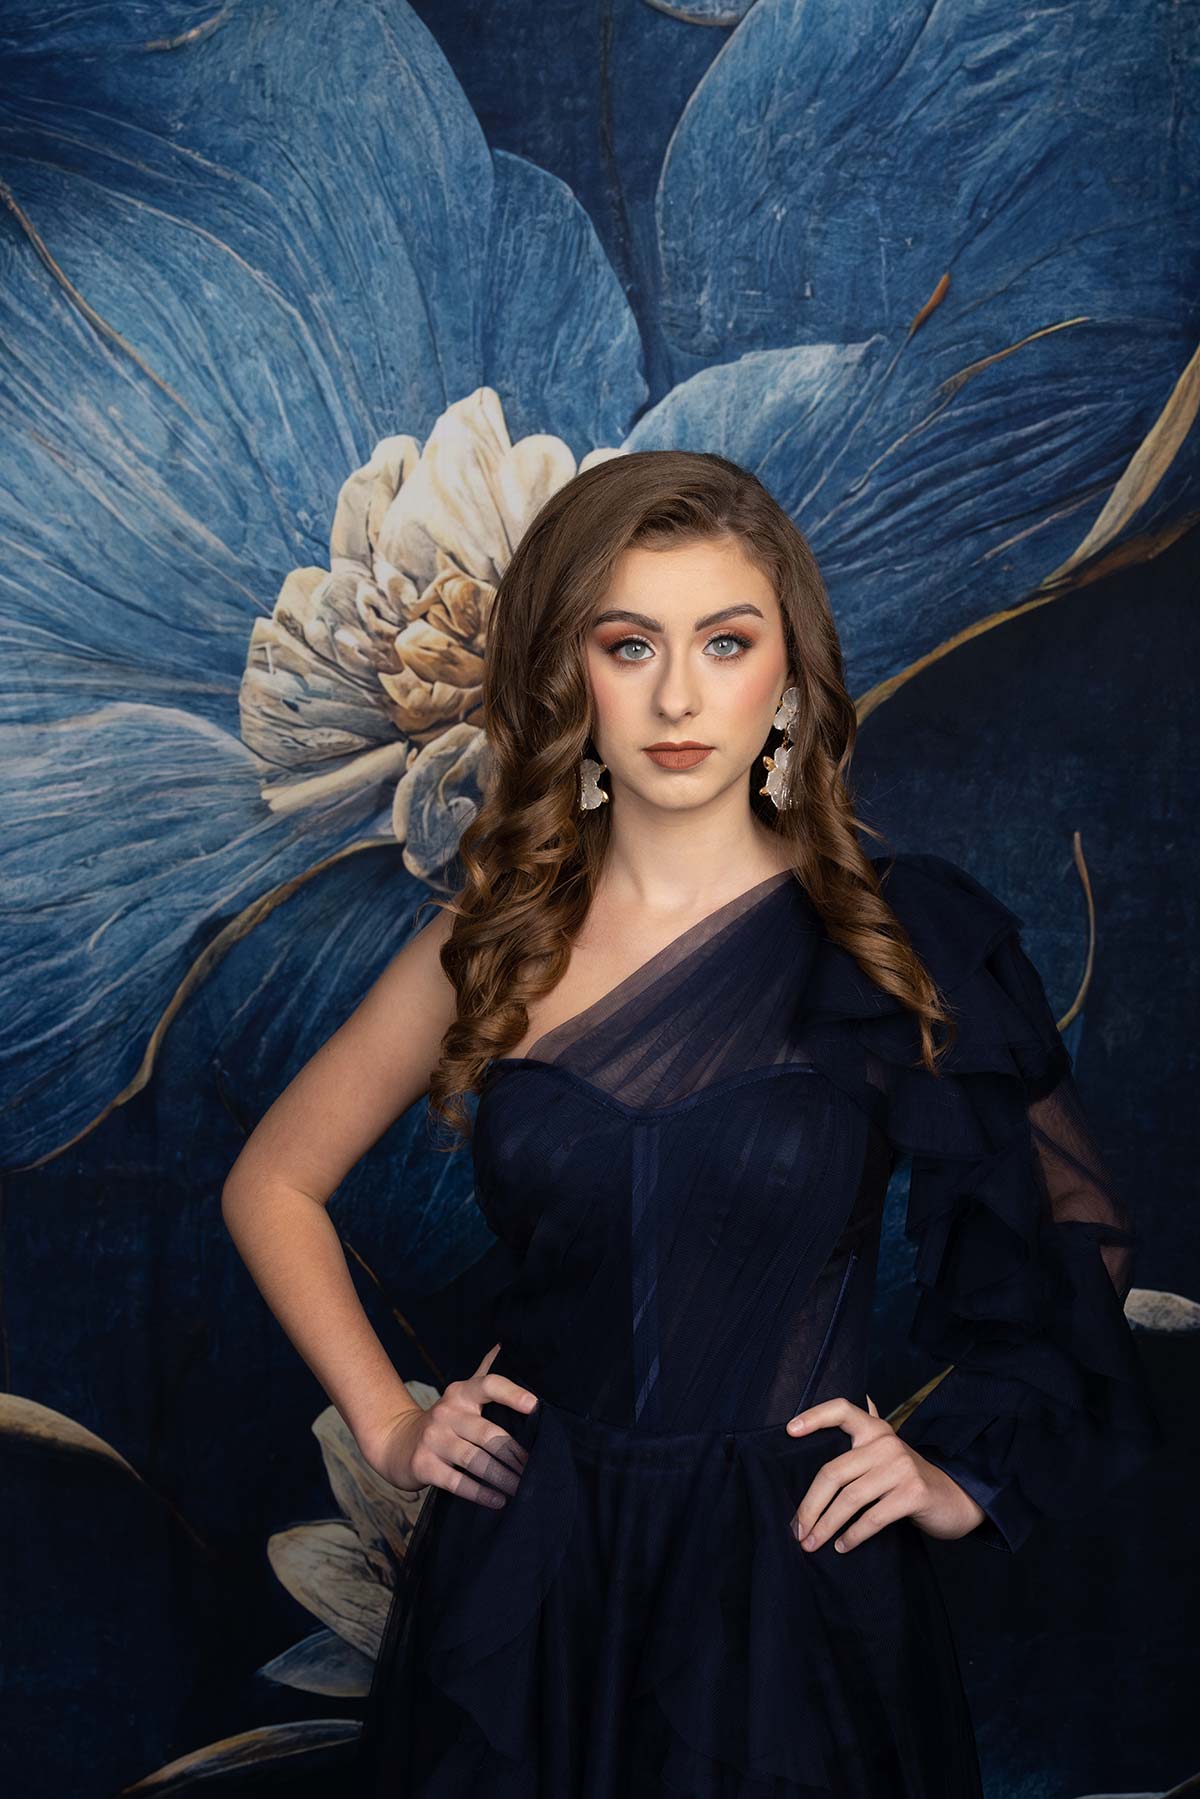
So now what we want to do is go from a 2:1 to a 4:1 lighting ratio, and that’s a two stop difference. So now what we’re going to do, I’ll show you again, we’re going to go to that fill light and we’re going to come down another stop. Now, our main light is still at F11. So here we go, we’ll take a test shot. Now that shadow is becoming more pronounced.
4:1 Lighting Ratio Portrait
Settings: f/11 @ 1/200, ISO 200
8:1 Lighting Ratio
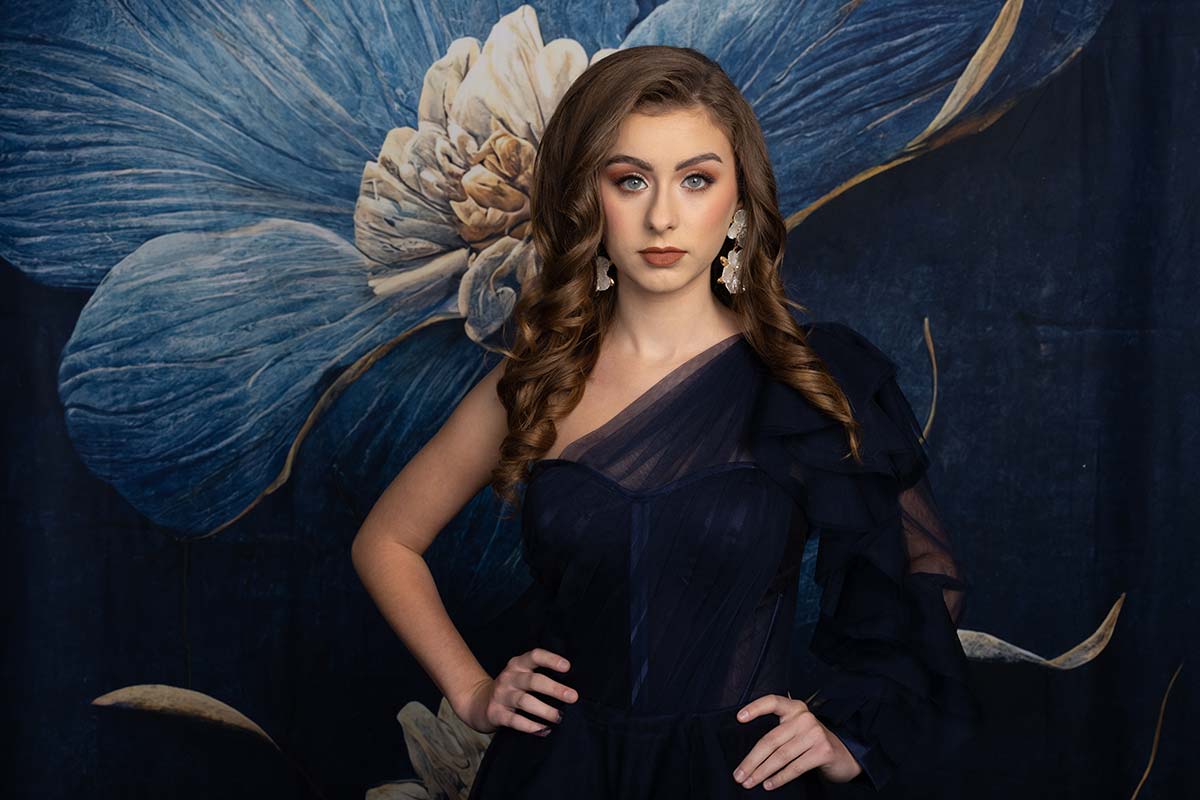
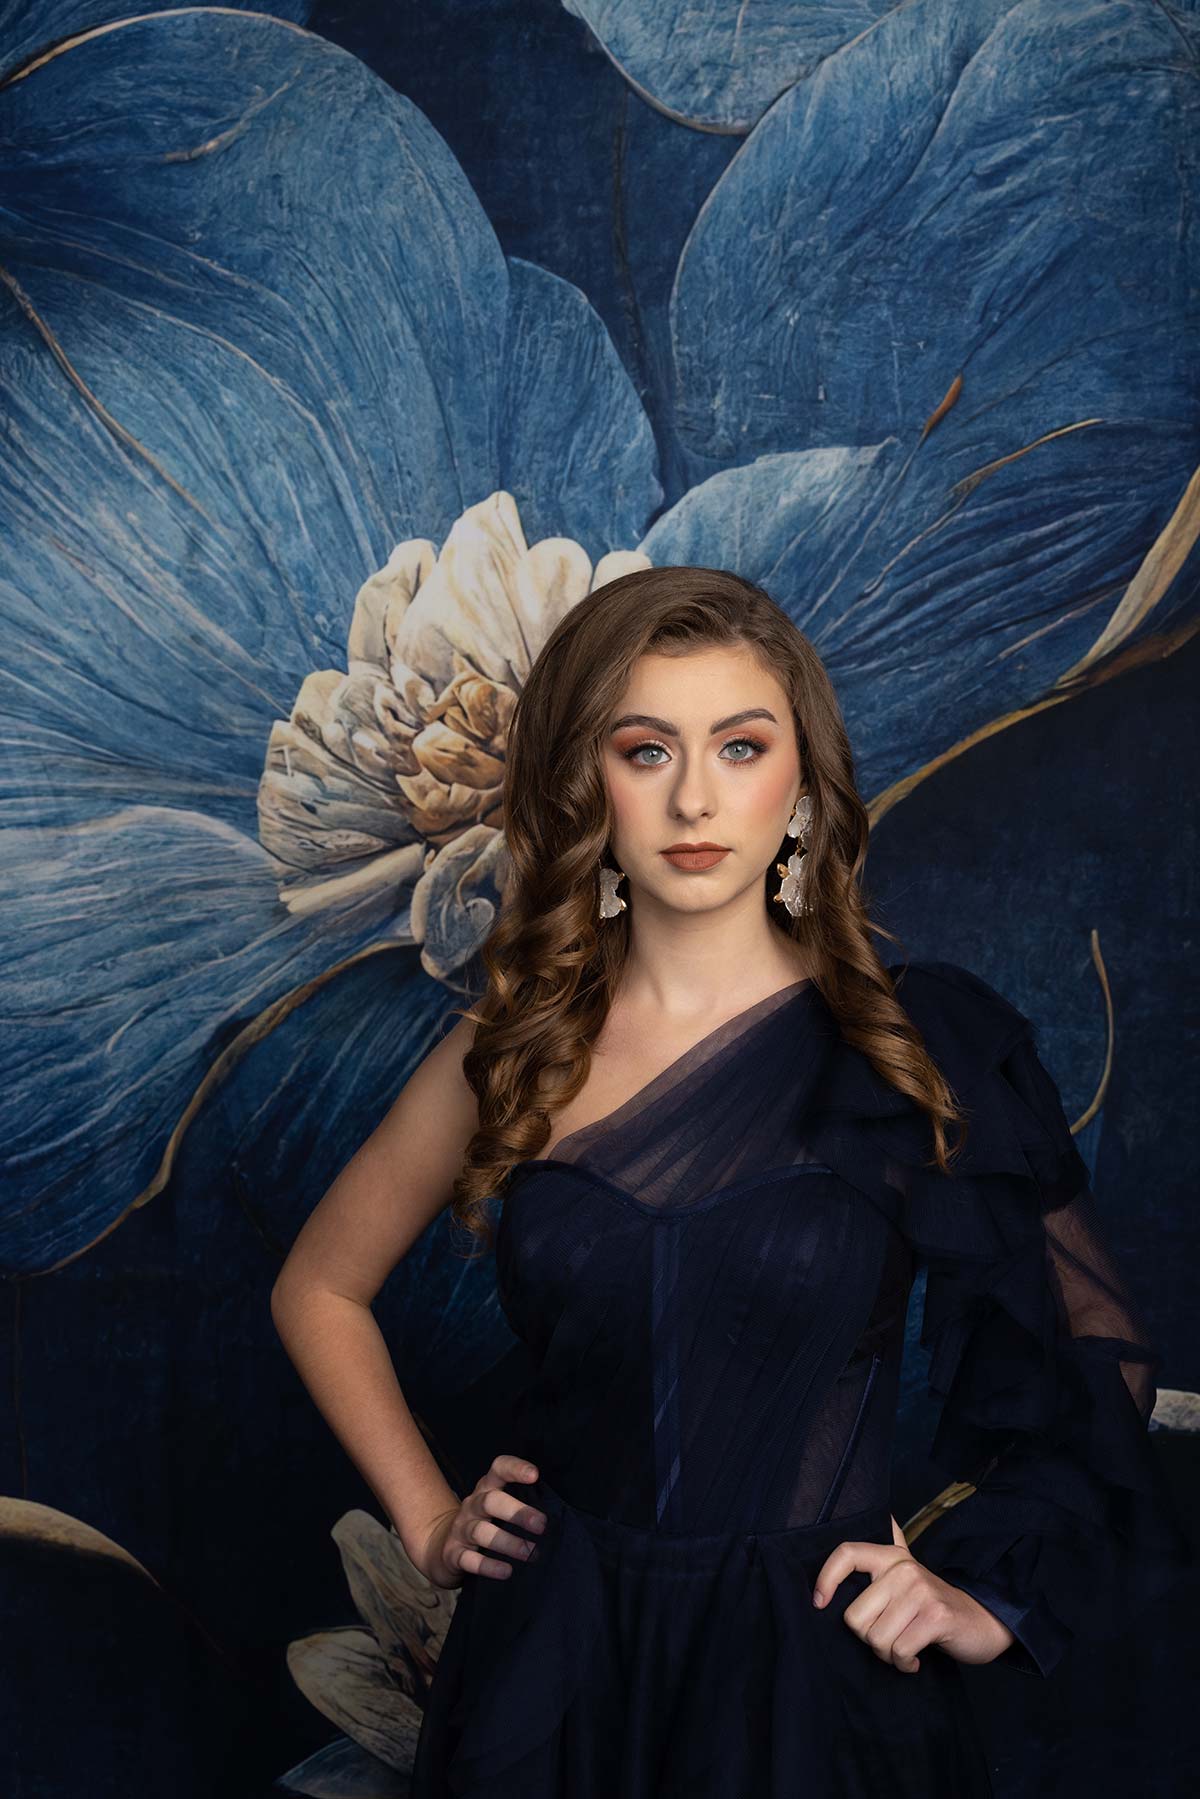
So now what we want to do is go to an 8:1 difference. So we were at 1:1, when the lights were even. Then 2:1, 4:1, now 8:1, and there’s a three stop difference. So the same thing, we’re just going to come right to the trigger.
Again, I’m going to show you this, and now you’ll see there’s a three stop difference and that is an 8:1 ratio. Let’s take these same shots again. And again, you’re seeing that difference. Beautiful.
8:1 Lighting Ratio Portrait
Settings: f/11 @ 1/200, ISO 200
Side by Side Comparison
As you’re looking at these pictures side by side from 1:1 to 8:1, you are seeing a very subtle and incremental difference, and it’s that controlling of light and shadow that allows professional photographers to stand out from using an iPhone camera or just natural light photography in general. Don’t get me wrong, there’s a time and a place for that. But if you want to add mood and drama and more of a three-dimensional look to your portraits, you’ve got to embrace shadows. But more importantly, understand what type of shadows you’re adding to your portraits. Now, you are creatives, so season to taste, get out there, make your own images. And more importantly, I want to know in the comments, which one did you like the best? Was it the 1:1, even lighting? Was it the 2:1, 4:1, or 8:1, the last set of shots we took? You let me know which one you like, and we’ll see you in the next video.
1:1 Lighting Ratio
Settings: f/11 @ 1/200, ISO 200
2:1 Lighting Ratio
Settings: f/11 @ 1/200, ISO 200
4:1 Lighting Ratio
Settings: f/11 @ 1/200, ISO 200
8:1 Lighting Ratio