
Laws of Light: 5 Tips for Shooting in Direct Sun with Jay P. Morgan
Hi, I’m Jay P Morgan from The Slanted Lens, and today we are going to talk about every photographer’s worst nightmare: shooting in direct sun. OK, maybe there are a few other nightmares, like “I forgot by batteries,” or “I formatted the wrong card and lost all my images,” or “I don’t have the correct cable for my strobe,” or “My camera sensor has dirt all over it in every image”
OK, so there are a lot of nightmares when you shoot, but shooting in direct sun does not need to be one of them. The craft of photography is the ability to shoot at any time of day and make incredible images. We can’t always control where we shoot and the time of day. Let’s say someone has a wedding and they come out of the church right at noon. We can’t just ask that they reschedule everything so that we can shoot them coming out of the church during magic hour. We need to have the ability to shoot when and where things happen. This means you will need to know how to handle direct sun. There is no reason to hide inside when the sun is high and harsh; we are going to show you how to get out there and shoot successfully. So If you’re brave enough to get out there and shoot in the hot sun, then here are five tips you’ll need in order to get the best images and make it worth your time.
1. Don’t rely on shade
One solution is to find shade, somewhere that will cover your subject so the light will be soft and more flattering. Shooting in shade is ideal for wide-open, soft, reflected light that is very neutral-looking.
However, sometimes you don’t have much shade to choose from like in an open field. Or, you want to shoot in the specific location, and moving into the shade would be pointless. If you have the option to use shade and it doesn’t change the purpose of the shoot, definitely go for that, but when you don’t have the option to use shade, then it’s time to fight the sun.
2. Use the Sun as a key light
When you can’t hide from the sun, then the best thing you can do is make it your key light. The sun is the biggest key light there is! There won’t be anything around that is as bright as the sun. So why compete with it? Use the sun as a key light. You do this by moving your subject until the sun lights their face in one of the five portrait lighting positions. Have your subject look up toward the sun. This crates a nice butterfly. Maneuver your subject until the sun on their face falls into a Rembrandt or split light. This can be hard because you can’t move the sun so you have to move your subject. Use the sun as a key to light your subject’s face.
To make this really work, it’s good to use a reflector of some kind and bounce light back into your subject’s face. This will open up the shadows and make the image much more appealing.
The huge advantage of this setup is minimal equipment. But you are at the mercy of where the sun is in the sky. And it doesn’t give you much flexibility in terms of background choice. You can’t pick up the sun and move it wherever you want it to be.
The problem is that this light is really harsh and will show every flaw on your subject’s skin. Because there’s so much contrast, you might have to do a lot of retouching to correct all the blemishes.
It’s not ideal, but it is an option if you have to work in these conditions. It’s not my first option. but I have seen some amazing images using the sun as the key light.
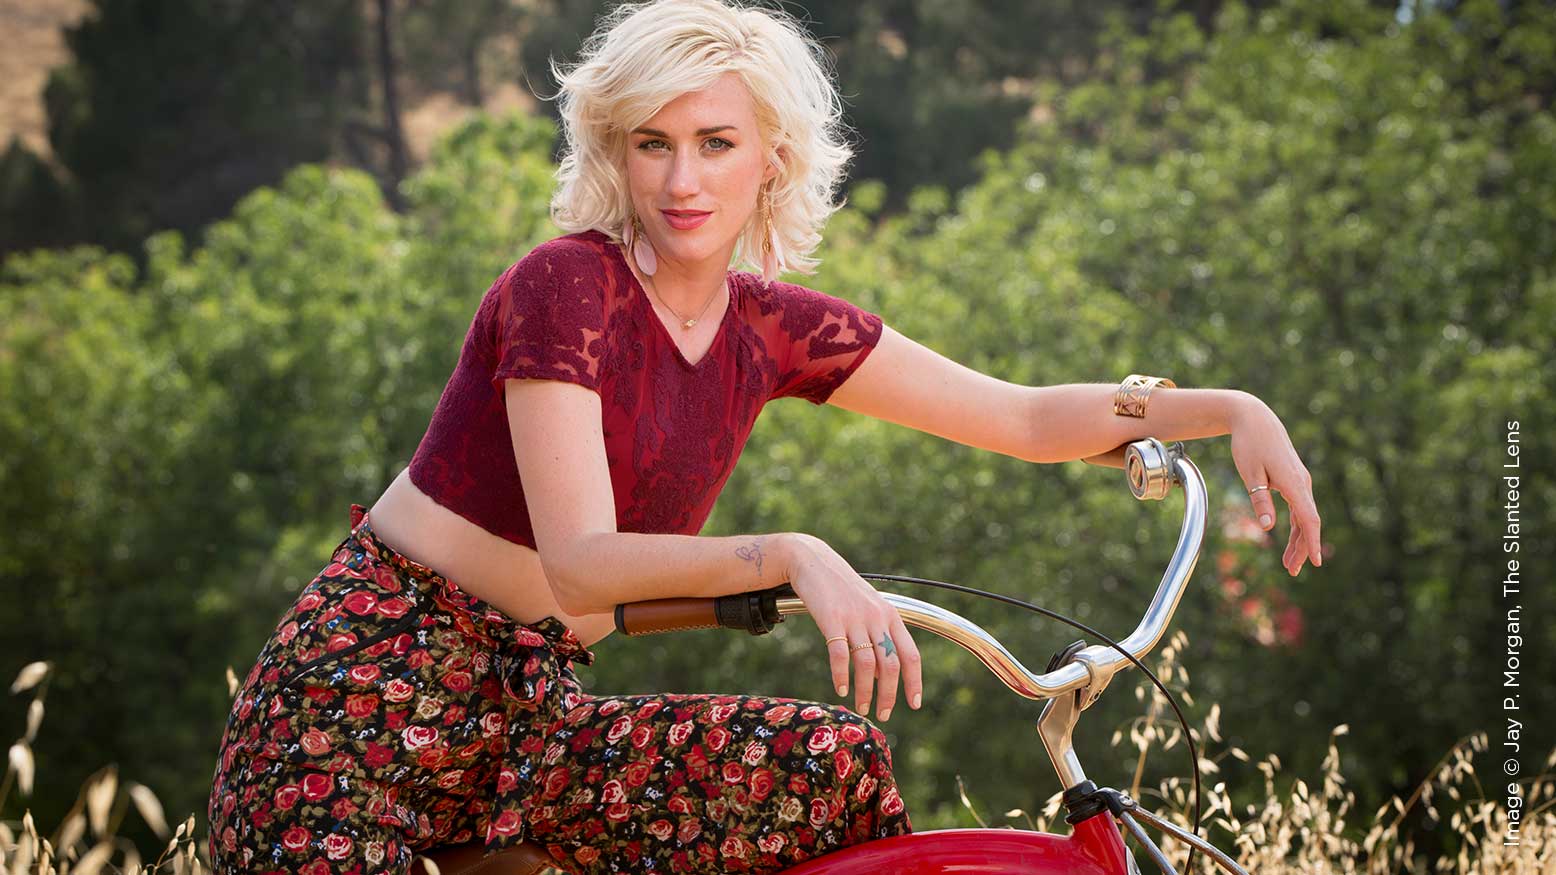
3. Use the Sun as a back/rim light
This is my favorite and go-to option just about every time I shoot in direct sun. Having the sun behind the subject will create a nice rim light on the subject’s hair, resulting in a natural-looking separation of the subject from the background. Putting the sun behind your subject also gives you a darker background, because everything in your background will also have the sun behind it. This gives you a dark background with a beautiful rim light on your subject (for separation) and an open light on the face.
When the sun is high in the sky, this is an easy thing to pull off. Once the sun starts to get lower on the horizon, now you’re competing with the direct sun, and it will create flares. Flares are good but change the look. You can’t shoot everything with flares, unless you’re J.J Abrams. With this technique, you can just add a reflector from the side to brighten your subject’s face. This works because the sun is hitting the reflector directly and bouncing back into your subject’s face. A hard rim with a soft, reflected key light is a great combination. Get that reflector up high so the light source is lighting your subject from slightly above eye level. If you put the reflector on the ground, then it’s reflecting up and looks like horror light. Don’t be lazy—get that reflector above your subject.
In these images, we put the sun behind her to give us a nice, darker green background and then brought in a reflector to give her just a small amount of softer light on her face. Our subject’s hair color is so light, it’s a little difficult to make her face look bright enough to match her hair, whereas if we were shooting someone with dark hair, it would match, no problem. Using the reflector gives us a nice, open, airy feeling, bouncing the light onto her face.
You can also physically position yourself on the ground and put the sun directly behind the subject. The subject blocks the sun from the camera and gives you a rim light around their whole body or head.
The upside to this technique is you get great images. But the downside is you need more equipment. A stand or an assistant needs to hold the reflector. If you don’t have an assistant, use the groom’s parents or bring a stand. It does slow the shooting process down, but the look is worth it.
4. Use a Translucent Reflector
Putting a translucent overhead is a great way to control the light that falls on your subject. By doing this technique, you can get softer shadows and have more of a softbox look. This is a cleaner look that works great, as you get a beautiful, soft, controllable light. With this technique, you get almost halfway to shade, so it’s not quite as dark and soft as if you were in actual shade, but more similar to a light cloud coverage.
For a full-body shot, this technique shows the shadow of your translucent on the ground, which means you’re limiting your shot selection to waist-up or close-ups. If you want a full-body shot, try to hide the line of the shadow with the edge of your frame. Or, get a huge reflector that will cover more area!
5. Use a Strobe and Translucent
In this setup, we will still be using the sun as a rim light and the translucent reflector to create a softbox, but now we are adding a strobe to open up the shadows and have more control over the image.
With this setup, you have complete and total control for world domination! You’ll be able to control the amount of shadow and the harshness of it on your subject’s face. In order for this to work, you really need a strobe that has high-speed sync. Without one, you’ll have to compensate by lowering your aperture, since you’re in direct sun. This might not be a look you’re going for, so it’s something to consider.
This setup needs the most equipment to shoot in direct light, but also gives the greats amount of control!
Conclusion
We don’t need to fear shooting in direct light! There are so many ways around the harshness, and you really can get some incredible shots when you embrace the light. We’ve got some really unique images shooting with all of these different variations, and if we would have just stuck to the shade or waited till the sun was rising or setting, we would have missed out on this completely different feeling.
So, do not fear! Venture out into that harsh sun, try out some of these techniques and just don’t forget sunscreen.


