
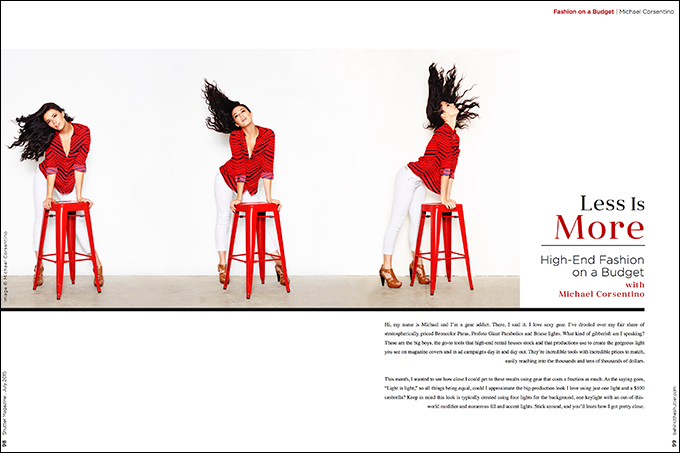
Less Is More: High-End Fashion on a Budget with Michael Corsentino
Hi, my name is Michael and I’m a gear addict. There, I said it. I love sexy gear. I’ve drooled over my fair share of stratospherically priced Broncolor Paras, Profoto Giant Parabolics and Briese lights. What kind of gibberish am I speaking? These are the big boys, the go-to tools that high-end rental houses stock and that productions use to create the gorgeous light you see on magazine covers and in ad campaigns day in and day out. They’re incredible tools with incredible prices to match, easily reaching into the thousands and tens of thousands of dollars.
This month, I wanted to see how close I could get to these results using gear that costs a fraction as much. As the saying goes, “Light is light,” so all things being equal, could I approximate the big-production look I love using just one light and a $100 umbrella? Keep in mind this look is typically created using four lights for the background, one keylight with an out-of-this-world modifier and numerous fill and accent lights. Stick around, and you’ll learn how I got pretty close.
Achieving the Look
Half the battle is figuring out the tools you need to create the look you want. Since I was planning on shooting full-figure, three-quarter and tighter images, I knew I was going to need a source large enough to cover this range. Additionally, with the one-light setup, I knew I’d be standing directly in front of my light and potentially blocking it. So I’d need a source large enough to completely wrap around me and illuminate the model without any issues.
There were other important factors to consider. I wanted a punchy, contrasty light that approximated the look popular in fashion magazines and advertising images. I also needed maximum coverage, with enough spill to light both my model and the white background behind her. With these things in mind, an extralarge umbrella with a silver interior was the obvious choice. Westcott’s $100 7-inch Silver Parabolic was the prefect fit. Silver would not only give me the specular quality of light I wanted, but also increase the effective output or efficiency of my light. With an indirect light source like an umbrella, this was important. In order to shoot full-figure images at my desired f/14–16, I’d need to place my light at least 16 feet from my model, and I’d need all the power I could muster.
Anatomy of an Umbrella
So why use an umbrella? Each light modifier has its own unique set of characteristics that make it the right or wrong choice for the job. Umbrellas spread light everywhere, so if you’re looking for a modifier that’s going to allow you to control exactly where you’re placing your light, an umbrella isn’t the right tool. If, on the other hand, you’re looking for a modifier that’s going to deliver as much overall light as possible, an umbrella is just the thing.
Umbrellas are often scoffed at because they are such basic tools, but don’t be fooled: Under the right circumstances, umbrellas rock. They come in shoot-through and bounce-back versions, providing myriad effects, from soft to specular, based on their size and interior fabric. The silver bounce-back style I’m using here is known as an indirect light source. This is because the strobe faces away from the model and into the curved, concave part of the umbrella that faces the subject. Because of this, you’ll need a strobe with sufficient power and/or sufficient f-stop.
2 Looks, 3 Sets
This shoot was all about keeping it simple—simple tools and simple techniques. I started off with one light and white seamless for the first look. I always have props on hand, things like interesting chairs, antique ladders and wooden boxes. The red stool worked perfectly as an accent note to Chelsea’s red blouse, and helped create compositional balance. A fast flash duration freezes the action as Chelsea flips her hair, creating an energetic series of images. Image 3 from this series uses a slightly different technique. Here I used two foamcore V-flats to build a three-sided white box behind and around Chelsea left and right, essentially bathing her in white light. This added an extra all-over wash of light to the image. It’s a great way to go if you like the high key look or don’t have a roll of background paper (see Look 1/Image 3 and Lighting Diagram 2).
For the second look, I decided to go all DIY and use the silver insulation panels I had in studio serving as large reflector panels for background. I taped them together and created a cove to shoot in. Insulation panels are inexpensive and work perfectly as backgrounds, reflectors and black blocking panels.
The point is, you don’t need to spend a king’s ransom to create really cool-looking images.
Post-Processing
I kept the post simple and straightforward, focusing on the skin, color and contrast. For retouching, I used frequency separation, a fantastic method for removing blemishes, adjusting tones and maintaining realistic skin detail. Frequency separation separates the detail and tone in an image, allowing you to work on them independently. It sounds complicated, but it’s not. If you search YouTube, you’ll find a ton of videos explaining this technique in excoriating detail. (I recently came across a great Photoshop retouching panel that has it, among other super-useful scripts, built in. It’s called the “Beauty Retouch Panel,” and you can find it over at RetouchingAcademy.com.
What’s Your Angle?
Choosing the right angle when photographing models makes a big difference. As usual, there are no rules here, and of course it will depend on the model and your vision for the images. In this case, shooting slightly up at Chelsea produced more winners than losers, by a wide margin. A lower angle helps elongate and slim the body, and adds a larger-than-life, heroic feeling.
Gear and Camera Settings
This series of images was shot with medium-format digital, a Phase One DF+ with an IQ250 digital back; Schneider Kreuznach 80mm LS f/2.8 AF and 150mm LS f/3.5 AF lenses; a Profoto 7A 2400WS Generator and one Prohead; Pocket Wizard Plus IIIs for triggering the lights; a Sekonic L-758DR light meter; and one Westcott 7′ Silver Parabolic Umbrella (Model 4633). Given their size, build quality and versatility, these umbrellas are an amazing value at only $100. They’re available in four flavors: Silver, White Front Diffusion Cover, White Diffusion and White/Black. I’ll definitely be doing more with these in future articles. Camera settings were as follows: ISO 100, 1/125 shutter speed, f:14–16.
Fashion for Less
The experiment was a success. Clearly, you’re not going to get the exact same quality of light delivered by the big-league über-expensive modifiers listed above—there’s no arguing they produce insanely beautiful light. The important takeaway here is that I’ve achieved the look I was after using a single $100 umbrella. You can do a lot with a little. If you have access to drool-worthy professional tools and tons of lights, by all means, use them. But if you don’t, don’t be held back—if you know what you’re trying achieve, there’s a lot you can do with simple, inexpensive tools.


This Post Has 4 Comments
Wow a 7 INCH Westcott Parabolic Silver Umbrella? Pretty tiny I think.
I know your referring to the popular 7 foot Silver lined Parabolia.
You know the one that Paul C. Buff put on the market first at a reasonable price before all the other
lighting companies copied and released… As with most lighting concepts the kowledge of lighting comes
first and the tools come second. Everything mentioned can be done with Paul C. Buff’s original 7 foot PLM parabola’s and
Less expensive PCB lighting products.
Where in the world are the images you are referring to? You seem to reference more than 3 images/diagrams but all I see are the 3 images at the top.
“Want more information on this article? Get access to video content and additional supporting images. Launch the July issue of the magazine by logging in or signing up for a free account by clicking here. Shutter Magazine is the industry’s leading professional photography magazine. – See more at: https://www.behindtheshutter.com/less-is-more-high-end-fashion-on-a-budget-with-michael-corsentino/#sthash.ado0R4Ke.dpuf“
Thanks!