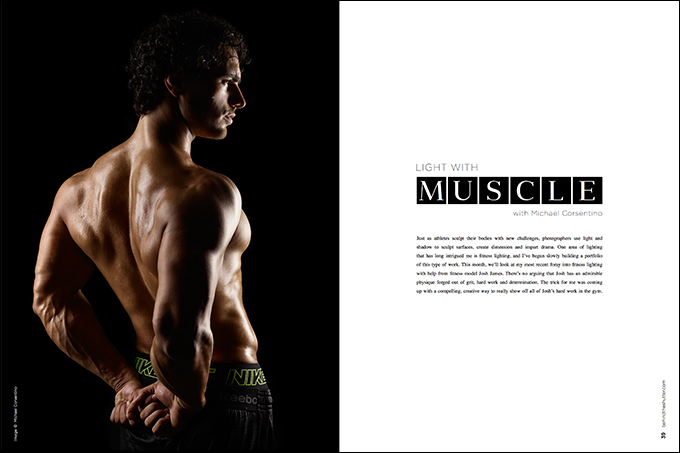
Light With Muscle with Michael Corsentino
Just as athletes sculpt their bodies with new challenges, photographers use light and shadow to sculpt surfaces, create dimension and impart drama. One area of lighting that has long intrigued me is fitness lighting, and I’ve begun slowly building a portfolio of this type of work. This month, we’ll look at my most recent foray into fitness lighting with help from fitness model Josh James. There’s no arguing that Josh has an admirable physique forged out of grit, hard work and determination. The trick for me was coming up with a compelling, creative way to really show off all of Josh’s hard work in the gym.
Research, Inspiration and Sharing With Your Team
If you’re anything like me, you probably have an ongoing collection of images with lighting that inspires you. One of the great ways to organize and share images with your team is with Pinterest. I have a fitness lighting board on Pinterest that I frequently update as I find amazing new images. Check it out for a look at what inspires me. Whenever you venture into uncharted territory or even if you just need a little inspiration, researching what’s been done before is a great jumping-off reference point. A Google image search is always my first stop.
Lighting the Subject
My concept going in was a series of images that appeared to be shot on a black background, but with the flexibility to project the white geometric shape you’re seeing in Look 2 onto it. This meant I’d need to use a white backdrop and make sure the only light hitting it was the one used to create the triangle shape and not the light used to illuminate Josh. Pulling Josh away from the background as far as I could helped create two zones that could then be independently controlled and lit (or not). I had two “looks” in mind, both similar in some respects but with enough differences to distinguish them. Both were about surfaces, shadow, highlight, volume and dimension, while Look 2 would incorporate the aforementioned geometric shapes to add a classical, heroic, Olympic flavor to the images and serve as a counterpoint to the shape of Josh’s body. For this, I asked Josh to hold a Swiss ball overhead, and I projected a triangle shape on the backdrop. The interplay between the sphere, triangle and the curves of Josh’s body created the look I envisioned.
I chose cross light as the foundation for my lighting pattern. You can’t beat it when it comes to carving and sculpting surfaces with highlights and shadows. Cross light also does a great job imparting drama. To create the lighting you’re seeing in Look 1, I used two stripboxes—a large one for the accent light and a medium for the keylight. These helped confine the beam of each strobe into a narrow shaft of light, and prevented the light from spilling onto the background. Aside from the white triangle shape I planned to project onto the background for Look 2, I wanted the background completely black or as close as I could get it.
In addition to its sculpting ability, cross light can serve as the keylight or accent light. This provides maximum flexibility and freedom of movement when posing subjects. With Josh facing the accent light, it becomes the keylight, and vice versa.
For Look 2, I used cross light with some important differences. I left the accent light strobe/strip box combo in place, and swapped out the keylight stripbox with a silver interior Mola Softlights Solo beauty dish. I did this to introduce extra punch and contrast to the light. I added a Profoto Zoom Spot to the mix to create the triangle shape on the backdrop. This is an amazing light shaping tool.
Keep in mind that with lights facing the camera, you run the risk of introducing flare, like there is on the left of Look X. Sometimes flare is the desired effect, but it wasn’t for this image. I used a combination of V-flats, flags and cutters to block the light spilling onto the background and into the lens. V-flats are 4×8 sheets of black foam, and flags and cutters are black fabric on metal frames available in various shapes and sizes.
Posing Considerations & Vantage Point
You’ll notice that I’ve posed Josh so that the side of his body, rather than the front, faces the camera. This accentuates the taper from his shoulders to his waist, and avoids a boxy look. One thing I always pay attention to is where the subject’s arms are falling. If they’re off the body and you can see the curve of the back and stomach, the effect is significantly more slimming. I shot the majority of the images from a low vantage point to heighten the heroic feeling I was after.
Post Processing
A successful lighting plan reduces the amount of work required in post processing—it’s the old quality-in/quality-out principle.
Here’s what I did to put the finishing touches on these images. Even with stripboxes keeping the majority of light off the background, there was still some spill light to contend with on parts of the background. To produce an evenly toned solid black background, I created a levels mask around the subject and adjusted the black point to uniformly darken it. I did this by using the Quick Selection Tool to create a selection outlining the subject. Next, I inverted the selection.
I then expanded the selection by 60 pixels, hit the Q key to create a red mask, blurred the mask using the Gaussian Blur filter set to 40, and hit the Q key again to switch from the red mask view back to an active selection of marching ants. This last step assured that the levels adjustment layer mask I was about to create would leave ample space around the subject and only affect the background. With my selection still active, I created a Levels Adjustment layer, which produced a mask automatically based on my selection, which I then inverted. Now I was able to use the black point slider in the Levels Adjustment panel to adjust the brightness of the background and not affect the subject. I used a soft brush, switching between white and black, to paint on the mask, adjusting any areas that needed it.
To retouch the skin, I used the Frequency Separation method and dodge and burn layers. Retouching Academy’s Beauty Retouch Panel helped expedite the process. My concept for these images was a moody, dramatic look. One of my go-to techniques for this is an effect known as “Bleach Bypass.” For this, I used Google’s Nik Color Efex Pro 4. I set the opacity for the Bleach Bypass layer at 30%, applied a sharpening action, and I was done.
Gear & Settings
I shot this series of images with the following camera and lighting gear:
- Phase One DF+ and IQ250 digital back
- Schneider Kreuznach 80mm LS f/2.8 AF
- Profoto 7A 2400WS generators and pro heads
- PocketWizard Plus III radio triggers
- 2 Elinchrom Rotalux stripboxes (large for the accent light and medium for the keylight in Look 1)
For Look 2, I kept the large stripbox for the accent light but replaced the keylight with a silver interior Mola Softlights Solo beauty dish for its added punch and contrast. I used a Profoto Zoom Spot to create the crisp white triangle shape on the background. I metered the keylight at f/16 using a Sekonic L-758DR flash meter, and set the accent light and Zoom Spot to one stop under the keylight, or f/8. I adjusted the output to taste from there.
I’m a big fan of shooting tethered. Whether you’re using an iPad, laptop or a monitor, you simply can’t beat a larger screen when it comes to critical analysis of your lighting, composition, wardrobe, and hair and makeup. Working this way also forces you to slow down and be more deliberate and thoughtful about what you shoot. That means you shoot less, and more of what you do shoot is successful.
I used the following to shoot tethered for these images:
- Eizo ColorEdge 24″ monitor
- Tether Tools USB cable
- Inovativ Scout 42″ Production Cart with optional monitor arm
As always, don’t get hung up on the gear. You can get close to what I’ve accomplished here using speedlights and other lower-cost tools. I’ve acquired these tools over a long career, and I use them day in and day out in a commercial environment.
The big takeaway here is direction of light, the shadows and highlights it creates, and its ability to sculpt surfaces like nothing else. So get out there and find some direction with your lighting. I can’t wait to see what you come up with. Post images on the ShutterFest Facebook page, and tag me if you’d like my two cents.