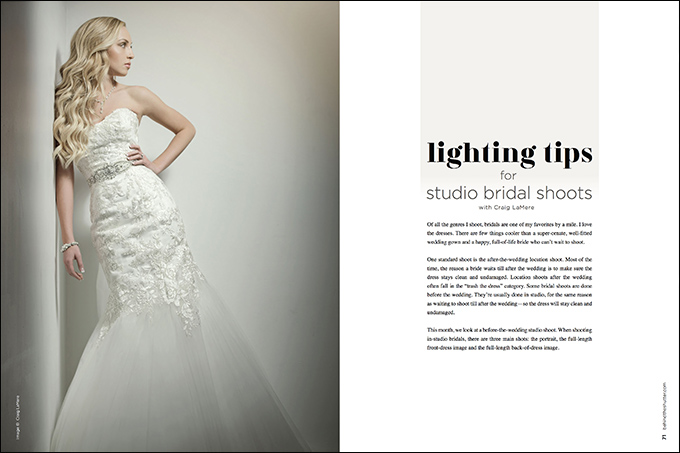
Lighting Tips for Studio Bridal Shoots with Craig LaMere
Of all the genres I shoot, bridals are one of my favorites by a mile. I love the dresses. There are few things cooler than a super-ornate, well-fitted wedding gown and a happy, full-of-life bride who can’t wait to shoot.
One standard shoot is the after-the-wedding location shoot. Most of the time, the reason a bride waits till after the wedding is to make sure the dress stays clean and undamaged. Location shoots after the wedding often fall in the “trash the dress” category. Some bridal shoots are done before the wedding. They’re usually done in studio, for the same reason as waiting to shoot till after the wedding—so the dress will stay clean and undamaged.
This month, we look at a before-the-wedding studio shoot. When shooting in-studio bridals, there are three main shots: the portrait, the full-length front-dress image and the full-length back-of-dress image.
The Portrait
When people think of bridals, the first thing that pops up in their mind is the dress. It’s important to bring your portrait skills so your bride knows the images are not just about the dress.
Before I place my light, one of the things I look for right away is the part in my client’s hair. One of the best ways to mess up a headshot when you are using directional light is to place the light so you are shooting on the side of the part, rather than shooting against the part. You do not want to shoot into the part because you will cast a very unflattering shadow on the forehead. Put the light on the opposite side, and you will be good. I love it when I have a client with a middle part because I can shoot to whatever side I like.
The next thing you are going to do is place your light for your shoot. The placement is determined by the mood you want to create. If you want a more formal type of portrait, consider a Rembrandt pattern, which is a short light pattern. If you are shooting more bright and light, you more than likely will shoot a loop pattern so you can get plenty of light in both eyes but still have some direction to the light for some shallow depth.
The other pattern I would use on a bride who wants a lighter feel is a butterfly pattern. Like the loop pattern, butterfly puts light in both eyes and also provides depth. Unlike the loop pattern, the depth is from on top rather than from the side.
My favorite for bridal portraits is the loop. The entire face it lit and there’s great light in both eyes. It’s the most foolproof pattern.
The Full-Length Dress
Some brides spend pennies and other brides spend fortunes on their dress, but they both want their dress showcased in the best possible way. Think of it in the exact opposite way as you would think of shooting a portrait. When you think of lighting a portrait, you are thinking of the most flattering light. If you are shooting a face that has a lot of unflattering details, like wrinkles or very textured skin, you don’t want to light the face in a way that accentuates those details. Pick a lighting method that flattens out the textures. When you are shooting a bride’s dress, bring out as much detail in the fabric as possible.
When shooting the dress, I shoot very directional light on the fabric, which makes the dress sing. At the same time, you still have to shoot flattering light on the bride so she looks great as well. It can be tricky using one light, and in a lot of cases, it is best to use a two-light setup. The reason for two lights is that you can light the face the way you want with a pattern that is flattering to your subject, and then use a different pattern on the dress.
If you are going to shoot one light, use a larger light source, like a 4×6 softbox, and feather it a lot to get the light scrim across, or shoot at least a 60-inch a strip light. I have a pretty hard rule on strip lights: They need to be shot with a grid attached, but this is one of the exceptions to my rule. I like the grid off the strip light because now it functions like a skinny softbox. I am able to wrap the light around the face, and at the same time I get directional light to bring out the detail on the dress. If the light is getting a little dark on the shaded side, I bring in a V-flat or other reflector to help bring back some of the detail.
I prefer a two-light setup. The light on the dress should be a strip light with the grid attached, but the second one is a matter of taste. If you want a softer look, you could shoot the face with a 2×3 softbox. If you want a little harder look, you could shoot with a 22-inch beauty dish. If you want a hard look, you could shoot with a snoot.
The setup for the two lights is pretty simple. You want to make sure you have both lights on the same side, or you will get conflicting shadows. The biggest challenge of the setup is making sure the light from the strip and the light from whatever mod you choose meter the same or very close to the same value. Let’s say you used a dish and the bottom of the spill from it metered f9. You would want to make sure where the strip was hitting is registering f9 as well. The strip can fall off as much as it wants after that; just make sure it is a match at the intersecting point.
Whatever pattern you choose for the main light, put the strip light to the side in a position like you would if you were going to split light. What you are trying to do is bring light across the fabric of the dress, to fill in every little nook and cranny to bring out all the detail in the dress.
Full-Length Back of Dress
When I’m shooting the back of the dress, I use one light. It’s a lot easier to light than the other two setups. You’re not dealing with the face of your bride, so you have a little more wiggle room.
I want to make the dress look as long as possible. It needs to be bigger than life. I distort the dress with lens choice. If you shoot the dress with an 85mm, it will be scaled to proportion and just okay. I shoot the dress like this so I make sure I have covered my bases. Shooting from a low angle in an upward direction at 24mm lengthens the dress and creates a dramatic, larger-than-life effect.
My style showcases a combination of directions, both upward and downward, using wide-angle lenses. The one pitfall of this combination is making sure you are at an f-stop that gives you some leeway, or you can lose the focus you want. Because you are shooting at 24mm, you don’t have a lot of depth-of-field issues. As long as you are shooting at f4 or more, you should be good.