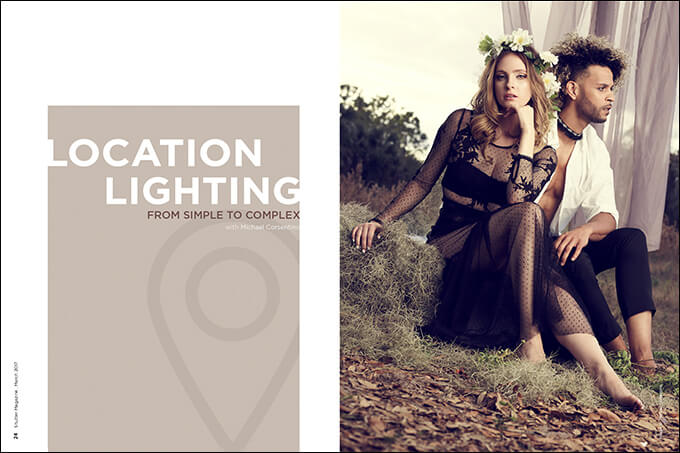
Location Lighting: From Simple to Complex with Michael Corsentino
Want more information on this article? Get access to video content and additional supporting images. Launch the March issue of the magazine by logging in or signing up for a free account by clicking here. Shutter Magazine is the industry’s leading professional photography magazine.
For me, anything beyond one light and a small modifier starts to fall into the complex category. Additional lights mean more stands, more sandbags, more triggers, more grip equipment, more assistants, extra time to set up, additional transportation logistics and permits. I opt for simple, especially on location. Sometimes, though, the shoot demands more complex solutions or a combination of simple and not so simple to get the job done.
In the shoot for this article, I was asked to photograph a spring fashion editorial on location for a high-end boutique. The location was a park. This required a lighting plan that would accommodate whatever the location threw at us the day of the shoot. Despite weather forecasts, you never know exactly what Mother Nature has in store for you. Conditions the day of the shoot can be anything from cloudy and overcast to harsh overhead sunlight or dappled light. You just never know, especially in Florida, so being prepared for all possibilities is key.
With that in mind, I put together a lighting plan that allowed me five options. The first tools on my list were a large 74-inch octabank with an 8×8 scrim. I chose this combination because I wanted to create a soft quality of light for some of the looks.
The general rule of thumb is the larger the modifiers, the softer the light they produce. When you’re working on location, a scrim or even a small collapsible diffusion panel can be indispensable for taming harsh overhead sunlight. Scrims and diffusion panels can also be used to create large softbox-like light panels used to diffuse either natural light or a strobe fired through it. I used a strobe for my keylight in conjunction with the octabank. I also chose a second strobe with a 7-inch silver reflector. I planned to use this second strobe with a color temperature orange (CTO) gel as an accent/rim light intended to replicate the warm specular light from the sun on my model’s hair and shoulders. I added this light in case conditions were overcast, which they were at several points during the shoot.
Along with four C-stands, grip heads, sandbags, triggers and other miscellaneous bits, the above equipment made possible four stationary lighting arrangements. I also wanted a setup that was flexible and mobile, something that would allow me to work quickly and easily, move the models from one location to the next, to shoot full figure and three-quarter images. For this, I chose my go-to setup, an Elinchrom 27.5 Deep Octa and Quadra pack and head system. This 400 watt-seconds head has more than enough power for the kiss of light I needed, with lots of juice to spare. Equally important, it’s super lightweight, which makes it perfect for use on an extension.
The five lighting options I put together were as follows: scrim and octabank, scrim and octabank with gelled accent/rim light, scrim with strobe fired through it, scrim alone, single lightweight strobe and small modifier on an extension pole.
When you’re working with a combination of strobes and ambient light, you have two sources of illumination at work. Each of these needs to be controlled independently. This is easily accomplished using camera settings and the power output control on your strobes. Once you’ve locked in the aperture setting you want, one that produces the desired depth of field, you’ll need to adjust the remaining exposure settings to achieve a balanced exposure. In other words, an exposure that is neither underexposed nor overexposed. In a fully manual situation, which is my preferred workflow, you’ll use shutter speed, ISO and the power control for your strobes to control this balance. If TTL is your preferred exposure method, you’ll also have flash exposure compensation control in the mix. Find this on your camera body or on your strobe’s compatible TTL-enabled wireless trigger.
With respect to which settings control which light source, ambient versus flash, remember these simple guidelines: Shutter speed controls the amount of ambient light contributed to the exposure, while aperture and the flash power control how much light is contributed by the strobe. In ambient light/flash scenarios, where ambient light is generally the dominant light source, flash serves as fill light and is therefore not the dominant source. In practical terms, this means when you’re making adjustments to create the desired balance between flash and ambient, you’ll use slower shutter speeds to increase the overall brightness of an exposure or faster shutter speeds to knock down the ambient light and create a more dramatic exposure.
I’m always looking for ways to keep things as technically simple as possible. This way I can focus on being creative rather than worrying about gear. One of the great things about shooting as sunset approaches is that you can use the sun as a warm-toned, specular accent/rim light for the hair and shoulders. For the images I shot later in the afternoon, in a meadow of dry grassy reeds, I didn’t need to introduce a second strobe and CTO gel because at this time of day, the sun was perfectly positioned and had the lovely orange contrasty glow I wanted for the accent light. Earlier in the day, I had to set up a second gelled strobe to create this effect. Always keep in mind that at the right time of day, the sun makes a fantastic accent light.
And when it comes to keeping it simple and still creating gorgeous pro-level lighting, nothing beats one light and a small modifier on an extension pole. Working this way provides maximum flexibility and allows you to move quickly from one location to another without ever lifting a light stand. Using an extension pole to hold your strobe also avoids any of the potential hazards of people tripping over light stands. Using this setup as your sole lighting solution avoids the necessity of a permit in many municipalities. Maintaining proper exposure is as easy as keeping the distance between the strobe and your model consistent once you have your exposure locked in.
Just as important as knowing when to turn on your strobe is knowing when to turn it off. If Mother Nature is giving you gorgeous light that’s consistent with your creative vision, use it. It’s always going to be equal to or better than what you create with artificial light—and, again, it simplifies things. Even in situations where the sun isn’t giving you ideal light, you can modify it using a scrim or diffusion panel to create beautiful soft light. That’s why I always have a scrim with me for location work. This tool diffuses the sun’s harsh light and also softens and broadens it. Smaller diffusion panels can be used, but in this case, size does matter. The larger the scrim, the broader the source; the broader the source, the softer the light.
When you’re working on location, lighting conditions can change at a moment’s notice, and you need to be able to accommodate those changes and keep shooting. The technique above, in which I used a scrim to create soft natural light, works perfectly when the sun is cooperating. But what happens when the clouds roll in and cover up the sun? Now you’ve got an overcast situation without bright sunlight for the scrim to diffuse. In this case, you can simply substitute one or more strobes behind the scrim to create a light source with even coverage. I did this using a single strobe.
Just be careful of the wind, which can become a major issue. A windy day can wreak havoc on scrims, octabanks, large reflectors, etc. To keep your gear from blowing over and your talent safe, you’ll want multiple sandbags on each light stand. Even with sandbags, it’s best to have assistants to mind larger modifiers in case the wind picks up.
Want more information on this article? Get access to video content and additional supporting images. Launch the March issue of the magazine by logging in or signing up for a free account by clicking here. Shutter Magazine is the industry’s leading professional photography magazine.