
The process for ensuring a photo shoot goes according to plan involves three key ingredients: concept, wardrobe and location. In this article, I dive into locations and the tricky business of planning properly so there are no surprises the day of.
Last August, we flew out to San Francisco to shoot Lenny and Melissa Volturo’s wedding. This was a two-day event for us—we decided to keep the first day dedicated to their ceremony and creatives in San Francisco so we wouldn’t have to rush before their reception that night. We knew we wanted to spend day two focusing on epic images. We had an entire day to shoot, so I started my research with Google, using phrases such as “San Francisco unique architecture,” “San Francisco nature,” “abandoned San Francisco”—the list goes on.
Once I found something that looked interesting, I checked the tags on the image or original post to find the actual location. If tags were not available, I took a screen shot and dropped it into Google Images. Give it a try; it’s amazing how easily you can find the exact location from an image. I also use the site Panoramio.com, which gives exact coordinates of locations, and shows the perspective from where images were shot and even technical details like camera/lenses/lighting.
At this point, I had my top five spots selected and mapped out so I could pitch the ideas to Sal in a way that would enable him to make an intelligent decision (with info like drive time, time of day, etc.). Once he narrowed our locations down to his top three, I was able to run with everything to make sure he didn’t have to worry about any of the details on the day of the shoot. After all, his job is to create incredible images; my job is to make sure nothing gets in the way of that.
PLAN DILIGENTLY
Piss-poor planning from the beginning will inevitably result in complete disaster. Unfortunately for our team, it took a lot of resistance, too many last-minute canceled photo shoots and a lot of unnecessary tension for us to realize we needed to get better about having all our ducks in a row from the beginning. We simply don’t have the time anymore to waste on shoots that aren’t 100 percent solid and will fall apart the second one piece of the puzzle goes sideways.
Do your research. Sure, that exotic location you found on Google seems like the most magical place on earth—which is normally your first red flag. Something that seems too good to be true usually is. That’s where the diligence and attention to detail comes into play as you’re planning out the day. First step: Make sure the location actually exists. I know it sounds crazy, but I can’t tell you how much time I have wasted trying to find a place that was created in Photoshop. (Google “purple trees Isle of Skye” and imagine my disappointment when I found out this place wasn’t real while planning our trip next month.)
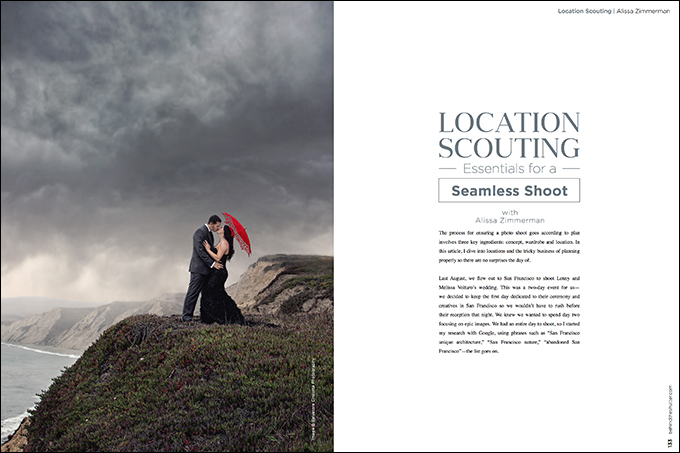
Blogs can be your best friend when you’re figuring out how to actually get to these off-the-beaten-path spots you have your heart set on. If you find what appears to be a remote location, you had better read as many tips and reviews of said location to make sure you understand what you’re getting yourself into. One of the three spots we chose for Lenny and Melissa was the edge of a cliff at Point Reyes. After tons of research, I found out that the specific scene we saw in images when searching “Point Reyes” in Google is a spot that would have taken us an additional hour to get to (hike time not included).
Ah, hiking. This brings me to my next point: permits. Anytime you are planning a shoot in any kind of national park, always assume you will need a permit. These are not the types of locations to wing it and hope you don’t get kicked out. As a rule of thumb, we do whatever it takes to get a permit. And don’t be fooled: Nine out of 10 times, park employees will give you the run-around for months before granting you access to shoot in their beloved space. Don’t let it discourage you. This is their process. Stay persistent if this is a location you’re dying to shoot in.
BE REALISTIC
Once everything is in line and you have a solid concept, it’s time to start mapping out the day and timeline of events. Do you want to shoot during the Golden Hour? Depending on the time of year and your location, that time of day could be anywhere from 4 p.m. to 8 p.m. What’s your plan if it’s a gloomy day and there is no sunset? These are all things you need to think about when planning your location.
For Lenny and Melissa’s shoot, Sal originally wanted to shoot the abandoned shipwreck in Inverness last so we could have a dramatic shot of the two of them on the boat at sunset. After showing him the map (showing where we were coming from and where we wanted to go), we agreed that it made sense to do that shot first, the Tomales Bay State Park tree shot next and then end on the edge of the cliff at Point Reyes.
When putting together your timeline for the day, don’t overlook the basics: drive time (actual and with traffic factored in), time to eat, hair and makeup (touch-ups and changes in looks), wardrobe changes, loading/unloading of gear and, most importantly, getting dialed in once you arrive at your location.
UNDERSTANDING ALL OF THE ELEMENTS
Everything mentioned above sounds great in theory—until something doesn’t go according to plan and you’re left scrambling, trying to make things work. For us, if we’re ever in a situation where we are left trying to make things work, we know we will be focusing on all the wrong things instead of the only thing that should matter: getting the shot and getting it right.
As nice as it would be to find remote locations with no one around, sometimes it’s just not possible, like when the shot you’re looking for is one with crowds of people surrounding you. You have to have a Plan B (and Plan C, D and E just to be safe). Can the random intruders in your shot be edited out? If not, change your perspective so they can be. Do you have time and/or the ability to get everyone in the crowd to sign a release so you can use that image legally in any kind of promotional work? If not, shoot the scene in a way those people can be blurred out in the background.
Understanding lighting in any given scene is crucial to the outcome of your shoot. Ideally, you should be looking for locations with plenty of open shade to work with. That’s not always possible, which is why it’s important to have the right gear to compensate when you run into lighting issues on location.
For Lenny and Melissa’s first two locations, we knew it was a gamble. Both spots were tourist destinations, so we ran the risk of showing up and not being able to shoot. Luckily, both spots were completely empty, but you should always be prepared to pivot when that isn’t the case.
If there’s one thing to take away from this article, it’s that preparation is the key to success when finding and planning locations. Understanding the things that can go wrong and having a plan when they do is the only way to ensure you’ll have a shoot where you can focus on the task at hand without any unnecessary distractions.


This Post Has One Comment
Love it, simple, straight forward, well written and soooo on point!!! Always better to learn through someone else’s experiences and mistakes, especially when carrying a ton of gear, wish i read this years ago before my first location shoot lol,
Great job Alissa