
Michael Anthony – Turning the Ordinary Into Extraordinary
Wedding photography is a competitive field. In addition to the challenges of excelling in a saturated field, wedding shooters often find themselves in situations where they seemingly possess little to no control of their surroundings.
In order to excel in your business, you have to be able to provide your clients with creative consistency and a unique final product, no matter the situation. Fortunately, there are many tools that often go unused on a wedding day that can be found in our natural surroundings.
Get the Light Right
In order to overcome challenges when shooting bridal prep, you often have to think outside the box. When I walk into a bridal suite, the first thing I am looking at is the light. Often a bridal suite is full of clutter and people. When I arrive, I turn off all the ambient light in the room, and then begin to add light where I need it. I look for strong directional soft light with a darker background.
This bridal suite had a huge window that allowed light to spill out in all directions. By closing the curtains and using them as a snoot, I was able to create the darker background and directional light I was looking for. This gave me a basis to shoot some of the prep scenes. Once your light is right, you can get creative.
Do not be afraid to use external lighting to complement the ambient light. The light in this room wasn’t perfect, so to create a gorgeous bridal shot, we used a large octabox and a Profoto B1 positioned close to our subject, with a reflector opposite to fill in the shadows. For a background, I found some furry pillows in an adjacent room and had our bride lay down on the bed. I then positioned the pillows around her and posed her in a way that showcased her curves. I stood above the model to give the photo an interesting angle. (When posing a model with her arms above her head, be careful to cover areas like the armpit, and always turn the face into the light.)
Tips for Getting the Light Right
- Turn off all of the ambient light in the room. Don’t be afraid to ask for permission to do so. Add light back where you need it.
- Use curtains as natural light modifiers. You can create a snoot or use the backside as a reflector.
- Bring the proper tools for the job. Better to have something and not need it than to need something and not have it. You can purchase an affordable Yongnuo off-camera speedlight system if you are just starting with OCF. Use portable light modifiers to soften the light on your subject.
Shooting Through Objects
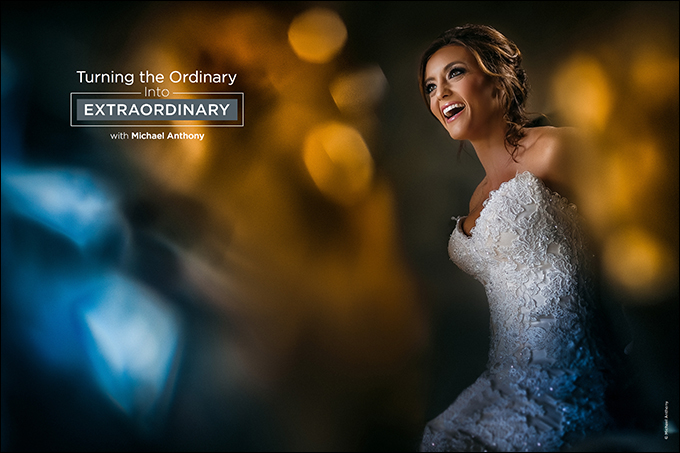
One of my favorite techniques for removing a subject from a distracting room is to use a colored semitranslucent object to shoot through. During this shoot, I found a soap dispenser and a toothbrush holder in a room next door. Using these two objects, I framed my subject and waited for the right moment to take the shot of her. A video light was held by the makeup artist to give the bride’s hair some separation from the background. Remember, a great photograph is always going to be about light, composition and the moment. To nail all three elements takes patience, and it’s always worth it.
When shooting through a translucent material (glass, water, leaves, etc.), using a bit of light on the backside of the object will cause its colors to pop, and will also sometimes cause a reflective pattern to appear. During the wedding day, there are many natural elements you can shoot through, but it’s also a good idea to keep some in your camera bag just in case. Prisms, colored crystals and even flash gels are easy to carry with you.
Tips for Shooting Through Objects
- This technique can be applied anywhere on the wedding day. It often produces a candid effect. Make sure your pose is not camera-aware when shooting through something.
- By backlighting your shoot-through object, you will produce a very unique effect. We use this technique during receptions when using off-camera light by shooting through beer bottles/wine glasses.
- Carry a variety of objects with you in order to give your patterns some diversity.
- This technique blends really well with strong directional light, producing an inconsistent highlight-to-shadow pattern. Use off-camera flash to give your subject dramatic lighting.
- Veils make awesome shoot-through objects. Experiment with different veil techniques.
Using Reflections
I admit I have an uncanny obsession with finding reflections on the wedding day. They add such an interesting dynamic to a photograph’s composition, and always scream creativity to a client who has no idea what you are doing when you are framing a shot.
Reflections can be found in more than mirrors. Some of the best natural light comes from reflective surfaces that also produce light. When you are shooting on location, these scenes can be found on lit-up bus stops, movie posters, etc. But they can also be found in almost every bridal suite as well, namely through the television.
The natural light in this room was incandescent and dark, but I noticed the TV hanging from the wall. I flipped it on and asked the bride to stand very close to the screen. I posed the bride close to the screen so the light source was large in relation to her body from the perspective of my shot. Through my lens, I was able to see the reflection. A solid color being displayed on the monitor would work best, but, as with most weddings, we rarely get control over such things. By taking multiple frames, you will find that eventually the light will be right. If done correctly, you will have beautiful light on your subject and a unique perspective that lends itself to your style.
Don’t be afraid to use the natural light in your surroundings as well. This same room had almost no ambient light, except for two very large industrial-looking lamps. I positioned our bride very close to the lamps to soften the light as much as possible. By shooting at a wide aperture and a higher ISO (F/1.4, ISO 1250), I was able to suck up enough of the ambient light to create a good exposure. This shot required no additional lighting. Again, by using a reflection, I was able to create a dynamic portrait using the light available to me.
Tips for Using Reflections
- Reflections can be found anywhere, not just mirrors. Look for water, reflective tables and windows.
- Go outside and use the reflections in a window to frame your subject. By using a flash on your subject inside, you can essentially spotlight the subject and still keep your reflection outside.
- Using good light on your subject makes your reflection more prominent; conversely, the darker the subject is lit, the less obvious the reflection will be.
Getting the Signature Bridal Shot
Your bride has spent hours upon hours researching the perfect dress. It is essential that you photograph her alone to showcase this important decision. Just as you would when photographing a couple together, you must take the time to create a signature art piece of the bride alone.
Remember, if you want to charge more for your work, you have to do something that your competitors are not doing. For us, it’s the way we use light. Whether it’s natural light, flash or a combination of the two, our style incorporates the use of creative lighting to create a distinct look for our clients. I highly recommend stepping out of your comfort zone and experimenting with off-camera flash.
This venue was a Victorian mansion. Because it was so beautiful, incorporating the architecture was essential. I positioned the bride on the stairs with her back to me so I could see the details in her dress as the train cascaded over the stairs. I then used a Profoto B1 with a zoom reflector off-camera to the right, exactly opposite the sun, thereby sandwiching the bride in a combination of ambient light and flash. My assistant held the light on a monopod and angled it downward. By having two directional light sources, texture was created on the dress and a dramatic lighting setup was complete. I then framed our bride to showcase the venue, her dress and her overall shape and beauty. I cannot stress how important it is to get these shots. Take a combination of horizontal and vertical shots to allow for easy positioning in the wedding album.
Tips for Getting the Signature Bridal Shot
- Use dramatic lighting or other unique techniques to set yourself apart from your competition. Remember, this is portfolio time, and these are the images that your potential clients are using as a basis for deciding whether or not to hire you. Do not waste the opportunity to create unique photos and set yourself above the crowd.
- Use creative post-production to further enhance your imagery. These tools are extremely useful for creating a distinct style. Post-production can be used to create a clean and airy edit or a dark, dramatic scene. If you are not good at post-production, then by all means, outsource. We use Evolve Edits for our entire post-production workflow, and they will work with you to accomplish any look you want.
- Showcase all of the wedding details, but most importantly for this image, focus on the gown, the venue and the bride. Your shot needs to take your client’s breath away.
- If you nailed it, feel free to show the client the back of the camera to help build her confidence and trust in you.
- Try to create motion in these images. Have the bride swing her train, throw her veil or run through the scene.
These techniques are meant to open your eyes to a different way of shooting. They are not meant to change your style as a whole, but to give you additional tools you can keep in your camera bag whenever you need to approach a situation in an uncommon way. There are many ways to distinguish your style, and finding the right combination is something that will come with time, dedication and practice.


