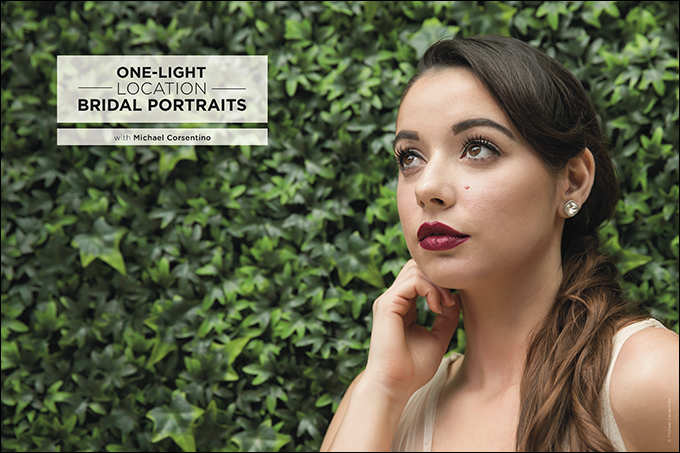
Michael Corsentino – One-Light Location Bridal Portraits
There’s no perfect camera-setting recipe for every scenario. Every situation is different. The guidelines here will help get you in the ballpark and arm you with the knowledge you need to make informed decisions. Knowing why and how is the most important concept to master.
Finding the light
One of the first things I look at when creating bridal portraits that I plan to augment with flash is the overall ambient light conditions. “Ideal” shots are typically in open shade or are backlit, but side-lit scenarios are what I’m looking for. These allow me the flexibility to work with even light and then add flash at whatever strength fits the desired mood for the images I want to create. If a harder look is more to your liking than contrasty, natural lighting conditions might serve you better as your starting point. But for this shoot, I wanted to create a flattering, natural-looking blend between the available light and fill flash.
Don’t overlight
Resist the temptation to overlight your images (unless that’s what you’re going for). Just because you can doesn’t mean you should. Sometimes a bold lighting statement that says, “Look at me, I’m artificially lit” is what you want because it really makes your image sing. Other times, it can end up being a major distraction or, even worse, looking amateurish.
During ShutterFest, I noticed a tendency toward overly lit images among many of the electronic print competition entries. I get it: When you’re getting started with off-camera lighting, it’s easy to get carried away with the excitement and wow factor flash can bring to an image. But remember the mission of your image, and be true to that with your lighting. Let subtlety rule the day. Think of lighting like salt when you cook. A little boosts flavor, while too much ruins the dish in a hurry.
Balancing flash and ambient light
Understanding how to balance flash and ambient light is a challenge for many people getting started with off-camera flash. Let’s break it down to its simplest terms. With ambient and flash contributing to the same exposure, you’ve essentially got two separate zones or sources of light you’re working with. Each of these sources requires independent control to achieve the desired result. You may want less ambient light for a dramatic day-for-night look, or maybe it’s a subtle fill flash you’re after.
Independent control of flash and ambient is easy once you know how to do it. The camera controls you’ll be focusing on the most are shutter speed, aperture and ISO, and flash exposure compensation in the case of speedlights and TTL-capable strobes. Remember that aperture controls the amount the flash contributes to the exposure, while shutter speed controls the amount that ambient light contributes. In the event you’ve set your desired aperture and want less or more flash, you’ll use flash exposure compensation to control the flash output (speedlights and TTL-capable strobes). ISO controls the impact, or sensitivity changes, that aperture and shutter speed will have overall.
Step by step: Determining your exposure
Whether you’re working in manual or TTL, the workflow is the same. The first thing you’ll need to do is establish your ambient exposure, which provides a solid starting point for your image. I recommend doing this before ever turning on a speedlight or strobe. Dealing with one variable at a time is much easier than starting with both ambient and flash at the same time. During this first step, you’ll decide how much ambient light you want contributed to the exposure.
As previously outlined, slower shutter speeds deliver more ambient light, while faster shutter speeds deliver less. In other words, if you’re looking for a natural-looking balance between daylight and flash, you’ll want to choose a shutter speed that maintains detail in the sky (if you have one in your shot) but that isn’t too underexposed. Depending on conditions, this is typically achieved by deterring the balanced exposure reading provided by the camera’s meter and then slightly underexposing by a half to a full stop. Conversely, if you’re looking for a moody dark-sky look, you’ll want to underexpose your ambient exposure by a full stop or two, maybe more. In many cases, trying to achieve this look will cause you to quickly exceed your camera’s maximum sync speed as you boost your shutter speed to bring down the ambient light contributed. This is when high-speed sync (HSS) saves the day.
Keep in mind that because of the way HSS works, you can expect a serious reduction in the output of your speedlight/TTL-equipped strobe. You may need to gang up several speedlights/strobes to maintain the power output you need. High-speed sync allows you to exceed your camera’s maximum sync speed so you can substantially knock down the ambient in an exposure using shutter speeds up to 1/8000 of a second. Most cameras’ sync speeds are somewhere between 1/125 and 1/200 of a second, so you can see just how much flexibility HSS gives you.
In the event you’re working with manual strobes or manual speedlights and you’ve reached your maximum sync shutter speed, you’ll need to rely on stopping down your lens to reduce ambient light while also boosting the output of your strobes to compensate for the overall loss of light reaching the camera’s sensor. I’ll be writing more about additional ways to use HSS in upcoming articles.
Using a light meter to determine % of flash
One exceptionally fast and accurate way to determine the balance between the flash and ambient contributions in an exposure is to use a handheld flash meter. My meter of choice is the Sekonic L-758DR for a number of reasons. One of them is its ability to provide a numerical reading of the percentage of light being contributed by my flash. For example, if my meter told me that 20% of the light in my exposure came from my flash, it would easily follow that 80% of the exposure came from the ambient light in the scene. This is important because by knowing the effects created by using different percentages of flash, you can determine the overall look of the exposure and know when to use one percentage over another.
Basically it works like this: 20% to 30% flash provides a nice natural fill light, 50% flash creates a 1:1 relationship with ambient, and 70% to 80% will overpower the sun. This method provides quick feedback and an easy-to-use shorthand for creating the balance you want. These images are right in that 20% to 30% fill flash range.
Lightweight, portable tools
The right tools make all the difference. This is especially true with weddings and location work. In general, I’m looking for lightweight, supercompact and easy-setup/tear-down tools. My go-to for this type of scenario is Lastolite’s line of collapsible softboxes, octabanks, reflectors, diffusors and extension poles.
For this shoot, I used the following equipment:
- Lastolite Ezybox II Medium Octa 31.5″ Softbox LL LS2720 to provide a natural-looking circular catchlight and plenty of soft light due to its internal and external diffusion panels.
- Lastolite Ezybox II Speedlight Bracket LL LS2701 so I could gang up two flashes in the event I needed more power.
- Lastolite Non-Rotating Extending Handle (29″ to 91″) LL LS2453 for on-the-move shooting where light stands don’t apply. (I don’t mean to sound like a Lastolite commercial. There are plenty of great options out there, but these are just the tools I use.)
Feathering your light
You don’t need a ton of lights to create beautiful location portraits. You just need to know how to control the tools you have. These portraits were created using just one speedlight and a collapsible octabank. When it comes to controlling the softness of flash, one must-have technique is feathering. The great thing about softboxes and octabanks, unlike umbrellas, is that they have a definitive edge where the light output begins to fall off. This falloff actually starts from the center of a softbox/octabank, where there is a hotspot of light, and moves outward toward the modifier’s edge and beyond. This is where the light becomes much softer and “feathered.”
It’s this range outside the middle of the softbox/octabank where you’ll find the ultimate soft-light sweet spot. Work the edges of your lights rather than the middle for the best results. Aim them slightly past your subjects for the softest light. This way, they’ll fall into the softer, feathered part of the light rather than the harsher hotspot in the center.