Nanlite PavoSlims Photoshoot

Are you ready for a rooftop photoshoot using the NEW nanlite PavoSlims? These lights are powerful and QUICK to assemble. During this fashion portrait session I show you how-to use these lights to illuminate (fancy word) the building and light up our subject to create very dynamic lighting and a unique look. What makes this look unqiue? We are literally transforming what the naked eye sees by using colored lighting. And best of all, because the lights are so quick and easy to set up – we were up and running in no time. Try that with flash photography! In this tutorial, you will learn some portrait lighting and how we set up composition.

Equipment Used:

Team:

Photographer: Sal Cincotta 
Model: Rachel James
Hair & Makeup: Brandi Patton, ReFine Beauty

What’s up everyone? My name is Sal Cincotta and tonight I’m excited because we are checking out the brand new Nanlite PavoSlim 60 and 120. So we are doing a fashion shoot on the roof and I’m super excited about these brand new products from Nanlite. It is their PavoSlim unit 60 and 120. So you’re going to notice that the lights have either a B after it for bi-color, which means we can control color temperature, or C for color, meaning we can control color through the RGB gamut.

And so for tonight, I’ve got this idea in my head. It’s nighttime out; flash isn’t what I want to be using here because I need what you see is what you get. And so what I’m using is on our main model, Rachel. We are going to use the 60B and we’re going to set it to daylight, so I’ll set it to 5,500. It’s a nice, square, soft light source. And then, what we’re going to do to light up the building, this is what I’m most excited about, we’re going to use the 120Cs for that, so that we can control RGB color. So I’m thinking we’re going to throw teal up. She’s wearing a gold outfit, but we’ll be able to mess with it.


What this allows me to do is something I don’t want to say I couldn’t do with flash, but it would take a really long time to get dialed in with flash. Most exciting part of these units is they accept two battery types: one is a V-Mount, so anybody who’s working in cinema typically has a V-Mount battery; or L series battery. They handle either one., so whatever you have access to you can use. So it makes it super easy to use. Of course, you can plug them in as well, but I’m going on a rooftop and so on the roof I’m not going to have access to power. So we’re going to use that battery source, use the 120s to light up the side of the building and use the 60 to fire 5,500 and illuminate our subject with it, so super excited.

Follow along on this photo shoot we’re going to get some really killer stuff, but watch how easy it is for me to get set up and get this thing going no matter what time of day or night nor the temperature because it’s pretty cold up there. So let’s get moving.

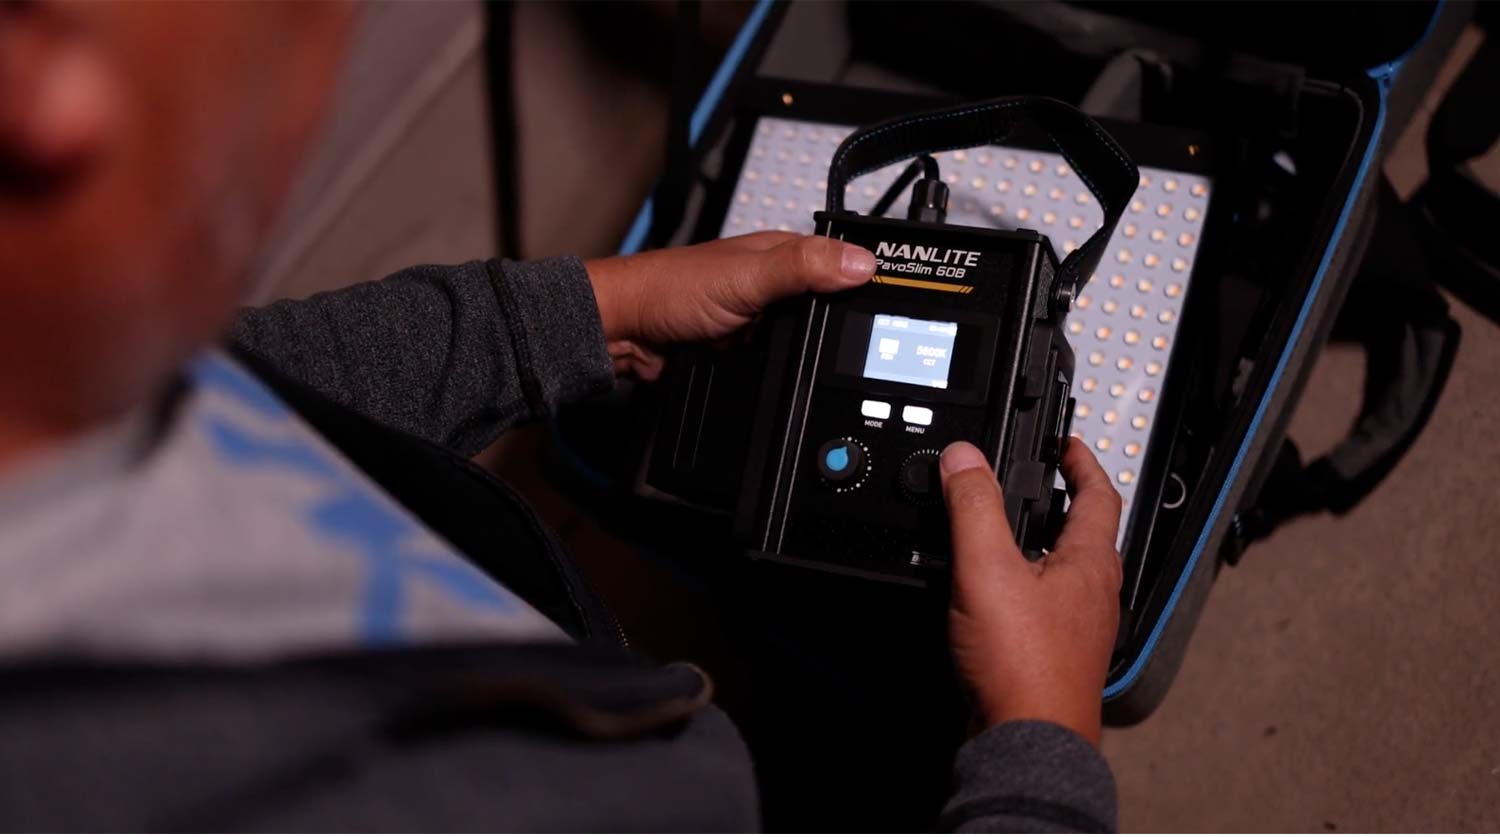
Oddly enough, to light this, we’re using a Nanlite on Nanlite PavoTube. Got this. Super easy to set up here. Snaps in, locking ring, and then what we’re going to do is use the L series batteries. We could use a V-Mount here as well, but I’ll save the V-Mount for the larger light. Turn this on. That’s only at 50%, so we’re going to dial this down to 10% and we’re going to be at 5,600, so you can see how easy it is. LCD screen readout; you got your battery showing you your battery levels; 10% dim. We can change color temperature as well moving up in 100 all the way up to 6,500, so we’ll do this at 5,500.

All right, so this one’s already set up. If I want to soften this… Now let me turn this off. All this stuff comes with it. Super easy to get set up. Locked in, so it could go on a light stand and then we’ll soften this light up. I don’t want it to be too harsh. Like I said, as you can see, these are brand new, so couldn’t be more excited for these to use. I just think lights like this really give you a lot of freedom to do what you want to do with. So you can have some inner baffling, outer baffling, and then this is just going to wrap around the Velcro. Again, super easy to get this set up.

Settings: f/2.8 @ 1/25, ISO 400
Settings: f/2.8 @ 1/30, ISO 400

So now that we got that set up, we can use some inner and outer baffling. We’re just going to use one layer of baffling here and that’s first light set up. So now, we’ll put that here. Now we’ll get the 120 set up and the 120s are the 120C. We’re going to use that for color. And again, I love these cases – makes it super easy to work with, travel with, throw them in the car, power out, but it’s just truly incredible.

All right. Now for this, we’re going to use a V-Mount battery. Guys, slap that in there. We are going to use battery power for this, so again, very, very versatile light. Snaps right in and then this is going to go into the panel. These are cool. Look at these soft boxes. They just release and they get big, so you could use these on commercial sets. You can use these for beauty portraits, headshots – super practical, easy to use and break down.

Once you set them up, you don’t have to un-Velcro them at all, but I’m going to lay these down for this particular shoot because of the way I want them and fire it up at the building. So for this, we’re going to power it on. It’ll also do color temperature, but we want RGB mode, so we’re going to go into RGB. And now, we can control red, green, blue values: 100 green, 60 blue, guys. So we’re going to use that and fire that up at the building. That looks pretty fricking cool. Next light. For anybody wondering, it is very cold outside right now.

Settings: f/2.8 @ 1/100, ISO 1600
Settings: f/2.8 @ 1/320, ISO 1250
Settings: f/2.8 @ 1/200, ISO 1600

Super quick to get this set up. If I had to give you a perspective of time, I would say from being zipped in the box to completely set up, we’re probably in that five to eight minute range. Probably felt a lot longer for everybody because we’re freezing to get his done, but it is definitely illuminating the building. You can see how we’ve now illuminated that building. This is all our light in this. This has nothing to do with any ambient that’s out here. Super cool. All right, let’s get Rachel.

Settings: f/2.8 @ 1/125, ISO 1600
Settings: f/2.8 @ 1/80, ISO 800
That is a wrap. Needs to be a wrap. Rachel, get your blanket on. Oh, my gosh. All right everybody, that is a wrap. Love, love, love these lights. Rachel was an absolute trooper. She did great, but you’re seeing how with these lights we are really able to shape, create dab, create color, and just create a feel and mood that you cannot do that quickly with any other type of light. So hope you love the video. We’ll see you in the next one. I got to go get warm.
Settings: f/2.8 @ 1/320, ISO 1250
Settings: f/2.8 @ 1/30, ISO 400
Settings: f/2.8 @ 1/80, ISO 800
Settings: f/2.8 @ 1/125, ISO 1600
Settings: f/2.8 @ 1/100, ISO 1600
Settings: f/2.8 @ 1/200, ISO 1600

Leave a Reply

Want more content like this?

Check out our recent posts

yt thumbnail portrait lighting and understanding rembrandt lighting

Understanding Rembrandt Lighting

Ever wondered how to nail that classic, beautiful lighting in portraits? Look no further! In this video, we’re diving deep into the wonderful world of Rembrandt lighting for your in studio portrait photography – it’s like painting with light!

Watch as we break down portrait lighting and understanding Rembrandt lighting in the simplest way possible. No fancy jargon here, just pure, easy-to-understand tips and tricks. We’ll show you how to create those gorgeous shadows and highlights that make your portraits pop!

Whether you’re a newbie or a seasoned pro, there’s something for everyone. We’ll walk you through the history, the basics, and even some cool practical demonstrations. Get ready to take your portrait game to the next level!

Read More »
new westcott fusion by salvatore cincotta thumbnail

New Westcott Fusion by Salvatore Cincotta

The new Westcott Fusion by Sal Cincotta is something I’ve been working on with Westcott for a couple of years now. It’s an incredible product that will give you more lighting possibilities than you could imagine.

Check out this on location shoot and how we use the product. More videos coming.

Read More »