
As a wedding photographer in the highly saturated market of Los Angeles, I have always looked for ways to differentiate our brand. Early in my career, I experimented with different ways of using light. While I have always been drawn to the look of off-camera flash, the need to carry around large equipment hindered my ability to make a studio-quality soft-light portrait in a natural environment. Finding the balance between beautiful photographs and the ability to interact with my clients on the wedding day was going to be essential to our success as a studio.
Seeing the Light
Many people are surprised to discover that the majority of our work is photographed using a single flash combined with ambient light. I prefer to use soft, directional light found in easily accessible places. By directional, I am referring to a light source that comes from a distinct direction, rather than just open shade. This type of light is usually found by windows, tunnels or under freeway overpasses, or created by bouncing light off buildings, cars or reflectors.
Directional light, when used right, can be the most flattering type of light because it emphasizes highlights and shadows, creating dimension. When this light is found in natural environments, it is often soft and beautiful. While this is often good enough to make beautiful portraits, I have found that using a flash to accent the natural light allows me to create a studio-quality image in a natural-light environment.
Using Your Flash as an Accent
When using this technique, the flash will never be the keylight because a bare speedlight will create hard, distinct shadows. While this is good in some cases, many bridal portraits are more flattering with soft light. The flash should just be used to create dimension in your portraits.
Below is an example of what I am talking about. The first image of this bride getting ready was photographed using just the window light. Notice the highlight-to-shadow transition from the left side of the face to the right. This image, like most of my bridal portraits, was lit on the short side of the bride’s face (meaning that the light was illuminating the side of the face farthest from the camera). This is flattering light that provides a three-dimensional look to a portrait.
Short light generally looks good on everyone, but it looks especially good on females. The image of the bride is good by itself, but it lacks a punch and creative element that is consistent with our brand of photography.
For the second image, we added a flash behind the bride in a crisscross pattern, meaning the bride was sandwiched between light sources (the window and the flash). This added a level of dimension to the image, and separated the bride from the background. The flash was held by the makeup artist, and fired quickly through a small, portable softbox. (In small areas like this, use a grid on your softbox to avoid light spill.)
The second image is an example of how small differences can make a big impact in your photography.
Tips for using an accent light
- Your light does not have to be a hair light. You can use an accent light to light elements that you want to draw attention to. We often do this with details that are in the background of photos, such as a wedding dress.
- Experiment with colored gels to give your accent light a mood.
- Use a grid when in a small location to control light spill.
Creating Sun Flare With One Flash
Our studio is located just outside of L.A., where it is sunny and 75 to 90 degrees pretty much all year round. But sometimes we are faced with a gloomy day, or sometimes we are photographing in an open-shade location that needs a bit of punch. When conditions are not optimal, use a flash to create a warm, sunlit environment.
Back in April, we shot on a rainy day. It was gloomy out, but the way the sun lights up this particular location was something that we absolutely wanted our couple to have in their photographs. Remember, it’s up to us to meet our clients’ vision for their session if we expect them to make large purchases from us.
I positioned the couple on the ground and placed a light on a stand just behind them, camera left. I placed the light behind some brush to allow the light to skim off the brush and create an ethereal look. Now, positioning the light is one thing, but we have to get the color right. I am a big believer in the MagMod system, which is an amazing tool for photographers. I used a CTO (color temperature orange) on my Canon 600EX-RT, and placed the stand up high and angled downward. I exposed for the natural light on the couple. This was the final result.
Tips for creating sun flare
- Experiment with full CTO or half-CTO gels, depending on how much orange you want.
- Position the flash behind the couple in an area where it would normally be.
- If you are a wedding photographer, this technique works great with a bride who has a veil. Just be careful to not blow out the details of the veil by setting the flash power too high.
Using Backlight
We often use a flash in creative portraits as a backlight to give the image a unique look. Here is an example from a recent shoot we did in Pasadena, CA. The bride and groom were positioned on a wall, and we were using the cherry blossoms as a background. The first image was lit in open shade, which was even and nice, but it lacked the whimsical look that complemented the masquerade theme of this shoot. By adding a backlight, we were able to create a magical look. This image is different: By using a quick flash as an accent, we were able to make it stand out from the rest of the images that couples look at when searching online for this venue.
Using a backlight is also a great way to separate your subject from the background if needed. This image was photographed against a darker background, and without any separation, the subject’s hair would have been lost in the background. By using a flash behind the subject, we were able to make the subject stand out, rather than forcing the viewer to look for them within the image. The flash was positioned on a stand behind the couple, and was cloned out during post-production. When using this technique, place your back flash high enough to cover the back of the tallest subject’s head; otherwise, their head will only be half-lit.
Another thing you can do when backlighting a couple is to place the subjects slightly offset from one another. Have them turn their heads slightly, like they are about to kiss. The one farthest from the camera will have his/her face slightly illuminated as the light bounces off the one closest to you (we usually choose the bride to be lit).
Tips for using backlight
- Make sure your flash is not placed too low. This is done often, and will cause the groom to look like he is missing part of his head. Position your flash high behind the tallest subject.
- You can adjust the power of your backlight a bit more liberally than you would a keylight.
- Backlight water or translucent items for an interesting effect. This works great with fountains.
- Your backlight will reflect off bright objects, such as a wedding dress. Use this creatively combined with color-shifting techniques, flash gels and ambient light blending.
Lighting the Background
Lastly, I want to talk about lighting a background. We often use this technique on a wedding day to close out an album. We can easily create a beautiful silhouette by lighting a background directly behind our subjects. For couples, this is a really nice shot that gives a more candid appeal with a creative twist. Use a colored gel on your flash (it’s a good idea to use the wedding colors) to create a photo that doesn’t look bland or flat.
When using your couple as a silhouette, there are a few vital posing techniques. First, keep a slight amount of space in between the couple. This allows the shape of the body to be seen. The noses of the subjects should not be pointed directly at each other or touching. Kissing silhouette shots do not usually work.
Tips for lighting your backgrounds
- Colored gels work great.
- Even when using multiple-flash setups, lighting a background can turn a bland photograph into a professional-looking image. Try it next time you break out your flash.
- When creating a silhouette, keep space in between your subjects to show their shape; otherwise, it can be difficult to see the subject.
Using flash as an accent can improve your photography without much investment in equipment. We use every tool available to give us an edge on the competition.
Check out our video to see more examples of how we use flash creatively on a wedding day.


This Post Has 6 Comments
I have the same question. Good content but where are the example images?
read everyone… says at the header and the last sentence – log in – launch the issue.
I’m with you Martina, where are the images…?
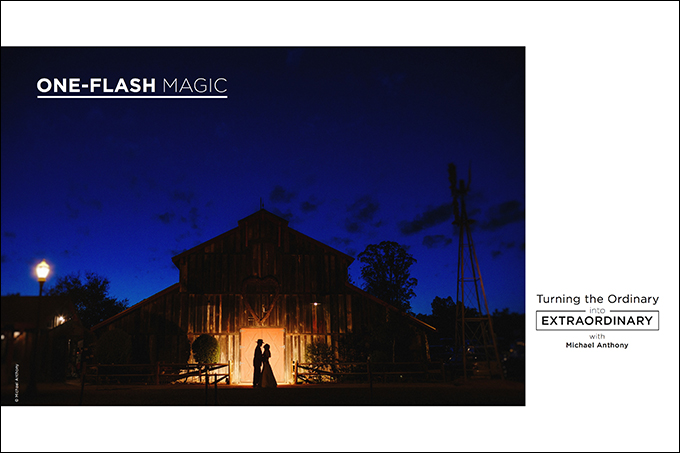
The articles sounds very intriguing, and if the other images are as stunning as the one leading the article (couple silhouetted against a barn), the others should be very impressive…
So, where are they…?
says at the header and the last sentence – log in – launch the issue.
Where can I find the sample photos described in this article please?
first sentence and last both say the same thing… log in – launch the issue.