
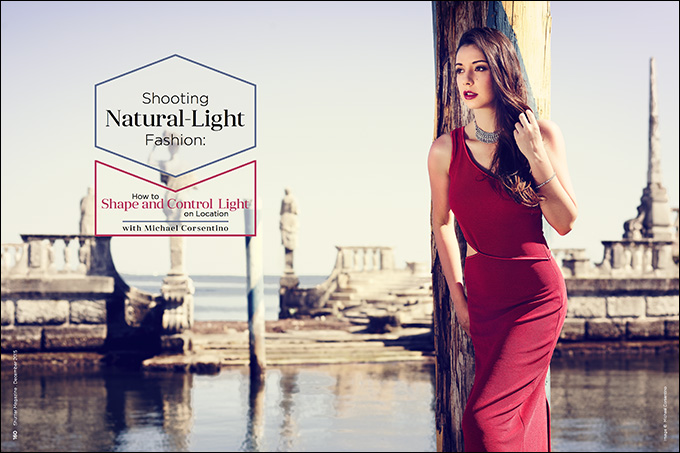
Shooting Natural-Light Fashion: How to Shape and Control Light on Location with Michael Corsentino
A few months ago, the Sunbounce company commissioned me to produce a location shoot demonstrating how I use its gear in my fashion and portrait work. The brief from the client was simple enough: Do what you do, produce killer images, videotape the entire process and provide BTS commentary explaining my choices and methods. As a longtime Sunbounce user, I was excited to take on this project and explore the possibilities.
I’m continually reminded and surprised by how much high-end fashion work is done on location using only diffusers and reflectors. Simple tools in the right hands make all the difference. You don’t need a million lights and complex setups to achieve polished, professional results for fashion images shot on location.
Quite the contrary. Most location fashion shoots are lean, mean, on-the-run operations where speed and flexibility are the premium. Until you’re shooting campaigns and look books with budgets large enough to pull location permits, you’ll likely be shooting guerrilla style. That means no light stands, tripods or anything else placed on the ground that passersby could trip on and potentially injure themselves. (I highly recommend an insurance policy with a $1 million liability coverage option at a minimum.)
The other benefit of working with simple lightweight tools is speed and flexibility. It’s much faster and easier to follow your model’s movements with the light from a reflector than it is to continuously reposition a strobe and modifier on a light stand. Reflectors and diffusers allow you to work quickly, keep things moving and maintain the energy of the shoot. Maintaining the energy is super important. It’s really easy for things to flat-line if you’re spending more time adjusting lights than paying attention to your model. With too much down time, even the best model will get bored and lose energy, and your shoot will suffer.
The first step in any fashion or portrait project is to assemble a rock-solid creative team. Ideally you want a team that works exceptionally well together, one unified around the common goal of producing the best cohesive series of images possible. While it’s important to have an initial vision driving your creative, it’s even more important to trust your team members and let them do what they do best. The whole is always greater than the sum of the parts. You’ll always make better pictures with the input, expertise and additional eyeballs of a team than you will on your own. A team typically consists of your talent (models), hair and makeup artists or H/MUA (sometimes the same person), a stylist who pulls clothes and oversees styling on set, a creative director (generally the client or agency representative) and assistants.
For this shoot, I had the luxury of three assistants. This arrangement works best as follows: an experienced first assistant who knows your gear inside and out, and two additional assistants who are familiar with photo shoots and photography in general, but aren’t necessarily experts. There’s a lot you can get done with one assistant, but additional assistants can keep an eye on gear that’s not being used. Equipment can quickly sprout legs and disappear forever at busy locations, so you’re better safe than sorry. When you’re working with a diffusion panel and a reflector at the same time, two assistants are indispensable. I prefer three assistants: two to hold the tools in use and one to watch and help lug gear.
The next and equally important piece of the puzzle is your location. Don’t underestimate the important role your location plays in the overall success, feeling and messaging of your concept. For these images, I wanted an opulent, epic elegance, something with a Great Gatsby feel. I chose the dazzling Vizcaya museum in Miami. Typically the clothing is what leads the styling because the designer or brand is your client. In this case, we had a location first and I needed to source clothing that matched it second. Since I wasn’t working with a stylist, I hired a rental house to pull the clothes. I chose Rent the Runway and selected three dresses for the shoot.
Tools
Whether you’re controlling and shaping natural light or the light from strobes, you have several important pieces of lightweight, relatively inexpensive equipment you should master and keep in your arsenal: the reflector, the diffusion panel and the subtraction panel. These three tools provide a tremendous amount of control in either scenario. I used only reflectors and a diffusion panel to produce this entire series of images. Let’s look at each.
The Diffusion Panel
Diffusion panels are key. They let you create open shade wherever and whenever you need it. This is essential because, without diffusion at your disposal, you’re at the mercy of the bare sun. Aside from sunrise and sunset, overhead, undiffused sunlight creates deep, unflattering shadows and hard light that most often isn’t the goal. A diffusion panel cuts the harsh light, creating a natural light softbox overhead. This gives you a soft, even light. I typically combine this with a white or silver reflector placed below the model’s face or torso to open up any deep shadows falling under the chin or in the eye sockets. Depending on where the sun is, I sometimes add a third or even fourth reflector to bounce in additional fill where needed, add catchlights, highlights, etc. I used the over and under diffusion panel and reflector arrangement for several of the images here (see the image captions). This is commonly referred to as clamshell lighting.
The Reflector
Reflectors are essentially super-lightweight, low-cost lights. The sun typically provides the juice, but you can just as easily fire a strobe into a reflector and direct the light wherever you need it. Why would you do that? The larger the light source, the softer the light. By firing a bare flash onto a reflector and bouncing its light, you’re creating a broader, softer, more diffused source.
Once you know how to control reflectors to shape and modulate light, they’re indispensable tools on location and in the studio. For this shoot, I used only natural light, a diffusion panel and white- and silver-faced reflectors. While reflectors don’t have knobs to control their output, you still have a lot of control over the intensity and quality of light produced. To control intensity or volume of light output from a reflector, you’ll rely on two factors: the distance from the subject and the reflectivity of fabric on the reflector. If you want less light from a white or silver reflector, add more distance between the reflector and the subject. If it’s more light you’re after, move the reflector closer, or switch to silver fabric for even more efficiency.
Feathering is another key technique. When you aim a reflector at a subject, you need to move it around to find the sweet spot where the reflector hits the subject bang on. This is the spot where you’ll have the most output and direct quality of light. I typically don’t work with this light. I prefer to feather the light. For this, I slightly angle the reflector to left or right so that I’m using the softer part of the light from the reflector.
Tone and contrast are your next considerations. There are myriad fabric surfaces available for reflectors: neutral white, silver, gold and combinations of each. White is the softest and most neutral; silver boosts output and contrast; and gold adds warmth. A reflector with gold fabric makes a great warm hair light.
Another technique I use a lot is shooting into the sun. Using the sun as a backlight provides a kicker light behind or from the side of the subject, and allows me to bounce light from the sun back toward the front of the subject.
The Subtraction Panel
While I didn’t use a subtraction panel on this shoot, I always have at least one with me. Like reflectors, these come in various shapes and sizes, but take away light rather than add it. Subtraction panels are commonly used to introduce or heighten the depth of shadows. Just as you’d use a reflector to add light and open the shadowed side of a face, subtraction panels conversely decrease light and add or deepen shadow.
Strobes With Reflectors and Diffusers
Even when I’m planning to shoot only with reflectors and/or diffusion panels, I always have two battery-operated Profoto B1 strobes with me. If there’s no sun, I need a backup plan. You can bounce your strobe into a reflector as well as fire it through a diffusion panel for a wide range of awesome creative lighting effects.
Getting Started
Reflectors, diffusion panels and subtraction panels come in a wide variety of shapes and sizes, some collapsible and some fixed, and from numerous manufacturers. I have collapsible as well as rigid frame versions, all valuable for different purposes. Collapsible ones are highly portable, while rigid frame versions are robust and stand up a lot better against the wind. Many reflectors are multipurpose, providing diffusion and multiple reflective fabric skins to choose from. If you’re new to reflectors and diffusers, getting one of each is a great start.
I encourage you to try each of these techniques. Once you do, I’m confident you’ll see that the possibilities with reflectors and diffusion panels are endless.
Creative Team:
Model: Ashleigh Arruda
H/MUA: Shelley Giard
1st Assistant: Kat Von W
Assistants: Deanna Hunt, Juan Carlos Citron
Video: Leonardo & Melissa Volturo


This Post Has One Comment
Great stuff!! Good points and good content. Also, I appreciate how you said “there are myriad fabric” Instead of “a myriad of” 😉 Good grammar wins me over!