
Storytelling with Light with Jessica Robertson
Countless songs, poems and even novels have been written about the Mona Lisa. It is not only the technical aspects that make this painting so alluring and timeless, it is the subject’s unknown story that has intrigued us for over five centuries. The main tools we use as photographers to create our masterpieces are the camera and the light. With these tools, we can manipulate light to add impact and tell the story behind the image.
A common industry practice today is to have a consultation with a client prior to photographing. Clothing options, locations and interests are among the customary items discussed. And while there are countless benefits from a consultation for both client and photographer, I want to understand a subject’s story.
The conversation initially begins with more generic topics like sports or interests, but my goal is to dig deeper. Sometimes, the story is not one others will easily understand because it is softer, quieter and more subtle. It might be incorporating the subject’s favorite color or capturing an expression the parent has seen since they were little. Maybe the location reflects a love of nature, or maybe the subject is sitting on their grandmother’s front steps, which are a sentimental place with family history. At other times, the story is obvious and more overtly understood by all who view the image. The subject may want to incorporate their athletic or academic interests, or another passion in their life.
Whether the story is very apparent visually or more subtle, I want to understand it so I am then able to start designing a lighting plan to represent that story. Should the lighting be harsh and dramatic because it’s for an athlete? Should the lighting be soft or natural to reflect the subject’s personality? Should the lighting angle emulate the stage lights of a theater for the thespian? By starting with their stories, I am inspired to visually tell a story with light.
As artists, we have the opportunity to explore various lighting styles and patterns. Here are four different subjects with four very different stories and lighting approaches.
Alternative Lighting
F3.2 ISO 6400 1/125sec 95mm
Sometimes, the story is not initiated by the vision of the subject, but rather by the way their loved ones see them—that is the true story. Saxon’s mom described her as being “a light in people’s lives.”
With this description as inspiration, the concept we came up with was to use battery-powered twinkle lights in conjunction with white icicle lights and regular strands of holiday lights. Because very little actual light comes from this type of light source, we used a BUNCH, and we layered them. We used a background stand to drape the holiday lights and positioned them about six feet behind her. We then positioned icicle lights below and around her on a white, fluffy bean bag. The white fabric helped to bounce the light back up and fill the shadow areas. For the third layer of lights, we used the small twinkle lights between the camera and the subject to achieve the final bokeh.
Once we were all set up and ready to photograph, we noticed the light was still insufficient and was inconsistent across her face. To solve this last issue, we added a small amount of fill light coming from the same direction by using the modeling light in a 4×6 softbox. Mom also helped out by holding an additional string of lights close to Saxon’s face. And then we were able to play with expression and different angles. So fun!
Natural Lighting
F4.5 ISO 320 1/100sec 200mm
For many years, I could rarely achieve what I wanted using only natural light. As an off-camera flash photographer, I never felt I could achieve the control over light that I wanted. While I still believe there are limitations to only using natural light for all situations, I do feel there are stories that are best told using only natural or available light.
In 2011, I moved my studio. One of the renovations to the building was putting in a floor-to-ceiling glass-paneled garage door. It acts in a similar fashion to a very large softbox and adds variety to in-studio sessions.
When chatting with Brianna about her session, we definitely wanted to highlight her beautiful eyes and create a softer, more natural lighting environment. The solid green shirt was perfect for bringing out her eyes, and we balanced that with a background that had warm tones and greens.
The garage door acted as the main light, and I used a reflector to fill some of the shadows on the left side of the frame. I placed her at the back edge of the garage door to allow the light to hit the mask of her face. I achieved additional backlighting by using a window about ten feet behind her. The window light flooded onto the background as well and acted as a background light.
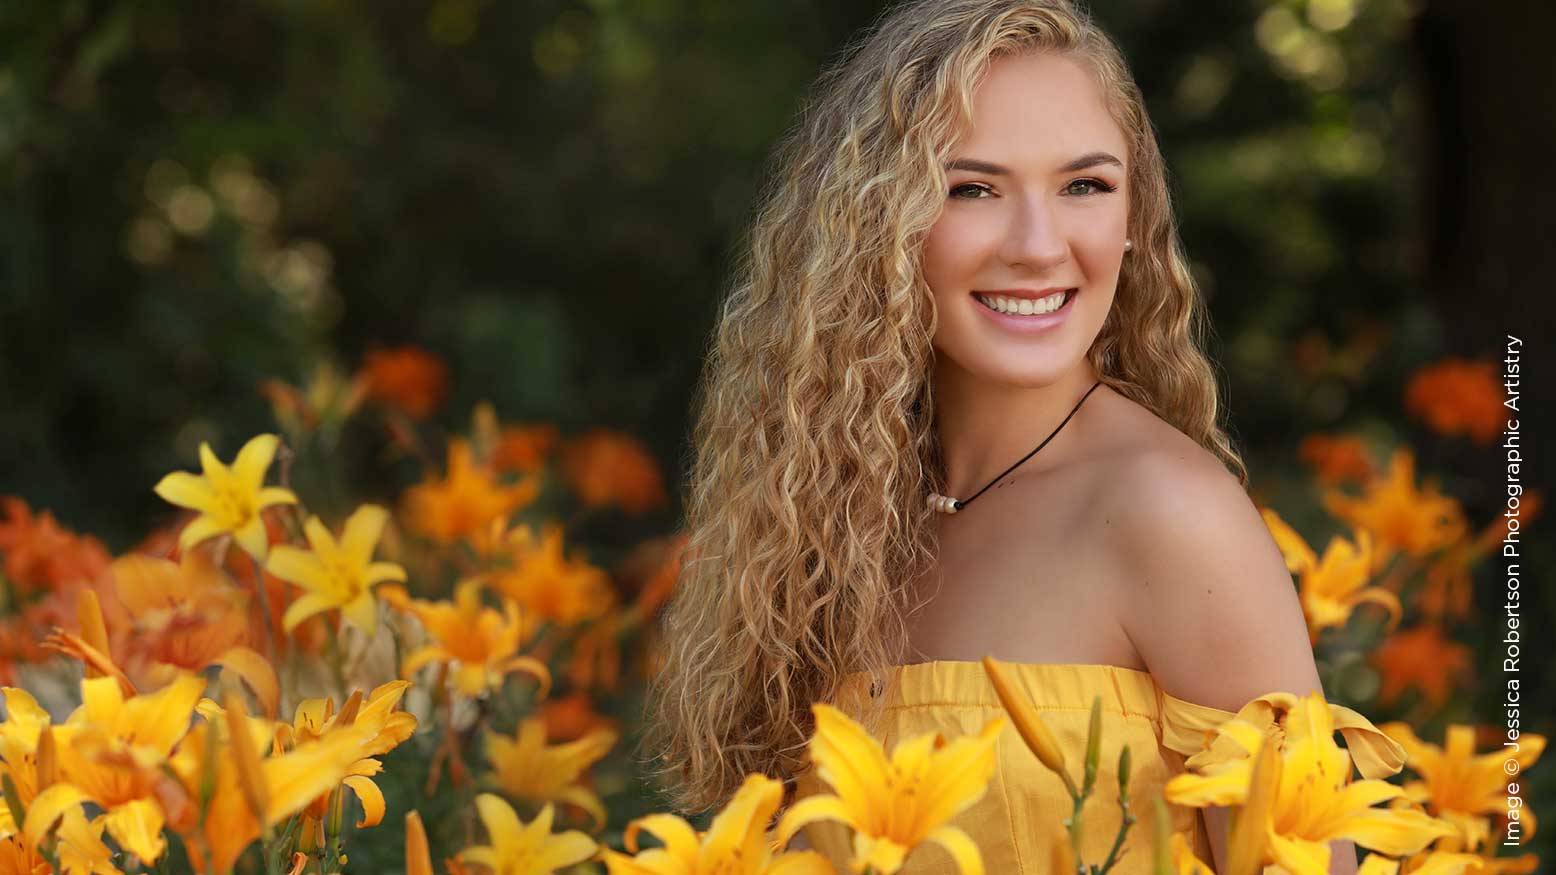
On-Location Lighting
Shadow Area
F5 ISO 200 1/250sec 144mm
Brooke and her mother began planning her senior session when I photographed the first daughter in the family three years prior. During Brooke’s consultation, I learned that she loves the color yellow and adores flowers. They found the perfect location to photograph that had both day lilies and sunflowers.
Ideally, I like to work in areas where the client is in the shade, where there is light coming in from the sun that is filtered either by trees or other objects. Obviously, this does not always happen. In this first image of Brooke, we sought some reprieve from the blasting summer sun, filtering it through the trees nicely.
My goal was to create a soft light that simply filled her eye sockets to illuminate the color of her eyes, but I did not want the image to appear overly flashed. I positioned the flash to camera right at about 60 degrees and just above her head. I used a two-foot Profoto Octo Softbox to soften the Profoto B1X 500.
Direct Sun
F5 ISO 100 1/400sec 60mm
In contrast, the second image was in direct sunlight. The sun was virtually straight above her head but slightly behind. The goal for this image was different. I didn’t want to just fill her eyes with light, I needed to balance the harsh overhead lighting and the backlighting. However, I set up my lighting in a very similar way, just with a larger amount of light from the fill flash. I also turned her face just enough to use the sun as a rim light on her left cheek.
For the client, both setups tell her story. Ultimately, I created well-lit images in both lighting situations. I believe that arming myself with lighting for all locations helps to differentiate our studio in our area.
Studio Lighting
F7.1 ISO 100 1/160sec 125-200mm
From the moment in my first photography class in college when I was told that photography is drawing with light, I have seen my lights as paintbrushes. Where do I want the light? Where do I want the shadows? What is most flattering for the subject? What tells the story?
Sports images have always been some of my favorite studio images. I love having the control to illuminate the shape of the triceps with just a small kiss of light while creating dimension across the abdomen with light crossing over the body. It is empowering to create an image in my mind and then move the lights around to “draw out” a subject’s physical attributes simply by knowing where to put the lights.
For Sawyer’s session, we knew we wanted to create images that were a celebration of the many hours she has spent playing volleyball. She sacrificed “normal” teenage activities and dedicated many hours to her travel team, so it was only appropriate to tell this story visually.
I used a 4×6 softbox as the main light but feathered it significantly, so it acted more like a strip box to create a narrow light source. It scraped across her body to allow for shadows and it was positioned at about 80 degrees camera right. I illuminated the left side of her body from behind and to her leftusing a 14″x48″ kicker. I used an additional 10″x36″ hair light from above to illuminate and separate her hair from the background. I also created a focused lighting pattern on the background with a 10-degree grid, which also helped to separate the subject from the background. Though the approach to the lighting was pragmatic, the result is both dramatic and flattering to the subject and the story.
Each client has a unique story to tell, and I believe it is my responsibility to take the time and effort to discover what it is. By using different lighting techniques, I express that narrative as an image. Alternative lighting, natural lighting, on-location lighting and studio lighting are four different techniques that not only help tell our client’s stories, but also help separate us from our competition. It is with light that we add impact and storytelling; it is with light that we paint our Mona Lisa.


