
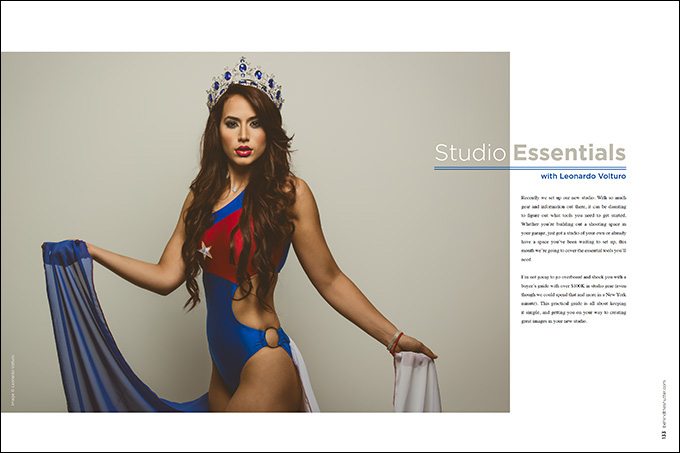
Studio Essentials with Leonardo Volturo
Recently we set up our new studio. With so much gear and information out there, it can be daunting to figure out what tools you need to get started. Whether you’re building out a shooting space in your garage, just got a studio of your own or already have a space you’ve been waiting to set up, this month we’re going to cover the essential tools you’ll need.
I’m not going to go overboard and shock you with a buyer’s guide with over $100K in studio gear (even though we could spend that and more in a New York minute). This practical guide is all about keeping it simple, and getting you on your way to creating great images in your new studio.
Lighting
The range of lighting tools is vast and overwhelming. Let’s break it down. Whether it’s strobes that cost a few hundred dollars, or pack and head systems reaching upwards of $10K, ideally you’ll want to invest in the best multilight system you can afford. If you have a $2,000 budget for lights, don’t spend it all on just one. Since portability isn’t a major concern here, options include an AC-powered head such as the Profoto D1, an AC-powered pack and head like the Profoto Acute, a battery-powered pack and head such as the Phottix Indra, or a strobe with a built-in battery, such as the Profoto B1.
When we began planning our studio, we were already invested in the Profoto B1 battery-powered strobe system, so we decided to simply add more Profoto lights and have everything seamlessly integrated and controlled via the Profoto Air remote. Currently we use three Profoto B1’s and two Profoto B2’s.
I recommended having at least 500 watts for you keylight. You’re going to need at least that much power when you’re using light modifiers, which can reduce output by as much as one or two stops. Having strobes with enough available power also comes in handy when you’re shooting at smaller apertures. Look into how low you can set the power with the lights you’re considering. Some situations require a lower power output from your strobe. One example is when you’re shooting with wider apertures or with modifiers that aren’t reducing the light as much as when you’re using a softbox.
What you’ll need next is a way to communicate with your strobes so you can fire or trigger them remotely from your camera position. As you do your research, you’ll likely come across lights with built-in radio-based triggers like the Profoto Air and Elinchrom Skyport systems. Having a receiver built directly into the strobe makes life very simple. It means that all you need to do in order to trigger the strobe is place the corresponding remote in your camera’s hot shoe; now you’re all set. Alternatively, lights lacking built-in receivers require the use of a separate set of transceivers to communicate, such as the PocketWizard Plus III’s, one for the light and one for the camera’s hot shoe. That’s more gear to buy, break and have extra batteries on hand for.
Modifiers
Light modifiers come in a host of shapes and sizes: round ones, square ones, rectangles, octagons and more. They also range in size from 1′ x 1′ softboxes to well over 10′ for some parabolic umbrellas. Beyond that, each produces a different look with different degrees of softness, contrast and distinct catchlights.
When you’re choosing the right modifier size for the job, a good rule of thumb is to think about how much of your subject you are lighting. If you’re shooting a headshot, a smaller modifier, such as a 20” beauty dish or a 2′ x 2′ softbox, might be a good choice. For full-length coverage, you’d likely want something larger, like a 5′ octa or a 4 x 6 softbox. That’s because larger modifiers are closer to the actual size of your subject. Using a smaller modifier causes much of the subject’s lower body to fall into the shadow as the light from the strobe falls off.
If larger modifiers aren’t an option for you due to height restrictions in your space, you’ll need to back up your light to achieve a wider area of coverage. Moving your strobe back forces you to crank up the power. This may not be possible if you’re already maxed out. In that case, you have a couple of other options. The first is to bring in a second light to provide fill; the most economical choice is to pop in a reflector.
In our studio, I typically modify my keylight with an octa. We do this because of the natural-looking catchlight an octa creates compared with a square or rectangular softbox. Once the keylight is determined, I add additional lights with different modifiers, depending on their purpose—fill, hair light, backlight. See my article in the September issue for lighting setups utilizing one to three strobes and a variety of modifiers.
Support
This section covers one of the most crucial categories: the gear you use to support your strobes. That means your light stands and their associated accessories, known collectively as “grip.” Don’t skimp here. The last thing you want is a light crashing down on somebody’s head or smashing into a million pieces as it hits the floor.
When shopping for stands, at a minimum you’ll want to invest in heavy-duty air-cushioned stands that support the weight of your strobe and a modifier combination that aids in smoothly and safely lowering equipment. Ideally you’ll want to purchase a few steel C-stands used the world over for their rock-solid stability. The Avenger C-stands we use support up to 22 pounds and have a “turtle base” that can be removed for easy transport. The individual legs can be set at any angle, and positioned in locations that are impossible with light-duty stands. C-stands are also great for location work.
Get at least one roller stand. These are worth their weight in gold when it comes to your keylight, and your back will thank you. A good roller stand allows you to quickly, easily and precisely position your keylight without all the heavy lifting.
You’re also going to need sandbags and counterweights. These help stabilize your stands and balance boom arms. You should be using these in studio and on location.
The final piece of the puzzle for your C-stands and roller stands are extension arms and grip heads. These tools give you both reach and articulation when positioning lights, flags or reflectors.
Backgrounds & Backdrops
The two backdrops you’ll typically start out with are black and white. For white, you may have the option of painting your wall or building a cyclorama/infinity wall, which is a wall that curves at the base to meet the studio floor, creating the illusion that the studio floor is infinite. If that isn’t an option, you can pick up a fairly inexpensive kit that includes black and white seamless backdrops, and the hardware and stands necessary to raise and lower it.
White gives you the option of having a bright white background or different levels, from gray to black, depending on your camera settings and the distance of your subject and light from the background. Black is great for creating moody and more dramatic images. There’s a ton of other backdrop options out there. Check out sites like boxdropsbysjp.com and silverlakephoto.com for some really cool backgrounds and floors in a variety of sizes and custom designs.
Tethered Shooting
This is the last and arguably one of the most important categories of essential studio gear. Shooting tethered will make your life so much easier. It allows you to get dialed in quickly and show your subject exactly what you’re getting in real time as the images you shoot pop up on your laptop. I’m also able to work intuitively as I dial in my lights with or without a light meter. The process is simple: Connect the appropriate cable to your camera and your laptop, launch Lightroom or Capture One, and start shooting tethered. These programs allow you to create presets and other settings that apply to your images as you shoot.
When shooting tethered, a secure connection between your camera and computer is essential. You don’t want to lose your connection or send your laptop flying across the room. A good quality cable and a stable platform for your laptop are a must. We use the DigiPlate platform from Inovativ. It’s made of aluminum and includes a built-in cable management system, laptop clamps and everything you need to keep your gear safe and secure. The DigiPlate is attached to one of my roller stands via the DigiBase connector. I have a DigiCameraPlate on my camera that keeps the cable securely connected. You’ll want to shoot tethered whenever possible.
That sums up everything you need to get started with your new studio. Don’t feel like you need to get everything at once. Build your kit slowly, and feel free to reach out with any questions. With these tools in place, you will be well on your way to creating great studio images.


