
Studio Portraits With Flare with Michael Corsentino
In photography, we use a range of classic lighting patterns, many based on the work of the master painters, to produce predictable and repeatable results. These foundation patterns are clamshell lighting, Paramount lighting, Rembrandt lighting, loop lighting and split lighting. Rim and accent lights can be added to any of these patterns to add further refinement and sophistication. The combinations are virtually endless.
One lighting arrangement you don’t hear a lot about is backlighting. This is when you place a light behind a subject who is facing directly toward the camera position and unobscured from its lens. This introduces flare, which is typically something we try to prevent. Flare can be unpredictable and difficult to control, causing unwanted optical artifacts such as ghosted dots across an image, as well as loss of overall image contrast. Tools like lens shades, flags, honeycomb grid spots and egg crate grids help reduce flare. You can always just use your hand to block light from directly entering the lens as well.
There are circumstances when flare can be a major asset. With a little know-how and a few lighting modifiers, flare in the studio can be harnessed as a worthy addition to your lighting repertoire. In this article, I look at creating flare using studio strobe. Working with flare from the sun is a topic for another day.
Flare is perfect for adding drama and sizzle when creating images of actors, musicians and other entertainers. Think Dreamgirls, Beyoncé and countless other subjects where one or more lights behind the model creates a dramatic entertainment-oriented background effect.
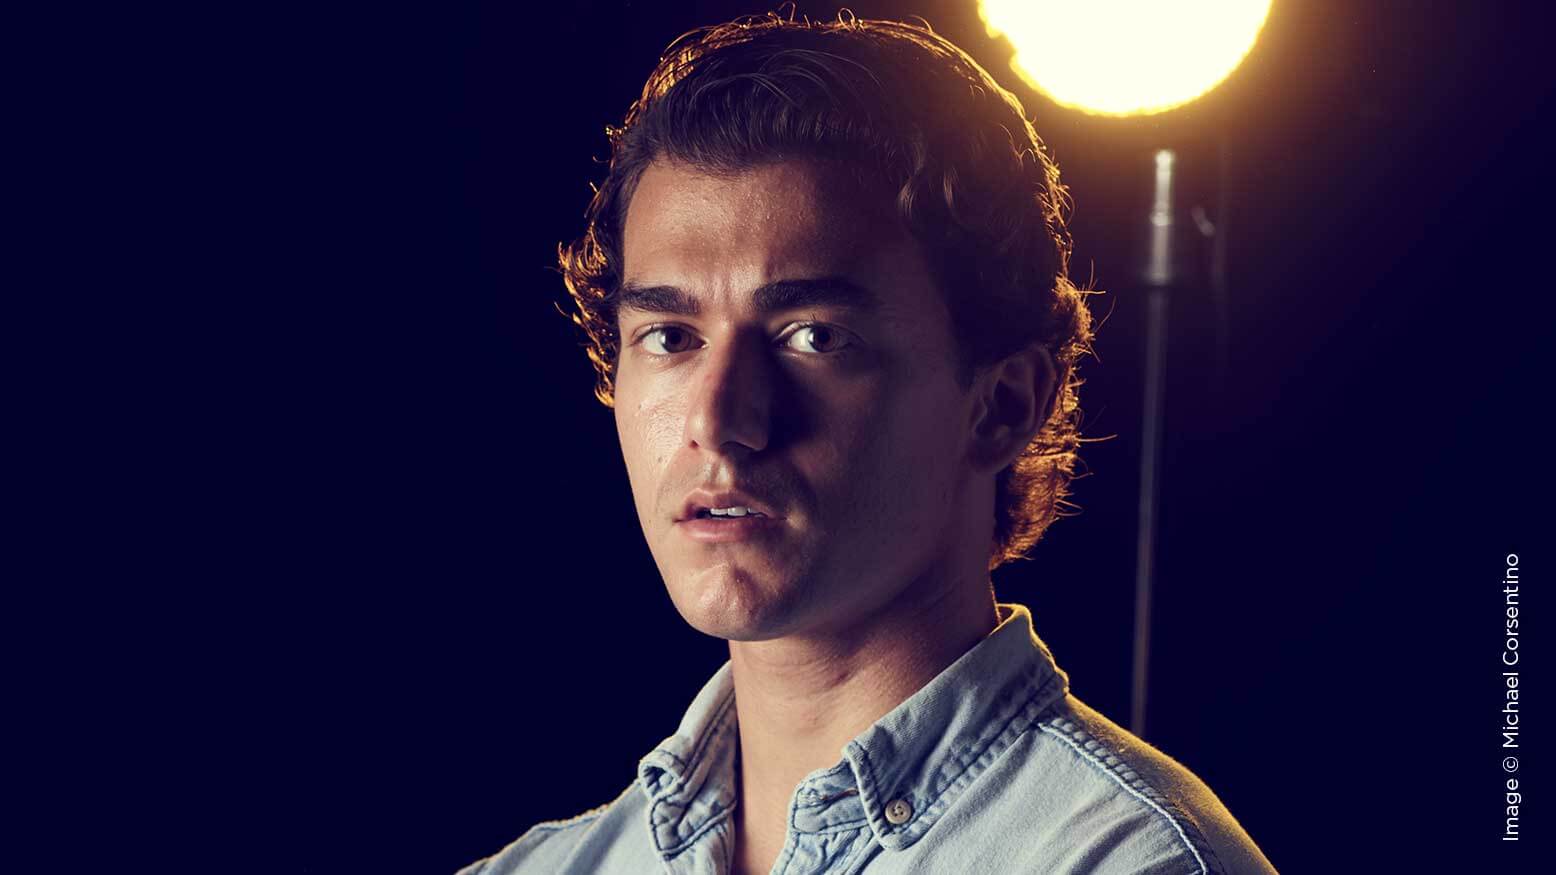
For this effect to work best and not end up silhouetting the subject, there needs to be additional illumination from the front. The strobe placed in front of the subject serves as your keylight and can be positioned using any of the foundation lighting patterns. I opted for directional side light on the opposite side of the strobe used for flare. This resulted in a semi-crosslit pattern and created balance between the lighting on the left and right sides of the image. In addition to subject illumination, the keylight helps balance foreground and background light and adds back contrast that’s lost when light enters the lens. In some cases, you may want to add back additional contrast in post.
There are a few tips, tricks and tools that will help make working with flare significantly easier, predictable and more manageable. First up is focus. Light coming directly into a lens can wreak havoc on autofocus. The good news is that, unlike the sun in the studio, you can turn off the modeling light on the strobe designated for backlight; now focus is no problem. So step one is to turn off the modeling light so that the only time there’s flare is when the flash fires.
Bare flash throws raw light everywhere. It has little to no shape and washes out contrast. This is where a few keylight modifiers save the day and make working with flare more manageable, controllable and predictable. Honeycomb grid spots and egg crate grids focus the strobe’s beam of light into a tighter, more defined spread and are often used to keep light from spilling back into the lens. Here I’ve added a 7-inch reflector and a 10-degree grid spot to the background strobe used to create flare. I used this to confine its light to a tight circle and reduce the amount of light directly entering the lens. The overall effect is smaller in size and therefore much more manageable than bare flash, resulting in less loss of contrast.
One technique not used here is bare flash as a backlight combined with very narrow apertures. This is a great way to add starburst effects to your images. It varies from lens to lens, but when flash hits a very narrow aperture, such as f22, a starburst effect results. Give it a try sometime. It’s a fun technique to play with.
I placed the keylight camera left to the side of the subject. This was modified with an Elinchrom 14×35-inch strip box with a 30-degree egg crate grid to create a narrow vertical shaft of crisp light. This kept the keylight from spilling back toward the camera position. As is my normal practice, the keylight was the first of the two strobes I dialed in. Working one light at time is the clearest way to see the contribution each light is making to the exposure. I metered the keylight using a Sekonic L-858DR handheld flash meter with its power set at f11 to match my camera settings. Then I made my first capture and assessed the results. This is the point where I season to taste and make adjustments to the position of the keylight and its power.
Now that the keylight was dialed in at f11 and correctly positioned, I turned on the background light and also metered it at f11 to match the power of the keylight. From test captures with the background strobe firing, I could see it was illuminating parts of the housing used to attach the grid. To remedy this, I masked off these areas with gaff tape, a must-have in any studio.
During the next series of captures, I further refined the lighting by adding a V-flat camera right to open up the side of the subject opposite the keylight, which was falling into shadow. With the lights set, I then experimented by introducing color for the background light. I started with blue and settled on yellow to add warmth to the image and complement the subject’s shirt and skin tone. I adjusted the height and left-to-right position of the background light throughout the shoot.
Give flare in the studio a try. It works equally well with strobes and handheld flash. Once you know how to control it, flare is a great way to give your images extra sizzle.


