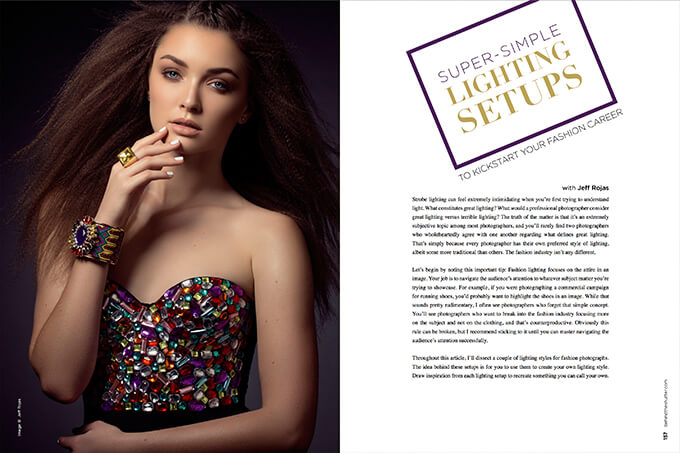
Super Simple Lighting Setups to Kickstart Your Fashion Career with Jeff Rojas
Strobe lighting can feel extremely intimidating when you’re first trying to understand light. What constitutes great lighting? What would a professional photographer consider great lighting versus terrible lighting? The truth of the matter is that it’s an extremely subjective topic among most photographers, and you’ll rarely find two photographers who wholeheartedly agree with one another regarding what defines great lighting. That’s simply because every photographer has their own preferred style of lighting, albeit some more traditional than others. The fashion industry isn’t any different.
Let’s begin by noting this important tip: Fashion lighting focuses on the attire in an image. Your job is to navigate the audience’s attention to whatever subject matter you’re trying to showcase. For example, if you were photographing a commercial campaign for running shoes, you’d probably want to highlight the shoes in an image. While that sounds pretty rudimentary, I often see photographers who forget that simple concept. You’ll see photographers who want to break into the fashion industry focusing more on the subject and not on the clothing, and that’s counterproductive. Obviously this rule can be broken, but I recommend sticking to it until you can master navigating the audience’s attention successfully.
Throughout this article, I’ll dissect a couple of lighting styles for fashion photographs. The idea behind these setups is for you to use them to create your own lighting style. Draw inspiration from each lighting setup to recreate something you can call your own.
TRADITIONAL
Simplicity is such a beautiful thing. This is one of my go-to lighting setups for fashion editorials and look books because it’s a simple setup that can easily be converted to a mobile lighting kit. This image uses a Deep Parabolic Umbrella in Rembrandt position, which is 45 degrees from our subject and 45 degrees overhead. For this image, my modifier is the Profoto Umbrella Deep White XL with diffusion material. My light is placed around 6 to 8 feet from the subject and my subject is 4 to 5 feet from the background to ensure that both my subject and the background are lit evenly.
If you find that the lighting is too dark on the shadow side, you have a couple of options. Introduce a reflector or white V-flat on the opposite side of the light. You can also place a second light with a softbox to fill in some of the shadows. If you decided to use a second light, you’ll want to be very cautious of cross light, as the second light will produce its own shadow if the light isn’t dim enough. To test the shadow of your second light in this case, turn off your main light temporarily and use the second light only to see if there is any shadow produced. This is a setup any photographer should feel comfortable using in a pinch.
DRAMATIC
If you’ve ever gone through my portfolio, you know just how much I love dramatic lighting setups. Most of my images have lots of contrast and texture. That’s because contrast and texture go hand in hand. You cannot see texture without contrast or shadow. Any object or person that is evenly and flatly lit does not have a lot of texture. While flat, even lighting is great on the face in order to reduce skin blemishes, it’s not always great in showcasing clothing (which is the point of fashion photography). Designers spend countless hours selecting intricate pieces of material to use in their work, along with piping, tulle and metalwork to complement them. If you’re using flat light to photograph clothing, you’re likely doing a disservice to the designer.
The set of images in Figures 1.5 and 1.6 were shot using a very simple lighting concept. The main light is placed to accentuate the subject’s face, the second light is placed to accentuate her clothing and the third is placed to light the background.
The main light is modified by a silver reflector, which creates a lot of contrast on the subject’s cheekbones, but it’s also placed far enough away so the light is broad enough to light the top half of her body. The second light is a beauty dish with a diffuser, placed on the opposite side and 45 degrees from our subject. It helps us lighten the shadows in the image. This ensures the shadows do not fall to black. The final light is an open gridded beauty dish placed to our subject’s side, used interchangeably between images, depending on where I’m trying to draw the subject’s attention. For example, the background light is used in Figure 1.5 to ensure the earring can be seen and that the audience’s eyes are drawn to that area.
HIGH KEY
My favorite high-key setup is far from traditional. I learned it from one of my first photography mentors, and modified it to fit a subject full length. This setup requires a bit of creativity and a less technical approach.
The main light in this image is a 21-inch white beauty dish with diffusion material, and our second light is a 6×4-foot softbox directly behind our subject, also with diffusion material. The subject is placed about a foot from the background light, as you can see in the image in Figure 1.12. Use your subject to block the strobe light from flashing directly into the camera. The main light is placed 2 to 3 feet from your subject and facing down 45 degrees to accentuate her jawline and cheekbones, while simultaneously creating lots of texture in the metal pieces on her dress. The main light does a great job of creating lots of contrast and texture in her hair, accentuating her beautiful braid.
This is a simple setup that creates a lot of drama. It requires very little equipment to produce, so it’s great for those who are shooting in their living room, second bedroom or garage.