
The Art of Storytelling: Redefining the Traditional Princess with Kahran & Regis Bethencourt
What happens when you have 14 models and two completely different studio locations while trying to put together a consistent campaign? That was the challenge presented to us during our princess project, aimed at redefining and reimagining the traditional princess with adash of style and culture. Spearheaded by our hairstylist, LaChanda Gatson, we collaborated to recreate iconic princesses so that young black girls could see themselves as royalty.
The idea was developed from the consistent lack of representation of black and brown children in the media and the fairytales we had grown to love. We often hear stories of black kids who ask their parents why they can’t have long blonde hair like Elsa, or skin like Cinderella. While this may seem like innocent child play, it can definitely play a part in developing a child’s self-esteem at an early age.
As photographers, we recognize that we have a unique opportunity as storytellers to show the world as we see it. We love that we get to shatter existing negative stereotypes, and we love the positive energy that kids get from being part of this experience.
We are inspired by many things around us: hairstyles, cultural traditions, fashion, as well as our own childhoods and upbringings. We merge all of those things together to create unique portraits.
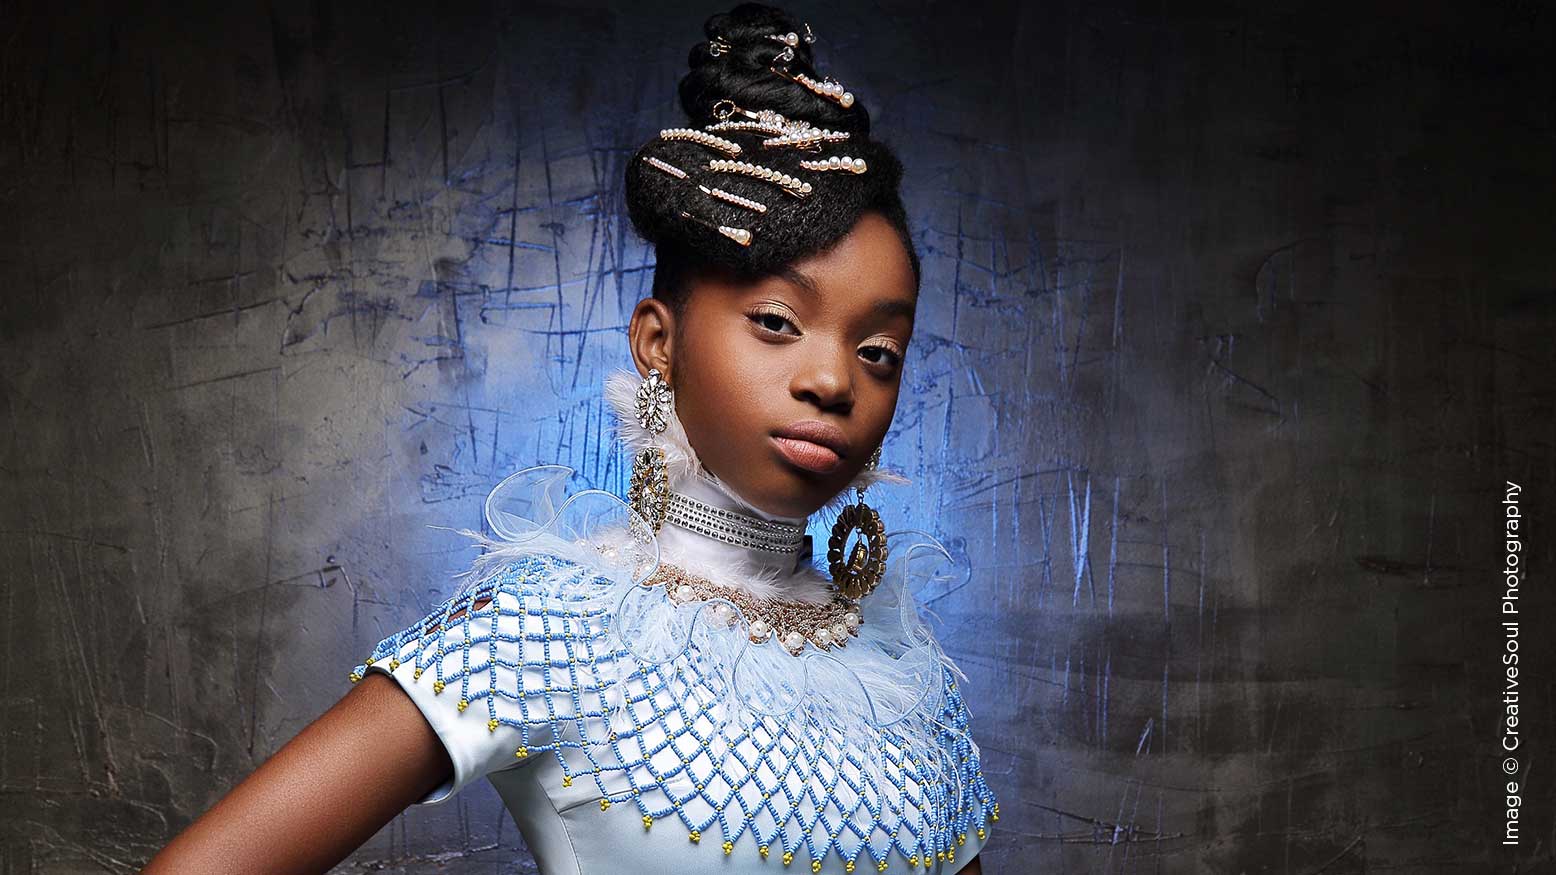
From a technical standpoint we knew that keeping things consistent would be a challenge since we wanted each princess to have her own look and feel. Also, since some of the photos were being photographed in Los Angeles and some in Atlanta, we knew that we would have different resources available to us. We decided to forgo keeping the backgrounds the same so that each princess had her own feel, but kept a consistent lighting style that gave a cohesive look to the campaign.
When traveling, it is essential to keep our setup simple, as we don’t like to travel with a ton of equipment. Our Profoto B10 Plus lights are key as they provide all the power we need and can fit into a small backpack. Since the Profoto B10 Plus is lightweight, we can move fast without sacrificing power. Also, having a continuous light that allows you to change the temperature of the light is a real advantage as well.
We often work with gels to add color to our backgrounds and add a little drama to the overall image, which has become our signature style. It also allows us to travel without having to worry about background colors that may not be available to us when we travel to various locations.
When we photograph kids, we love creating a feeling of power and strength. This was definitely the case in our Princess Series as we wanted the girls to be able to look back on the photos and see themselves as royalty. We love to embrace shadows (in the right places, of course) to give our subjects a more powerful presence. Our typical starting place for lighting is a basic butterfly lighting setup for most of our photos. For this project, we decided to use a simple two-light setup. We used a Profoto B10 Plus with a 3-foot Octa Softbox modifier placed on a c-stand directly above our subject as the main light to give us the butterfly shadowing. Instead of having the light directly pointed at our subject, we used feathered light to create flattering light on the model, so we placed our subject under the rim of where the octobox begins.
We also used a Profoto B10 Plus light with gels that ranged from color gels to color correction gels placed directly behind our subject and pointed at the background. This allowed us to create different colored backgrounds to coordinate with each princess’s look.
When working with gels, it is important to think about how colors play a part in the overall image. Think about how the colors coordinate with the overall mood of the image, the clothing, and the subject’s skin tone. You should also think about color in terms of the color wheel and how the colors coordinate with each other. This can be important in setting the right tone and mood to your image and creating an image that is aesthetically pleasing to the eye.
We like to keep our light minimal when working with our subjects because we want the subject to stand out more than the backgrounds. Keeping it simple allows our subjects to become the highlight of our photos. Since we rarely travel with more than two lights, we often use an eyelighter reflector underneath the subject. If that isn’t available, we use a reflector that is placed directly under the fill light to add a little fill under the harsh shadow areas of the subject’s chin.
Studio lighting doesn’t have to be complicated, whether you’re at your own studio or on location. Here are three final tips for keeping your setup simple.
1. Determine your mood
Think about the overall feeling or mood you’re trying to convey in your photos and start there. Are you going for a softer, more subtle look or something bold and vibrant? This will determine your starting place for lighting. If you’re going for a softer look, you’ll want to use large modifiers that can create really soft, flattering light on your subject. If you’d like your image to be more bold and powerful you may want to use modifiers that create more contrast and drama on your subject.
2. Use what you have
When we first started out in photography, we’d often think that we couldn’t pull off certain looks because we didn’t have a lot of studio equipment. It wasn’t until we started watching tutorials of photographers using one-light setups when we realized that we were only limited by our imaginations. Don’t feel limited by equipment or lack thereof. Use what you have and start from there. We found that working with a single light in the beginning allowed us to challenge ourselves to get much more creative at lighting. It also prepared us for traveling in a variety of different settings and being able to adjust to almost any lighting scenario. Being able to adjust in any location is a huge advantage to any photographer and will allow you to pull off a variety of looks.
3. Get creative. Step out of the box
Once you’ve nailed your main shots, start to think outside of the box and think of other things you can do to add impact. Perhaps it’s playing with gels, adding another modifier or simply adjusting your angles. Sometimes the best shots are unexpected and we often grow by experimenting and stretching ourselves creatively.
Challenge yourself to step outside of the box and do things your own way. Learn the rules, then experiment with breaking them to develop your own unique style. Think about lighting in relation to storytelling and how you want your story told. As photographers, we have the unique opportunity not only to document the here and now, but to reimagine and redefine old narratives and stories in our own way.


