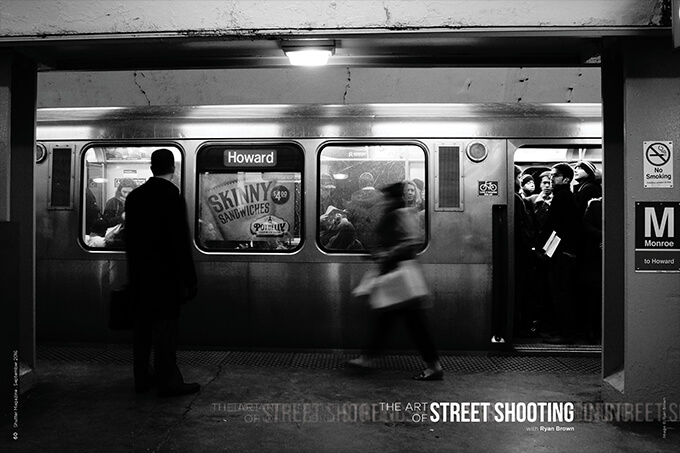
The Art of Street Shooting with Ryan Brown
Street photography is the most exciting genre I’ve ever shot. In my debut article for Shutter, I look at the history and some of the basics of this ever-evolving art form.
History
Street photography is one of the earliest and broadest styles of photography. It’s also known as documentary, photojournalism and reportage. One pioneer of the form, Eugène Atget, is known for his Parisian street scenes shot with a large-format camera in the late 1800s. Because of the nature of the equipment, the exposures were long, which created wispy scenes that rarely included people.
Fast-forward to the early 1900s, when shooters like Dorothea Lange and Walker Evans were hired by the Farm Security Administration (FSA) to document the effects of the Depression and Dust Bowl on landowners and farmers. This brought the idea of photojournalism into the public eye.
Around the same time, Henri Cartier-Bresson started getting noticed. Cartier-Bresson was known for his dynamic compositions and the idea of the “decisive moment.” This idea holds that an image is created at the height of the action, so it encompasses the story of an event in one image. Cartier-Bresson would later become known as the father of modern photojournalism, and founded one of the most prestigious agencies in the world, Magnum Photos.
My Inspirations
The history of street photography is my greatest inspiration. On my shelf sit books from all the greats: Cartier-Bresson, Atget, Robert Capa, Robert Frank and Elliott Erwitt. Everyone had their own vision. Erwitt documented people in an almost comical style. Cartier-Bresson used action and composition. Looking through their images helps me form my own style.
Black-and-white photography is another inspiration of mine. When you strip the color from an image, you are left with raw emotion. Color can be a distraction. Taking away this distraction allows you to see the story of an image a little more clearly. Today there are some great color street photographers, like Constantine Manos.
Inspiration starts with you. What gets you going? What do you see that makes your heart start pumping? Here are some resources to get you started.
- The Leica Blog
- Magnum Photos
And some of my personal favorite street photographers right now:
- Zack Arias
- Thomas Leuthard
- Valerie Jardin
Equipment
Equipment choices are seemingly endless: small to large, high resolution, medium resolution, mirrorless cameras, single lens reflex cameras. When I set out walking in various cities, my preference was for smaller cameras with a prime lens. Historically, the camera of choice has been the Leica rangefinder system with a lens slightly wider than normal.
“Normal” is defined as a lens that you put up to your eye, take it away, and everything appears the same size. The normal lens is calculated by measuring the diagonal dimension of the film or sensor plane. To give you an idea, in a full-frame camera, the sensor size is identical to a 35mm negative at 24x36mm. The diagonal is close to 50mm (a little less, actually), so 50mm becomes the normal lens or the separation of wide angle and telephoto. Street photographers historically have relied on the 35mm lens as their workhorse.
My equipment for street photography is the Sony A7RII mirrorless full-frame camera and the Sigma 35mm f/1.4 lens with the Sigma MC-11 adapter. The adapter lets me add the Canon-mount Sigma lens to the Sony FE camera mount. The Sony is a small mirrorless camera that is full frame, high resolution and really great at high ISOs. This combination allows me to push street photography to around the clock. Low light is not a problem, especially with the 1.4 f-stop. I usually go out with the camera and one lens. I have always thought that if you fumble with two cameras or changing lenses, you will miss something.
Other great focal lengths for street photography are 28mm and a small 24–70mm lens. It’s all about capturing what you can with what you have. The best camera is always the one that is with you. Some street photographers build their entire brand off of iPhone photography. Anything is possible.
Technique
Technique varies depending on what type of street photography you’re aiming for. I have a dynamic composition style. I keep my camera on Raw but the color tone set to monochrome. The Sony does a great in-camera black and white. Even though I might not always use it in black and white, I can see it immediately as monochrome.
There is only one camera on the market that saves a black-and-white Raw file, and it’s not the camera I own. With the Sony, I always have a color file to work from in the computer. Since I am photographing in black and white, you need to learn to visualize in black and white. I see tones and tonal value differences.
I like to use Ansel Adams’s Zone System as my basis for black and white. If you visualize the tones while photographing, it’s easier to create a dynamic black and white. In the images here, you will see I have dark tones and light tones. I direct the viewer where I want by putting some sort of value difference where I want their attention. Another technique I use is to find a repeating pattern. If you find a repeating pattern and then a subject that breaks up that pattern, the images become more striking.
As for actual technique, if I am photographing people, I like to shoot from the hip. If my ISO is adjusted higher, I can go with a higher shutter speed and a narrower f-stop. This means that when shooting from the hip, I have a better chance of getting sharp keepers while not alerting the subject to the fact that I am photographing them.
Software
My software of choice for black-and-white images is Nik’s Silver Efex Pro. This Google product is a great black-and-white conversion system. I use the plugin for Photoshop that they offer instead of the standalone program.
When adjusting an image, whether color or black and white, it is imperative that you start with a calibrated display. If you want full creative control, you need to know what you are looking at. Once my display is calibrated, I bring the image into Photoshop.
Since street photography is a form of journalism, I believe digital manipulation is unethical. I limit my street photography adjustments to contrast, exposure, saturation, dodging and burning, and that is it. I need to tell the real story, and adding or taking away objects is deceiving.
Inside the Nik program, you have several adjustments. I adjust a neutral monochrome image without any toning. I add a bit of structure (midtone contrast) to the image when it is called for, and take advantage of the control points in the system. The control points allow me to set a point in the images and adjust a small portion of them. If an area needs darkened a bit, this is the perfect way to do that.
Conclusion
Street photography is what you make of it. For me, it is a creative way to find striking compositions in everyday life, no matter where I am. It’s also a way for me to study and be inspired by the history of our industry.
Just remember that whatever you do in photography, you and your images are not defined by the camera or the lens. You are defined by the person who is behind the viewfinder. Make your own way. Make your own style. Be you.


This Post Has One Comment
I have moved into a new realm of street photography that goes beyond photojournalism (wherein truth and reality are critical). My images become art of an entirely new genre. I have seen nothing quite like it.
I use professional equipment (Canon cameras (7D and 5D Mark III) and lenses (70-200 f/2.8 and many others). I shoot people, buildings, animals, artifacts, and anything that seems interesting. I then take those images (RAW files) into Adobe Lightroom for developing. After initial treatments for exposure, lighting, clarity, artifact removal, etc., I import the image into Photoshop.
I have been a Photoshop professional for 23+ years, starting by restoring old photos before moving into artistic rendering. I have hundreds of brushes, textures, actions, and other tools I have created over the years in Photoshop. I also use plugin programs from several different vendors to enhance, touchup, or otherwise add effects to my art.
My art has attracted almost 1/2 million views in just over 4 years at http://haldanecreativeart.com. It is currently selling in two local galleries and is hanging in 2 restaurants and a radio station. It has twice been shown at the regional airport and has shown in several other venues as well.
I call my street photography art “Uniquely Asheville” (http://uniquelyasheville.com) because of the unique nature of the art and the unique environment that Asheville, NC provides.
John Haldane
Asheville, NC