
The Least Expensive, Most Versatile Lighting Modifier with Michael Corsentino
When the question “What’s the one lighting modifier I should buy?” comes up, my answer is always the same: a convertible umbrella. With many models available for close to or under $100, this humble tool is arguably one of the least expensive lighting modifiers you’re likely to come across—and, without question, one of the most versatile.
A quick Google search turned up convertible umbrellas available in varying sizes for as little as $17. That’s hard to beat for any lighting modifier, let alone one that does so many things and does them all really well. For the shoot featured here, I used a 41-inch Lastolite 8-in-1 Umbrella, clocking in at $113. What makes this umbrella so special is its eight possible configurations based on the fabrics and masks included. In order to keep things generic and applicable to any convertible umbrella you might find, I’ll focus on three of the four most common ways to use this tool.
Pros and Cons
First, let’s discuss the pros and cons of umbrellas. They’re often maligned for their light spill and lack of precise control compared to softboxes, beauty dishes and the like. In the right situations, this is a positive. Sometimes the light you create doesn’t need as much of a defined edge as you might think, as you can see in the images in this article. Convertible umbrellas are a jack-of-all-trades tool that offers four lighting configurations: shoot-through, bounce-back white interior, bounce-back silver interior and bounce-back with front-facing diffusion material. That means that with an umbrella, you get the option of direct or indirect strobe orientation (facing toward or away from the subject), which directly impacts the quality of light, all with one modifier. I’ll go over each of these configurations below.
In addition to their versatility, umbrellas work equally well with strobes or speedlights, requiring no additional expense for a speed ring. In fact, most strobes come with a built-in umbrella receptacle. Speedlight users need only an inexpensive tilt swivel bracket with a built-in umbrella receptacle to be up and running.
One of the other benefits of using an umbrella is the ability to focus the light to some extent. This is done by sliding the umbrella closer to or farther away from the strobe. The closer the strobe is to the center of the umbrella, the more focused the light, which translates into a harder quality of light with more contrast. Conversely, moving the strobe away from the center and positioning it at the widest part of the umbrella creates a less focused, softer, broader light.
Lastly, umbrellas are lightweight and compact, making them easy to use on a boom stand, light enough for an assistant to hold for an extended period of time and easy to transport. While this article focuses on their use in the studio, umbrellas excel on location for many of the same reasons listed above. The one caveat is wind. As with any umbrella, they don’t preform well in overly windy situations. If you find yourself working in heavy wind, you’ll probably want to reach for another modifier or risk watching your umbrella blow over.
Regardless of which modifier you’re using, factors like angle, size, position and direction of the strobe (toward or away from the subject) all play a role in the quality of light created. Once those decisions are made, it’s all about choosing shoot-through or bounce-back, the interior fabric (white or silver) and whether or not to use diffusion fabric.
Bounce-Back White
Right out of the box, your umbrella will likely be set up in the bounce-back white configuration. This configuration uses an opaque black exterior/silver interior fabric stretched over a shoot-through umbrella. The combination of the diffusion fabric inside covering the silver underside creates a white interior reflective surface.
There are several benefits of using an umbrella in a bounce-back configuration. First and foremost is the fact that it positions the strobe in an indirect position with respect to the subject. In other words, with bounce-back, the strobe faces into the umbrella and away from the subject’s position. In many cases, this results in a softer lighting effect than that created using a modifier, where the strobe faces the subject. This softer quality of light is further accentuated with a white interior.
Bounce-Back Silver
Here, the same attributes as bounce-back white apply, but with considerably more contrast and light output. This is due to the use of a silver reflective interior fabric. If you need a more punchy look or increased output from your strobe/speedlight, this is the way to go. That said, silver bounce-back is the one iteration I ended up not using for this shoot. When you need it, you need it. The Lastolite 8-in-1 Umbrella I was using has a separate insert that’s used to convert the umbrella from white to silver. Your mileage may vary depending on the model of convertible umbrella used, but the lighting effect will be same.
Bounce-Back With Diffusion Screen
In this configuration, a front-facing diffusion screen is added to the widest part of the umbrella, the side closest to the subject. Combined with its indirect strobe orientation and white interior fabric, the addition of diffusion material further softens and broadens the light, creating the softest possible lighting effect. Essentially this turns the humble umbrella into a makeshift octabank with all the upside and none of the expense.
Shoot-Through
With the opaque black outer fabric removed and its diffusion fabric-covered frame revealed, a convertible umbrella is now ready for shoot-through use. In this configuration, the strobe is aimed into the umbrella and fired through the diffusion fabric’s convex side of the umbrella, which faces the subject. In contrast to the three indirect bounce-back variations described above, shoot-through umbrellas use a direct lighting method. The strobe is positioned facing the subject. The light is surprisingly pleasing rather than harsh, with no overly bright hot spots you might expect. Of the variations discussed, shoot-through umbrellas provide the least degree of lighting edge and precise control, and they spill light everywhere. As you’ll see, these attributes can be turned into positives when you know where, when and how to use them.
Beauty
To create the beauty images, I used the umbrella as a shoot-through in combination with a fill reflector in a classic over-and-under clamshell lighting pattern. You can see that, despite the strobe facing directly into the umbrella and toward the subject, the lighting is pleasing and well suited for beauty.
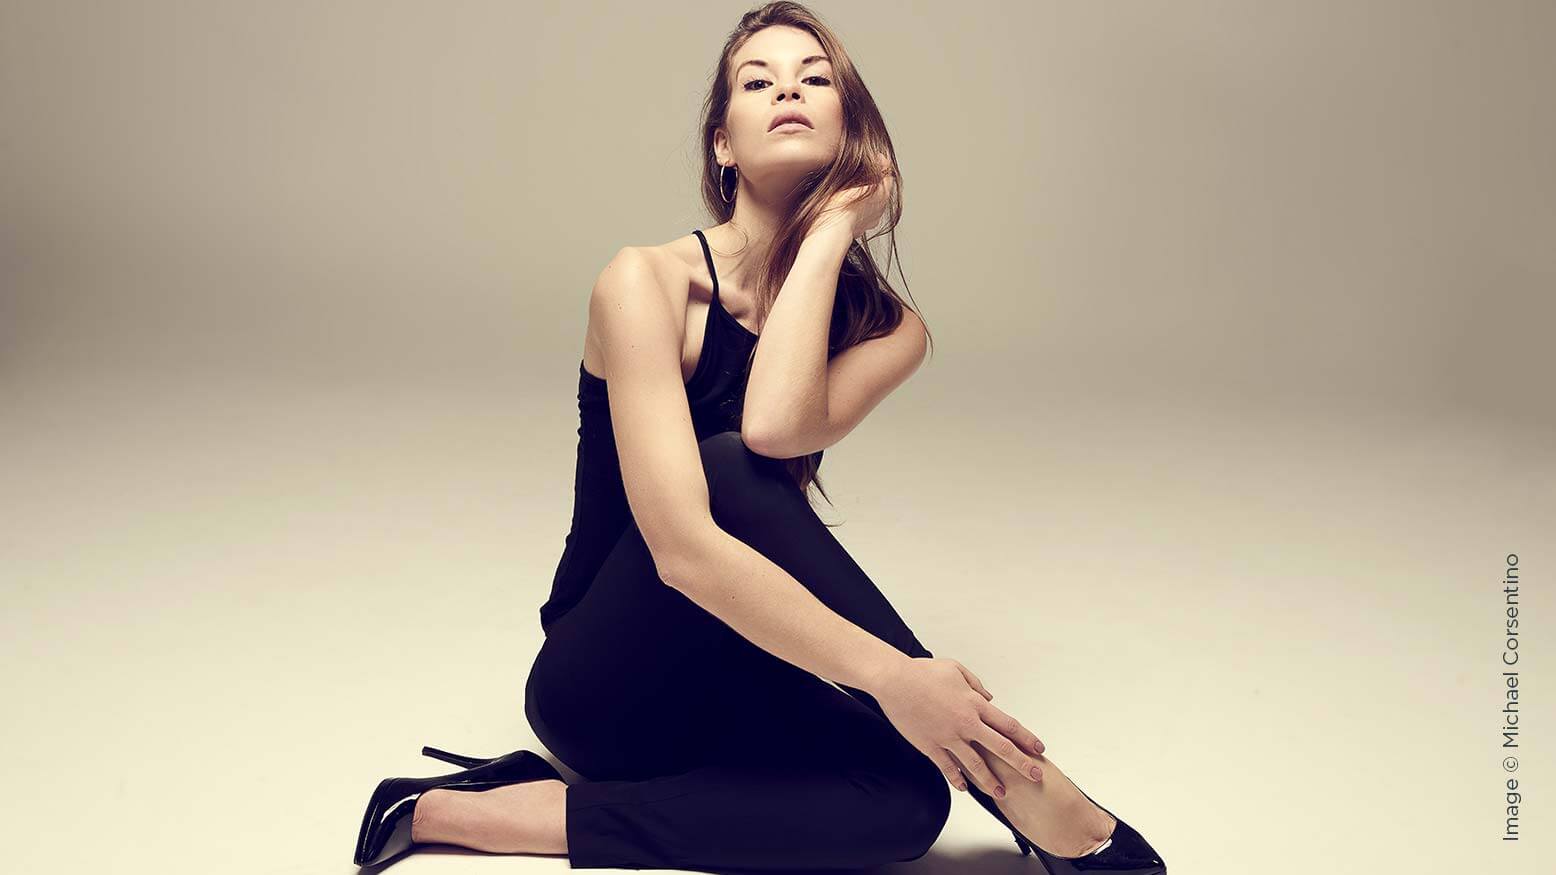
Soft Portrait
Here the umbrella was used as a bounce-back, with white interior and front-facing diffusion fabric. I moved the strobe to the side of my model, Candice, kept the fill reflector in place (shifted to match the new keylight position), and added a white V-flat on the opposite side of the keylight to provide subtle fill light on the shadowed side of the face. Changing the position of the keylight from the camera position to the side of the model introduced shadow for a moody vibe. The indirect strobe orientation, bounce-back lighting and diffusion fabric created a softer lighting effect.
Full-Figure Fashion: Two Ways
For the full-figure fashion images, I wanted to create one set of dramatically lit images with a nearly white background and another set with a slightly darker dove-gray background. It was easy to control the illumination on the background, in my case the white cyclorama wall in my studio, by simply varying the distance of the keylight from the background—no seamless paper changes required. The farther the strobe is from the background, the less light that spills onto it and the darker it gets. To create the dramatic lighting effect, I positioned the umbrella and strobe, configured as a white interior bounce-back, directly above and facing down toward my model. The edge of the light, or the “feathered” portion, plays a key roll. To achieve this, I simply instructed Candice to stay just behind the back edge of the umbrella.
Simple Tools, Awesome Results
If you take just one thing away from this article, it should be that you don’t need a ton of expensive gear to create compelling work. Stop using the gear as an excuse. You can do amazing things with simple inexpensive tools like a convertible umbrella.


This Post Has 3 Comments
Would have loved to see sample photos of the same model shot with the different umbrella modes. Otherwise, great article!
I agree with Earl, a few photos demonstrating use of the umbrellas
The sample photos are in the online magazine, which can be viewed for free (after registration) here: https://www.behindtheshutter.com/current-issue/