
Using Albums to Increase Sales with Craig LaMere
Want more information on this article? Get access to video content and additional supporting images. Launch the February issue of the magazine by logging in or signing up for a free account by clicking here. Shutter Magazine is the industry’s leading professional photography magazine.
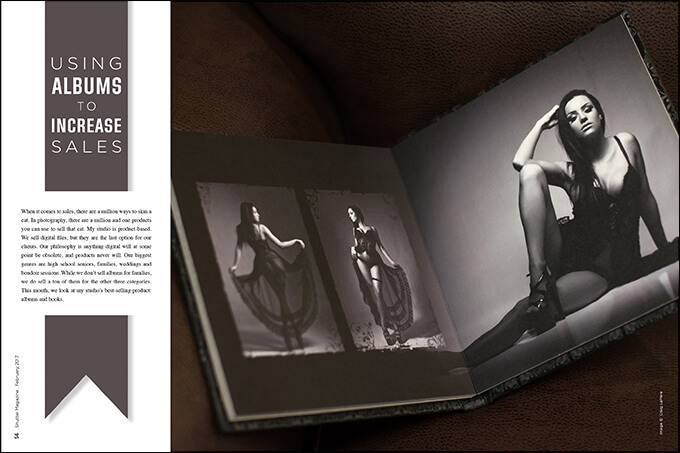
When it comes to sales, there are a million ways to skin a cat. In photography, there are a million and one products you can use to sell that cat. My studio is product-based. We sell digital files, but they are the last option for our clients. Our philosophy is anything digital will at some point be obsolete, and products never will. Our biggest genres are high school seniors, families, weddings and boudoir sessions. While we don’t sell albums for families, we do sell a ton of them for the other three categories. This month, we look at my studio’s best-selling product: albums and books.
Time Management
When I first started shooting, I wanted every shoot to be 100 percent unique. I would find all new locations for every shoot, find new poses for each person or family, and design each album page by scratch. I felt if I was not shooting and creating this way that I was doing a disservice to my clients and me. When I was building my book of business, it wasn’t an issue to spend extra time finding a new location for each shoot or building custom pages and layouts. As my book of business grew and my other obligations to the studio grew, I found myself getting more and more behind.
I asked friends who were shooting way more sessions than I was how they kept up with the work. A few of them told me it was just a matter of time management and setting routines. They were right.
Albums and books are a fantastic way to sell a variety of images to your clients, but there are a number of pitfalls you need to be mindful of, or they can quickly become a loss leader and a pain in the ass to offer your clients.
Probably the most common mistake when selling albums is pricing. The actual cost of the physical album is not that substantial when put up against metals or acrylics and even some canvas displays. Where you get yourself in trouble is the amount of time you invest in the creation of the album or book. Time investment includes shooting, editing and layout.
Pay close attention to your time. The easiest way to gauge it is to take the amount of money you are charging and divide it by the number of hours it took you to shoot, edit, design and deliver your book or album—that gives you a rough estimate of how much an hour your are making. If you take too long, you get beat up; if you can do it faster, you win!
Fighting Your Need to Be Creative (All the Time)
Artful shooters have a tough time suppressing the need to be creative during client sessions. This might sound weird, since what we do is art. But it’s important to adopt a set routine for sessions. I understand the need to flex your creative muscles so you do not get into a rut or get bored. So learn how to accommodate both your artistic and business needs.
You need a system that incorporates posing, locations, post-processing and design. Have a go-to shot list you go through when you shoot your session. These are the shots you know are going to sell every time. These are the shots that are pretty much going to look good with any client. These are the shots that you have done so many times that you can tweak them to fit any client. Have a location list that you know is going to have great light at a certain time. You know how to get the best depth of field because you know exactly where to place your subjects. When you take your images into post, have a base system and an order for each image. Have a system that gives you consistent results. From there, you can get creative. The system for your layout should be tried, true and pretty quick.
This will get boring for some of the creative shooters out there, but you can fill your creative needs by scheduling your own personal shoots. I do it all the time. It is my time to cultivate the artist in me. I can go as wild and take as much time as I like, and it does not affect my bottom line. This allows me to grow as an artist, which carries over to my clients.
Planning for Spreads
I always ask clients to send me pictures of their outfits. This helps me streamline my shoot and prepare for the layout. I have talked in other articles about how seeing the clothes will help with picking out locations and choosing backdrops because of the color palette of the clothes, but there are a couple other advantages to seeing the clothes before the shoot. One is that you will have an idea of how many changes you are working with. Because my main goal is to fill spreads, the more the merrier; if a client sends you just two clothes changes, you are limited in image choice at the view and order session. It is hard to sell a 10-spread album or book when you have only two outfits.
With high school senior sessions, we want a minimum of five clothes changes, and not more than eight. We stay out of the studio as much as possible. The only time we are in the studio for senior shoots is when we shoot fashion or sports uniforms. Most of the time we are running all over the place to different locations. If they have too many changes of clothes, clients start to get antsy.
Our boudoir sessions are a little different. Although we are still shooting to fill spreads, we do not need the same number of clothes changes for variety. That’s because 95 percent of these shoots are in the studio or indoors on location somewhere, so we are able to change the looks of the outfits with lighting. You can take a white outfit and shoot it with a 4×6 and make it light, soft and airy. You can take the same outfit and shoot it with a strip light and grid, and make the image contrasty, dark and moody.
Shooting for Layouts
When I’m shooting for albums and books, my mind is in layout mode. When you shoot for spreads, you do not need a million images. You need only three solid images. With any one pose, I shoot a full-length, a three-quarter, a tight crop, a vertical and a horizontal. This ensures I have all my bases covered for layout purposes. You can have more than three images in a spread, but you don’t want a cluttered page. Spread sessions go fast.
Layout: Don’t Do It Yourself
When I started selling albums, I laid them all out by hand. I created the layout templates using clipping paths, and bought different backgrounds online for each spread. I spent up to 30 hours editing and designing each album. I had it in my head that each album had to be totally unique. I felt I would be cheating my client and myself if I didn’t do it this way. After a while, I realized my clients were never going to see each other’s albums, and I was not cheating my clients or myself by changing my process.
The first thing I changed was how I did the layouts. I had been creating albums for so long that I had a bunch of templates. If I needed a spread with two vertical placements and one horizontal, or if I needed a spread with two horizontal placements and one vertical placement, I was in business.
The problem was how long it took to place everything by hand. Then someone introduced me to this company called Fundy…and my life was changed. I could go on an on about Fundy, an automatic layout program. All you have to do is load your images, hit a button and choose a layout you like. You can easily tweak a layout in seconds. What once took me hours I could now do in minutes.
I also changed my album design. I had been painstakingly matching the background of the album with the images, framing each image, and on and on. It was so time consuming. Just as my shooting style has changed, so has my layout style. Instead of using all these crazy backgrounds, I use a plain white background for my pages, which has saved a lot of time in the design process—while making my studio more profitable.
Want more information on this article? Get access to video content and additional supporting images. Launch the February issue of the magazine by logging in or signing up for a free account by clicking here. Shutter Magazine is the industry’s leading professional photography magazine.


