Using Backdrops to Create Impact Images with Craig LaMere
Photography is interesting in that you can make your work as simple or as complicated as you want. I have friends who are very artsy and who are true storytellers with every image. They think about every part of the image, and are meticulous in the placement of the subject as well as everything else in the frame. I also have friends who are not worried in the least about telling a story or being artistic. All they care about is producing an image in the fastest time with the least cost to the consumer.
There really are so many factors that go into the execution of an image. I pretty much fall in the middle of the two extremes. I put a lot of thought and preplanning into my shoots, but I don’t really shoot to make a statement, and there’s no hidden meaning in my work. I shoot to make cool, badass images. I break my images into two parts. One is the subject and the second is the background my subject is going to be on. This month, I talk about the different types of backgrounds I’ve used.
Sheets and Fabric
When I first started shooting, my “studio” was a room in my basement, which I used for about a year before I made the move to my first proper studio. The room was my theater and video game room. It was the biggest room I could use in my house. It was about 12 by 16 feet, and the ceiling 8 feet. I bought a simple two stand and bar backdrop stand. Back in those days, I had no idea about the different kinds of backdrops that were out there, so I did the only thing I could think to do, which was to go buy some sheets.
Some of the things I found out shooting my sheets was they are very thin and you can see what is behind them very easily. Also, they wrinkle super easy. You really have to wash them a few times on hot and use a ton of fabric softener if you want to be close to wrinkle-free. One of the not-so-cool parts of shooting sheets is it is kind of hard to find just a cool top sheet. Most of the time you have to buy the whole set to get cool ones, and you end up with a million fitted sheets and pillowcases. My mountains of pillowcases led me to a fabric store for my next backdrop.
I actually liked the fabric store a lot. There are so many options to choose from. You can get any color and texture of fabric you can dream of. Most fabric is much thicker than the sheets I was using. A lot of the fabric I used had a certain texture to it that really played well in my images. The fabric I liked best was the pillow-top type because of the stitching.
Although I really loved using fabric at the time, there were two things about getting fabric for drops that was not cool. One, you are super limited on width. Most fabric is pretty narrow. The bolts on average are 45 to 60 inches wide, so you are pretty much limited to shooting individuals. The second thing that mega sucks about using fabric for your drops is…holy shit, fabric is expensive! Don’t buy fabric at the retail price, or you will go broke. Most stores have some kind of coupon, whether it is paper or electronic, that gives you up to 60 percent off.
Seamless Paper
After that first year in my basement, I moved into my first studio. It was a sweet older building that had 12-foot ceilings and two shooting bays that had pretty good depth. I was introduced to a lot of new things in the photography world. One was seamless paper. Now that I had the room to put up a real drop, I started shooting the paper. I really liked it. It is a clean, flat surface that comes in a ton of colors. One of the great things with paper is how it responds to every light source. It takes natural, strobe and constant light very well. You can hit it with unmodified light straight on, and it still looks great. Seamless paper comes in about every color under the sun and in a variety of lengths and widths. It comes on rolls from 4 feet to 10 feet wide, and from 12 to 50 yards in length. Get the widest roll your shooting area can hold. Start with 20 yards or so to see if you like it. A roll costs as little as $75.
While I really liked seamless, there were a couple issues that made me quit shooting it in my studio. Because I’m a one-man show, I have to put the paper up and take it down on my own. A lot of the time I would accidentally rip and crease the paper. Then I’d have to cut it and start over. The second issue I had with the paper was storage. At one point, I had 10 different colors, and it was a pain to store because the rolls took up too much space. The paper also became too plain for my shooting style.
Hand-Painted Muslins
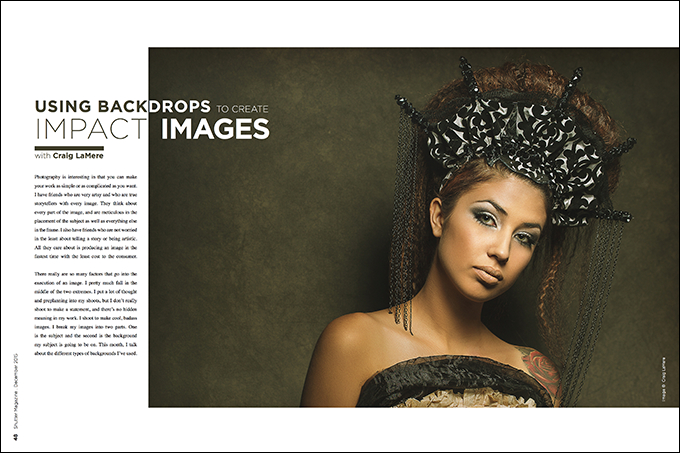
When I was having my issues with seamless paper, I was introduced to hand-painted muslins by my good friends Travis and Paula Gadsby of Silverlake Photo Accessories. Muslin drops are painted cotton muslin fabric. Muslin is heavier and more durable than seamless paper, and lighter and more maneuverable than painted canvas drops. They gave me a sweet deal on a couple to try. I picked out an earth tone and a gray one.
I liked them, but also hated them because of all the wrinkles and fold marks. I shot them a couple of times the way they were, and then decided I would try to steam out the wrinkles and folds. After two long attempts trying to steam, I asked Travis for advice. I followed his advice, and suddenly felt like the caveman who discovered fire.
Travis told me to hang the muslin and spray water on it from a spray bottle, front and back, and then wait for the wrinkles to disappear. I sprayed the drop and prepared myself for a long wait, but to my surprise, it didn’t take long, about five minutes. It was amazing. One of the universal reasons people avoid shooting muslins is the wrinkles. You cannot believe the reaction I get when I tell people how to get rid of them. (Travis made a video showing just how easy it is to get rid of them: www.youtube.com/watch?v=L6tY0TfKJq8.)
Now that I had the solution to my biggest issue with muslins, I was able to really give them a whirl. Of all the backdrops I have used, hand-painted muslins have had the biggest impact on my style of shooting. In my studio, I shoot at least 90 percent of all my work on them.
There are three main reasons muslins have been a game changer for me. One of my big issues with paper was its durability under the conditions I had to shoot in; I would rip and fold it all the time. That’s not a factor with muslin. One person can easily put it up and take it down without having to worry about it tearing or folding.
Another issue I had with seamless paper was the character of the paper. Seamless, just like muslin, comes in a million different colors. Because I shoot almost everything in my studio monochromatic, having a wide range of colors in my drops is very important. Seamless is plain, and that is what you get when you shoot it. For a lot of people, that’s a good thing, but for me, it was just too plain.
The way I shoot, I like my background in most cases to be part of the image. Because muslins have such a wide tonal range due to how they are painted, they give my images a depth that plain paper cannot. It’s the added depth that is so appealing, and the main reason I use them almost exclusively.
The last reason I prefer muslins to paper is how they can be stored. I just fold them up when I’m done and put them on a shelf till I need them—versus having giant tubes all over the studio.
I hope this helps you if you are trying to figure out the best drop options for shooting either in your studio or, like me in the beginning, in your cramped man cave.


This Post Has 3 Comments
Good article… I use painted muslin backdrops, 12’x20′ for the most part, and they’re great… but they do have the drawbacks you describe. I’ve been using clamps when I set the backdrop up, two at the top of the stands and two at the bottom, stretching the muslin a bit to get rid of the wrinkles, which works, but I’m going to try your method. Thanks!
I’m surprised Oliphant backdrops weren’t included in this post.
While they are pretty pricey to buy, if you have a decent commercial budget, I recommend looking at their stuff.
But even better–Save yourself the disgrace of owning the same old muslin the next photog owns and make your own–
So much more cost effective in the long run–AND allows you to shape your studio’s palette the way YOU want–
Easy tutorial for making your own is below: (I am not paid to promote this–just sharing a tried and true )
http://ilovehatephoto.com/2014/10/15/how-to-hand-paint-an-oliphant-or-schmidli-style-photo-backdrop/
The seamless paper also gets dirty fast. Just after one shoot, even with cleaning off shoes, they will show marks, and yes it is hard to lower down more paper by yourself. I don’t notice marks from muslin fabric.