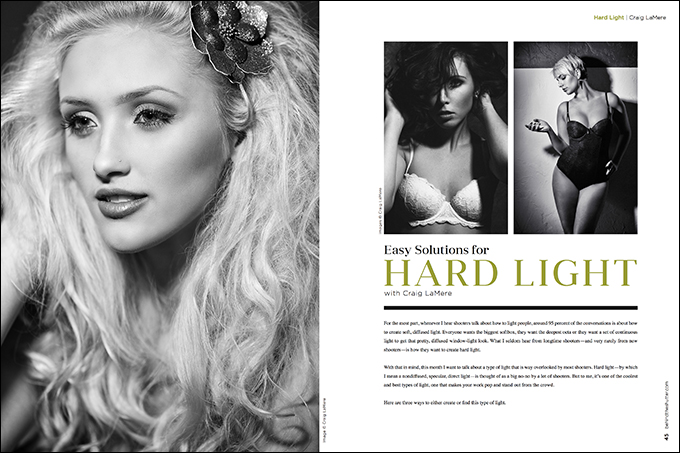
Using Hard Light with Craig Lamere
For the most part, whenever I hear shooters talk about how to light people, around 95 percent of the conversations are about how to create soft, diffused light. Everyone wants the biggest softbox, they want the deepest octa or they want a set of continuous light to get that pretty, diffused window-light look. What I seldom hear from longtime shooters—and very rarely from new shooters—is how they want to create hard light.
With that in mind, this month I want to talk about a type of light that is way overlooked by most shooters. Hard light—by which I mean a nondiffused, specular, direct light—is thought of as a big no-no by a lot of shooters. But to me, it’s one of the coolest and best types of light, one that makes your work pop and stand out from the crowd.
Here are three ways to either create or find this type of light.
Modeling lamp as constant
A strobe head comes with two lights. One is the actual flash tube that creates the light you use to make your image. The other is what is called the modeling lamp. The modeling lamp is used as an approximate guide that shows you how the light is falling in conjunction with your strobe.
Here’s a memorable early experience I had shooting strobes with barn doors.
I had been shooting strobes for a long time, always with an attached softbox, a strip light with a grid or a beauty dish. I decided to practice with my barn doors. I put them on and turned the head on. The light that came out, because the lamp was at full power, was super bright. It reminded me of a Fresnel light. I shot my session, but kept thinking about how bright the modeling lamp was in my Einsteins.
I wanted that old black-and-white Hollywood feel with a lot of depth of field, but with a hard edge. I also wanted that “shoot what you see” feel, the latitude of shooting you get using constant lights, but in a harder form. I knew the light from the modeling light was not going to be strong enough to shoot at f4 or more without really pushing the ISO; if I wanted to be past f4, I would just shoot the strobe as a strobe and not try to use it the way I was hoping to. I figured I’d shoot at f2–f1.2 with my 85 L 1.2.
I scheduled another practice session for the next day to see if the lamp with the barn doors was bright enough to use as a continuous light. It was. It was awesome to just put the light where I wanted it, to use the barn doors to control exactly how I wanted the light to fall. I achieved a very crisp and edgy light.
Because I was using my strobe as a constant light, I used my constant rule, which is to spot-meter in camera. There were two small issues I had to resolve that were no biggie. Because I was using the modeling lamp as the main, I had to employ a custom white balance since the light was crazy warm in tone. I moved my ISO to 400—which for today’s bodies is nothing as far as noise goes—so I could shoot at the speed I wanted. I’m a hand holder, so I like to shoot at 1/500th and up because I’m kind of shaky.
Hard light indoors with the 7-inch reflector
When my first set of strobes showed up on my doorstep all those years ago, I was so excited that I tore open the cardboard boxes to get at my green AlienBees 800s. There was a black plastic cover over the modeling light and flash tube.
There was also a silver round thing in the box that I never really paid any mind, because all I could think of was getting to the studio and trying out my softboxes that had been delivered the day before. The silver thing was a 7-inch reflector. At the time, the only thing I knew to use it for was to get a grid for it and use it as a rim or hair light modifier. I had been shooting everything in studio with my 4×6 and 3×4 box to get that soft feel or with my white beauty dish to get a little harder look. I was getting bored and wanted an edgier look and feel to some of my images. So I wondered what would happen if I shot with this 7-inch reflector. Shazam. That’s what happened. I have never been more surprised by the light from any modifier more than I have been from using the 7-inch silver reflector.
The 7-inch reflector has about an 80-degree spread, which is about two-thirds the spread of a white 22-inch beauty dish and about twice the spread of a silver beauty dish. Because the 7-inch reflector is so shallow and the sides are so close to the flash tube of your strobe, it is very direct light; and because it is such an efficient modifier, there is not a lot of light loss. There is no baffler or diffuser between the light and the subject, so it produces just about the hardest light you can get.
When I shot the 70-inch reflector the first time, I shot it very directional in my studio. I was trying to shoot a Rembrandt pattern, and because of how specular the light is, it falls off like mad in a hurry on the shadow side. You can go from properly exposed to clipped in a few inches, depending on how close you place the head to your subject. I found that the modifier, if you are going to shoot really directionally, works best at a medium distance so some of the light can get into the shadows. I started playing with different patterns and found I really liked the light I got when I placed the strobe in a butterfly or loop position because of how the hard shadow was lessened. The hard edge is still there, it is just not as pronounced or long as it is in some other lighting patterns.
The hour before Golden Hour
Every photographer’s favorite time of day, the Golden Hour, is the hour before sunset. That’s when the light is perfectly soft and naturally diffused, making it near impossible to get a bad shot.
But there’s a time of day a lot of shooters overlook: the hour right before the Golden Hour. The hour right before the sun sets provides a very intense hard light. Some people say there is hard light outside in full sun most of the time throughout the day. True, but the light an hour before the Golden Hour is such good light because of the angle.
Shooters get hung up on natural light versus studio light, and to me light is light and the how, what and why you use it are the same. When you are thinking about how you would use your 7-inch reflector in studio, you’re taking the same things into consideration as you are when you’re considering how to use the hard light of the sun outside. If you were shooting in your studio, you would not just stick your strobe anywhere and fire it and hope you have a good image. You would place the light at the angle and direction you want in order to achieve the look you want. So, why would you just go outside at any time of the day and just shoot? You wouldn’t. That’s why I love the hour before the Golden Hour so much. The angle of the light at that time is perfect for butterfly or loop lighting.
Eyes get a full blast of awesome specular light in the hour before Golden Hour. The only real downside to this is the light is so intense at times that your subject’s eyes will start to water if you have her looking into the sun too much. I have the subject pose and then close her eyes until I set focus and compose the shot. Then I tell her to open her eyes wide, and I get the shot.