
Working with Specialty Lights and Modifiers—Is There a Difference? with Michael Corsentino
When I’m considering investing in a specialty item and incorporating it into my workflow, it needs to do one of two things really well. It either needs to do something that none of the other tools in my studio can accomplish on their own, or it needs to be able do the job of several tools at once.
Tools like the Fresnel, zoom spot and ring flash each fit the first category by doing something no other tool can. They add a lot of versatility to your lighting répertoire, but they have very specific, limited uses. You could say they’re one-trick ponies. The tool that does both is a rare bird indeed.
I recently decided to take the plunge and invest in the Broncolor Para 133, a tool that actually manages to meet both my criteria and then some. This is a really exciting light modifier, and I want to share the results of my first shoot with it and talk about how we used it, in a field report of sorts.
This is a costly tool, on par with what you’d likely pay for a professional DSLR. But if beautiful lighting is as important to you as it is to me, the expense may be justified. Any studio/rental house worth its salt is likely to have Paras you can rent to try out. So if you love the quality of light you see here, don’t let the price tag stop you.
So what’s the difference? It’s an umbrella—what’s all the fuss? Do these modifiers live up to all the hype? Are they worth the added expense? In my experience, the difference is similar to driving a Kia versus a Porsche, or drinking a $10 bottle of wine versus one over $100. With both, you need to try them before you truly appreciate that, yes, there is absolutely a big difference. The same is true with specialty lighting gear.
The legions of fashion, portrait and commercial photographers and rental studios that invest in one of every size must be onto something. So what is it exactly that makes the Broncolor Para so desirable for so many? It’s the variety of light you’re able to create with one. From super soft to specular and everything in between, this one tool has all the bases covered, which is why I found it so compelling. Another upshot is you need fewer tools to get the job done. As with most modifiers, you don’t need to use the same manufacturer’s lights. With the Broncolor Para, I can use my Profoto or Elinchrom strobes with an adapter.
So how does the Para achieve its lighting gymnastics? The magic happens via a sliding “focusing tube” in the center that allows the strobe in use to be positioned anywhere from the widest to narrowest part of its parabola shape. This takes the light from gorgeous and soft at the front, or widest, part of the Para all the way to hard and specular light at the back, or narrowest, part of its shape.
Along with the build quality you’d expect from a tool in this class, the Para has another unique attribute: its signature catchlight. You’ve probably seen this catchlight in countless fashion and commercial images and wondered what it was. Now you know. This is the result of its one-of-a-kind 24-faceted silver interior. (I’ve included a detail image of this catchlight, which I can achieve only with this tool.)
Let’s dig in and look at each of the finals and how I created them.
First Look
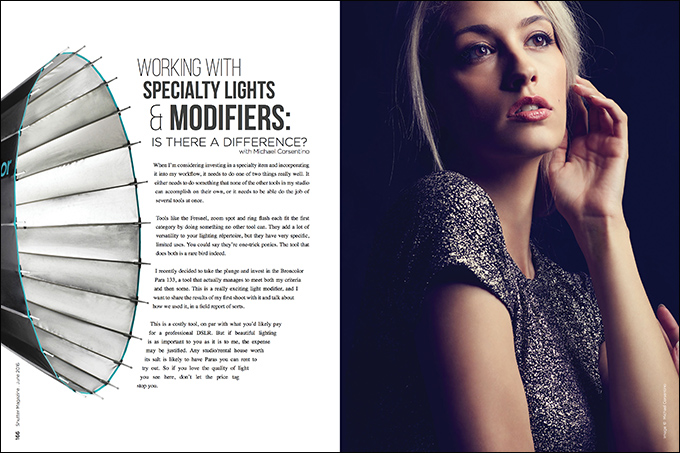
For the first image, I decided to start with a beauty setup using over and under clamshell lighting. I placed the Para above my model and positioned the strobe as far back as I could, at the narrowest part of its opening. This guaranteed me the hardest light possible. I placed a silver-faced reflector by my model’s waist to fill in the shadows cast from above and to match the contrast created by the keylight. As you can see, the effect created is very dramatic, capturing the Para’s signature catchlight, and screaming fashion.
Now that I’d nailed the hard-light look, it was time to move on to a softer fashion/beauty look.
Second Look
For the second, softer look, I kept the over and under Para and fill reflector arrangement, but this time moved them both camera right, giving the light direction and introducing shadow. I positioned the strobe at the widest part of the Para’s opening. This guaranteed me the softest undiffused light possible. It amazes me that I’m able to create both the first and second lighting effects with the same modifier. And I’m not even finished. Positioning the strobe at the widest part of the Para created a soft, silky, luxurious quality of light.
Third Look
For the third look, I wanted to see how soft I could take things with an editorial portrait. This modifier has a silver interior, so I was curious how it would behave with a diffusion panel. There are three diffusion panels to choose from with varying degrees of opaqueness. I wanted softer light, but I also didn’t want to defeat the Para’s unique characteristics and turn it into an everyday octabank. So I struck a middle ground and chose the No. 2 diffusion fabric. This softened the light, cutting it by about half a stop, while maintaining some of the crispness and the catchlight. To give the image a more polished effect and add more dimension to the model, I first added a reflector camera left to act as a kicker. Later, for the final image, I replaced this with a large Elinchrom strip box.
The right specialty lights and modifiers have their place. In previous features, I’ve demonstrated that you can come close to what’s possible with high-end gear using a variety of low-cost tools. But here you can really see the differences you get with the high-end stuff.


