
17 Actionable Tips for Instantly Better Wedding Detail Images with Lori & Jeff Poole
Do detail shots make you groan?
In the days of Pinterest, Instagram, wedding magazines and wedding blogs, creating beautiful images of wedding details has never been more important.
Yes, we know that the wedding day is about the beautiful union of a unique couple. But in all honesty, couples don’t spend an entire year planning just their wedding vows. Instead, they’re choosing centerpieces, gowns, shoes, flowers, linens, venues… It’s the visual details of the wedding that the couple spends the most time planning and researching. And they are doing that research online using image search media.
If you’re not taking your time to preserve the details they’ve worked so hard on, you’re missing out on a huge marketing opportunity! If you’re only sharing your couple creatives, you’re not being found when they search for something like “Moroccan wedding decor.” And of course, capturing images of these details is a great way to earn referrals from your fellow wedding vendors.
If you’re ready to up your detail game, check out our 17 actionable tips that will turn you into a detail ninja, from getting ready through reception.
1. Simplify your backdrop
When photographing the bride’s or groom’s personal details, start by looking for a simple, clean (not busy) backdrop. Polished fine-grain wood, glass, linen, or suede will allow your details to take center-stage. Avoid busy patterns, loud colors, heavy wood grain or granite, and dirty or cheap surfaces. You may even consider carrying a details styling mat in case the prep venue doesn’t have the perfect backdrop.
Pro Tip: Photograph each partner’s details on a different surface to provide a clear distinction in the album.
2. Direct the light
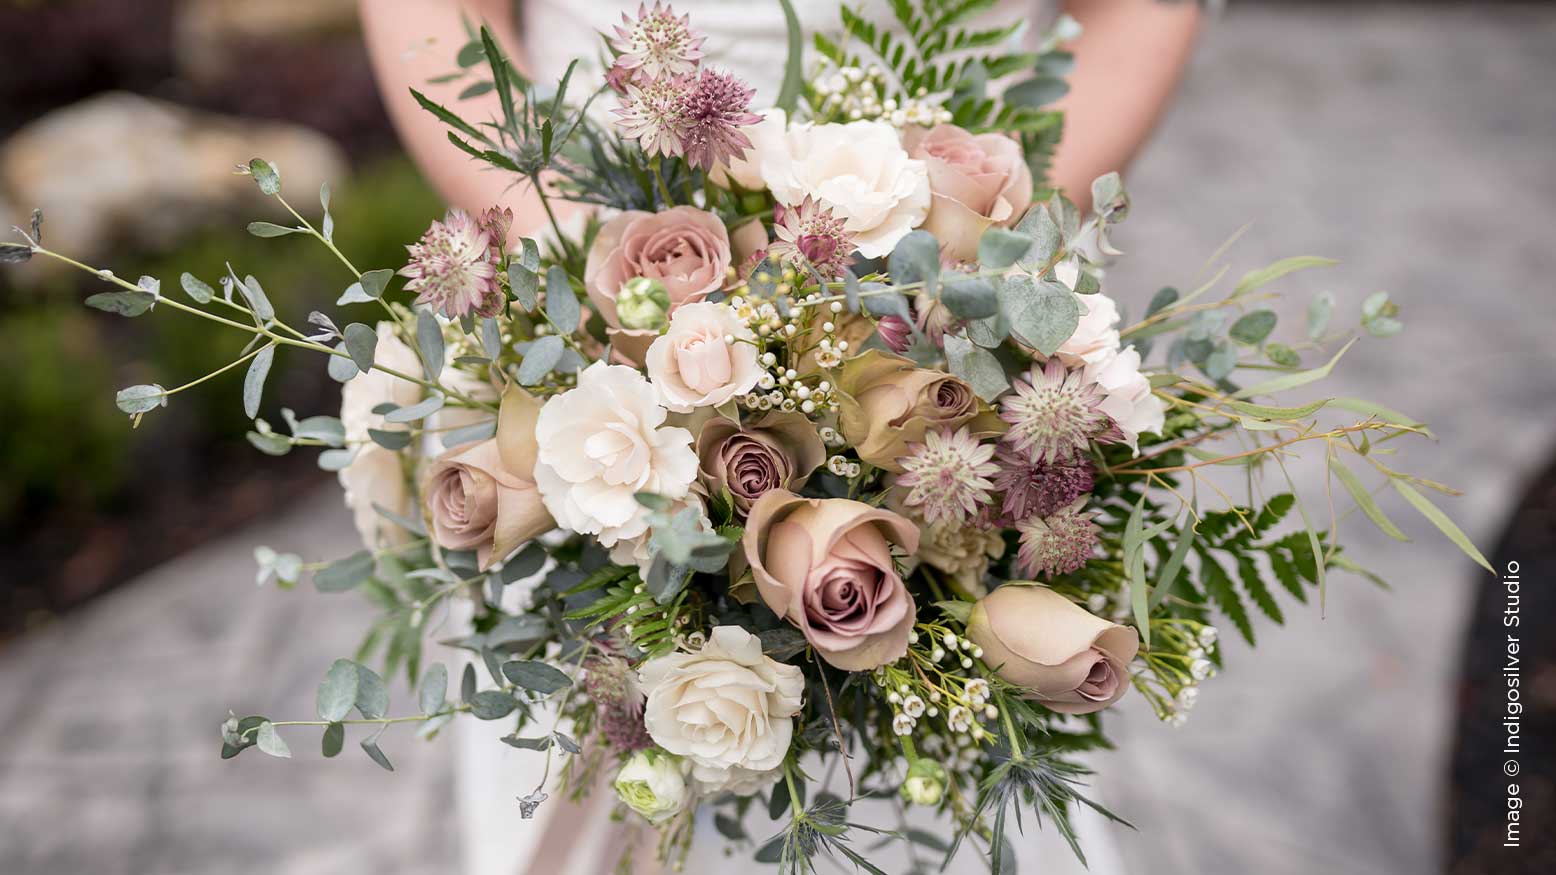
Bring your surface near a window and shoot alongside the window so that the details are lit from the side. If window light is unavailable, bounce your flash to the side. When an object is lit from the side, it enhances the texture of the item and makes it more three-dimensional. Want to bring out the lace in the dress? The petals in the bouquet? The rhinestones in the hairpiece? Directional lighting is your friend.
3. “Pose” the details
For the best detail shots, you can’t just toss the item up on the table and shoot it. Take careful consideration to showcase each item. For example, guide the necklace into a pretty shape. Stack the rings so that they interact with one another. Do something interesting with the shoes besides setting them flat.
4. Shoot macro at f/11 or higher
When getting super close up photos of the smaller details, it is important to stop down your aperture to maintain depth of field. A ring photographed close up at f/2.8 may have only one prong in focus and everything else extremely soft! You’ll definitely want to at least keep the whole center stone in focus.
5. Work on your flat lay game
Flat lay images are extremely on trend right now! A flat lay is essentially a bird’s-eye-view of your details, shot straight down with your camera angle parallel to the surface. A successful flat lay will have a strong composition of the items and a consistent color palette.
Pro Tip: Don’t feel obligated to include every detail in the flat lay. Instead, choose the items with the strongest composition and color affinity.
6. Show high-end brands when applicable
Your bride found the perfect bejeweled Badgley Mischka shoes to go with her Hayley Paige gown. Her earrings are Harry Winston. The bracelet came from Brilliant Earth. You have a label-conscious bride! Where possible and appropriate, work those labels into the photographs.
7. Get a ceremony pull-back before guests arrive
Show the aisle, the décor, the scene, and the altar or chuppah in one grand photo. This makes a great full-page spread in the album to transition from prep to ceremony. You’re also capturing the handiwork of multiple vendors in one clean photo!
8. Take advantage of repeating aisle elements
Whether the aisle is a sandy path lined with seashells, shepherd’s hooks with hanging topiaries, or oak pews adorned with floral bouquets, the concept is the same! The couple has chosen to adorn the aisle as a symbol of their path to unity. Take advantage of the repeating decorative elements by shooting down the aisle, with the first or second decoration in focus and the others falling into soft bokeh. This will yield a better result than photographing each decoration straight on, as it better tells the “story” of the aisle path.
9. Get eye level with the table
At the reception, the vast majority of the details are below eye level, which means you’re shooting down at them. This is often an uninteresting angle, and also brings more attention to the less photogenic details like chairs and busy ballroom carpet. Instead, kneel down and get eye level with the table. The image will instantly have more depth, as you can now include other centerpieces, candles, and chandeliers in the distance.
Pro Tip: Remove any chairs, glassware, or condiments that are directly between you and the centerpiece to avoid unnecessary foreground distraction.
10. Isolate details
As you are now eye level with the centerpiece, use a shallow depth of field to ensure that the viewer’s attention doesn’t wander. Showcase each detail in its own photo.
11. Use telephoto compression to your advantage
Using a telephoto lens to shoot reception details offers two strong advantages: 1. A narrower field of view and shallower depth of field helps hide busy ballroom carpet and other undesirable elements, and 2. Compression makes desirable elements like chandeliers or other centerpieces larger in the background. These two advantages really help you control the scene by keeping the background simple and soft, yet with depth and dimension.
12. Add directional lighting (again)
As with the pre-ceremony details, directional lighting is your friend with the reception details. Use off-camera flash or a video-style LED to side-light your detail. This makes the one detail you are focusing on brighter than the rest of the scene, and adds texture, which directs your viewer’s eye right to that detail. An off-camera lighting solution will yield the best results here for a spotlight effect; whereas bouncing your on-camera flash will light the whole room and crush any ambience from candles, chandeliers, or uplighting.
13. Shoot into the room, rather than toward a wall
The best way to showcase the ambience of the room in the background of your detail photo is to choose a detail near the edge of the room and shoot inward. This allows you to show additional tables, centerpieces, candles, uplighting, gobos, and chandeliers in your background. Consider how you are helping the venue sell their best features by showcasing beautiful light fixtures and architecture and minimizing the focus on chairs and carpet.
14. Watch your background
All this telephoto shooting with the whole room in the background has a caveat. It’s easy to have unwanted elements in the background. Keep an eye out for trash cans, large DJ speakers, exit signs, doors, and catering staff that will add unwanted distraction. Thinking forward to album design, be mindful of the overall color palette of your background. For instance, if you’ve mostly been shooting toward the center of the room with beige walls and warm uplighting in the background, you wouldn’t want to suddenly change directions so that you now have giant dark mahogany doors in your background. Keeping a consistent background color palette will make for a more cohesive album design.
15. Check in with fellow vendors
I once proudly showed a tablescape photo on the back of my camera to the wedding coordinator, and she said, “It’s pretty, but I would never show that in my portfolio.” Before I had the chance to get offended, she quickly added, “The chairs on the banquet table aren’t all set the same distance from the table, so the line is crooked. And same goes for the charger plates.” In that instant, I learned a quick lesson: The best detail shots are the ones that make ALL the vendors shine to their own highest standards, and those standards are not always aligned. While the wedding coordinator wanted perfectly aligned chairs, flatware, and chargers, the catering staff simply needed to get everything out on time. So now, I will check a tablescape for alignment and symmetry before taking a photo. My networking opportunity is lost if the vendor is displeased with something in the image. Take the time to ask your fellow vendors what they want to see in photos for their own portfolio.
16. Remember the DJ
Most vendors are pretty easy to represent photographically: Floral bouquets and centerpieces, cake, invitations, gown. But how can you represent the DJ, whose product is sound? Well, some of the DJ’s offerings might actually be visual. For instance, an uplighting package or dance floor lighting. And a DJ creates an experience, which can be photographed. High-energy guests shaking their booties on the dance floor, hands in the air, exaggerated (tipsy) expressions, and that one groomsman with his tie around his forehead… But how about showing the DJ? Hands on the mixing tools, leaning into the headphones, dance floor lighting all around. Make the DJ shine, and you’ll be one of the few photographers that remembers this important vendor!
17. Keep yourself in mind!
Your wedding clients have likely already purchased things from you that will be on display at the wedding: A bridal portrait, engagement photos, a guest signature book. If so, go ahead and photograph them! First of all, from your clients’ perspective, those items are a part of their wedding details (and will probably include them in an extra spread in their wedding album). Secondly, you can use the images in your own portfolio and marketing pieces, showing how clients enjoy their printed products. All the vendor love comes full circle!
Ready, Set, Go!
These are our favorite strategies for photographing wedding details that wow your clients and earn referrals from your fellow vendors. Which tip was your favorite? We’d love to hear what’s working for you!


