5 Steps for Creating a Successful Photography Narrative with Kate Woodman
Storytelling is what we do as humans. It’s in the movies we see, the books we read, the music we listen to—it’s even in that commercial for your laundry detergent or favorite soft drink. Now more than ever, creating a narrative is the key to engaging an audience that is constantly bombarded by content—and more and more photographers are being hired to fabricate these stories for brands.
So what is the key to creating a series of images that tells an effective story? Below are five tips to help you bring a successful narrative to life.
1. Create your characters
Have you ever been to a movie that has a great plot and beautiful cinematography, only to have it ruined by bad acting? You can have the best story in the world, but it’s all for nothing if your characters aren’t convincing. When I photograph my stories, I try to put myself into the mindset of a film director. Whether you’re shooting a portrait, a fashion editorial, or a commercial campaign, giving your talent a backstory and an emotional direction will help them to get into the head of the character or subject they’re trying to portray and make for a much more compelling image. Tell them that they’ve just won the lottery, and watch their face light up—or that their dog ran away, and watch their body language slump. The more you can reduce their inhibitions and allow them to roleplay, the more believable their character will become (and the more fun you’ll have on set!)
2. Follow a narrative arc
Most stories follow a classic narrative arc, comprised of four major parts—exposition, rising tension, climax and resolution.
A. The exposition sets the stage for your story, usually by introducing the characters, location and/or time in which the story is set. This is the chance for you to give your viewer a hint of what’s to come and establish a hierarchy of importance. For example, if your story is set in a fantastical realm, your introduction image might be a wide-angle shot of a magical landscape. Or, if your series relies mostly on your character development rather than an interesting setting, start with a tight portrait. This is your first impression, and it’s an opportunity to hook your audience with a compelling image, so you want to make it count!
B. The rising tension is where the plot thickens, so to speak. This is where we build interest, tension, or suspense that leads to the climax of the story. That character-building is going to be very important. Unlike in a film, where you have time to develop emotional nuance, here you have to condense that into a limited number of frames. You’ll want to illustrate that emotion in the form of expression, body language, and/or a change in time or location to propel your story forward. It’s worth noting that your rising tension can be developed over a number of images, depending on the complexity of your story, so take as much or as little time as you need here to develop your plot effectively.
C. The climax is the decisive moment or turning point in the story. It’s usually when a character makes a key decision or puts a plan into action. This could be a battle scene, an athlete crossing the finish line, or someone’s untimely demise. Because of its pivotal nature, the climax is usually showcased in a single, penultimate frame; as such, I like to incorporate something different aesthetically to set it apart from the previous imagery.
D. The resolution brings the story to a conclusion. It can be the calm after the storm, or where all of the loose ends are tied up, such as a king being crowned after his defeat of an evil army. Or, conversely, it can surprise the viewer by going in a direction the audience may not have expected, like the reemergence of the killer you thought the protagonist had defeated. This is the finale of your story, and it is likely the image that your audience will remember best, so you’ll want it to complement the series leading up to it.
3. Lighting
As photographers, we all understand the importance of lighting. Particularly in the portrait and fashion fields, there is often an emphasis placed on flattering light for our subjects. In narrative photography, however, the light has to complement the overall mood of your story. For instance, if you’re shooting a campaign for a whitening toothpaste, you don’t want dramatic, dark lighting, because it’s incongruous with the brand message and content—instead, you’ll want lots of bright, high-key lighting. Conversely, if you’re shooting the promotional art for the local theater’s latest production of Macbeth, it’s totally okay to sacrifice flattering, soft light for the more dramatic, contrast-y light that the play inspires. At the end of the day, you want to make sure your lighting serves the emotions and the aesthetics of your story and not the other way around.
4. Color
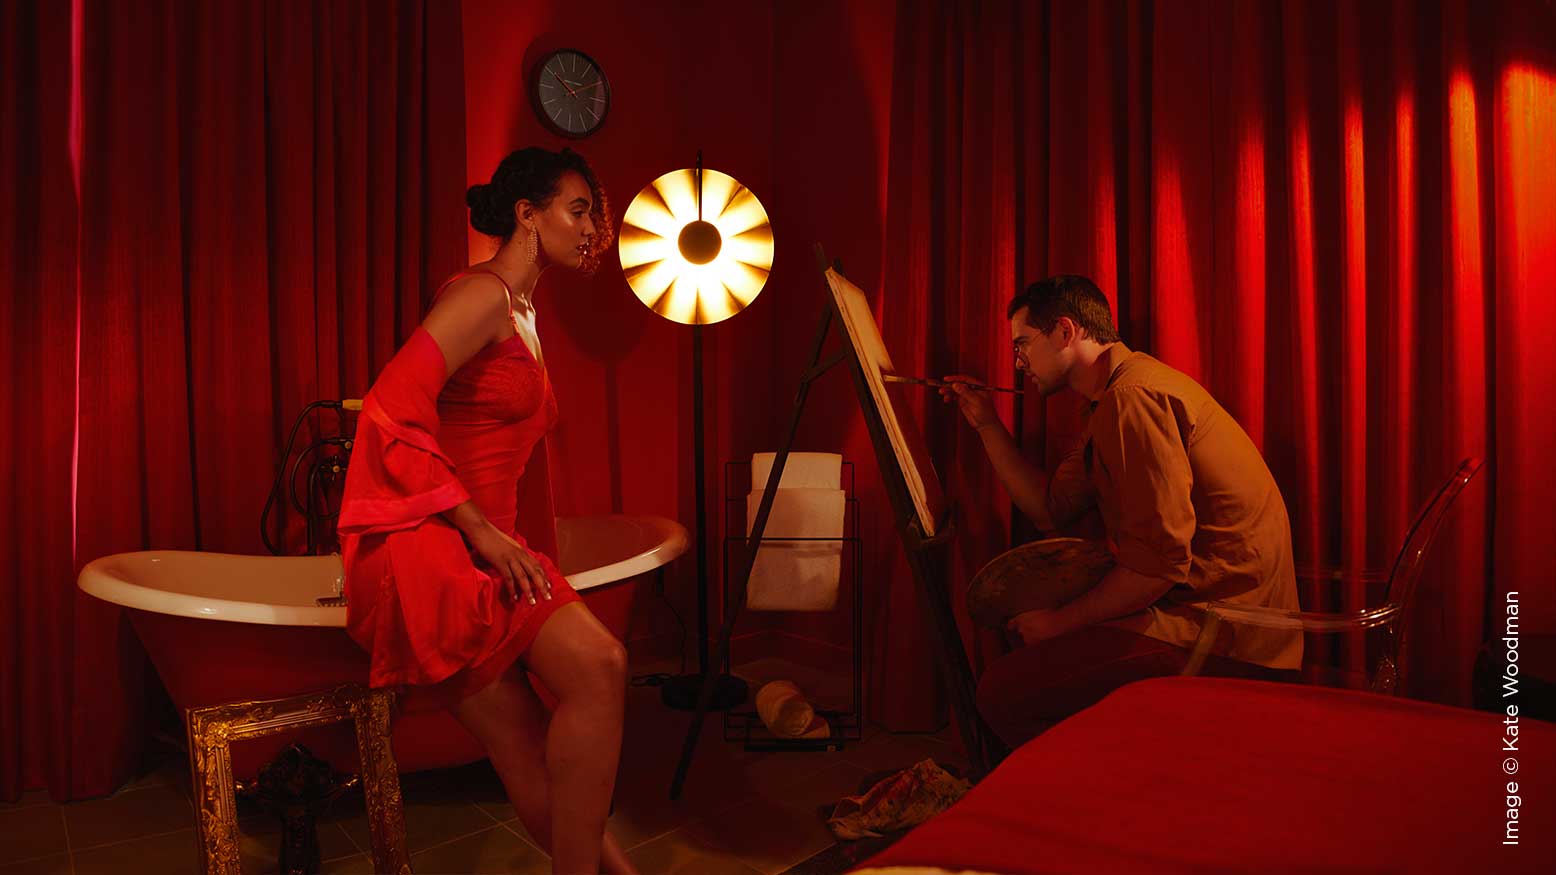
The same principles of lighting can be applied to color. People assign a lot of meaning to color. You see it in branding all the time—that quintessential Ferrari red that inspires power and boldness, or the Barbie pink that embodies femininity. We have developed strong associations of color with emotion—when we’re sad, we “feel blue,” or when we’re angry, we “see red”; if someone is new to something, they are “green,” or if they are cowardly, they are “yellow-bellied.” Colors have a strong psychological impact on us, and we can leverage this in our own work by incorporating color to facilitate an emotion we’re trying to portray. Color can be used in a very literal way, like in my “Time After Time” series, which uses a saturated, monochromatic color palette to set the tone of each scene. Or, it can be used in a more subtle way, like in this image, “Ignite,” where accents of red in the character’s wardrobe and the gas allude to a sense of danger. We can also use color harmonies to create balance within an image or across a series.
5. Composition
The last tip for creating a successful series involves the use of strategic composition. We want to find a balance in the series so that the images are cohesive but not too repetitive, and we can do this in a number of ways. If the lighting and/or color varies significantly from image to image, we can use similar composition to provide a consistency between images that will help tie them together. In “Time After Time,” the composition of the scene is fairly consistent (wide angle, shot at hip level, straight on, etc.), though the colors change dramatically as the characters shift farther and farther apart as the narrative progresses. Conversely, in “The Christmas Party,” the colors and lighting stay fairly consistent, but the composition shifts from image to image, with a mix of tight, medium, and wide-angle shots, as well as high- and low-angle shots.
Not only can composition be used to provide variety or cohesion across your series, it can also be used as an effective plot-driver. We can establish a scene using a wide shot, which provides context and allows the viewer some breathing room. Tighter shots, on the other hand, can feel very intimate or claustrophobic. Shooting up from a lower vantage point gives the viewer a sense of power and height and gives a character more prominence; conversely, shooting down diminishes a character, making them appear vulnerable or childlike. An aerial shot will convey a sense of detached omniscience, as if the viewer is observing from far away, while shooting through an opening or partially obscuring your view makes it feel as if the viewer is physically there, voyeuristically engaged with the subjects. These compositional tricks can help to add meaning and significance to the storyline.
One fun exercise I have found to be very helpful in developing my storytelling abilities is to distill a film into a series of stills. The next time you’re watching your favorite movie, see if you can select a set of stills (somewhere between 10 and 20) from the film that would convey the same story to a viewer who’s never seen it before. Pay attention to the variables above—does this series show emotion and character development? Is each image important to the narrative arc, helping to move the plot along? Do we get a variety in the composition of the images—or, conversely, is there a repeating composition the director keeps coming back to in order to drive a point home? How are the lighting and the colors conveying the mood of the scene, and are they consistent throughout the movie, or do they change? If you do this exercise enough times, you’ll be able to start implementing all of these ideas into your own work, and your stories will start to take on a life of their own!