
Beautify Your Brides Using Brushes in Lightroom Classic with Dustin Lucas
There are lots of opinions on what’s beautiful and natural, and how to make brides look their best. Posing and focal lengths are vital while shooting because they can set up an image nicely for touchup work in post-production. Focal lengths and taking a tight getting-ready portrait of the bride becomes a science. Just pull out your 70–200 lens and walk backward until your back hits a wall, zoom in, open up your aperture and fire. We work with a 100mm 2.8L macro lens, which allows us to get close and not distort the face. Typically for portraits, you want to stay at 85mm above and compose the image to accentuate their face.
This isn’t an article about shooting. We are going to dive into touching up skin in Lightroom Classic. No, we aren’t going into Photoshop and won’t have frequency separation or the ability to recreate pores after we soften. Let’s focus on Lightroom and what’s already at our disposal. Trust Lightroom—it makes editing simple.
Heal the Skin With Brushes
Order of Develop adjustments for post-production are crucial in Lightroom since we all know it will be slow at times. Adobe recommends editing your images in this order: Apply the Heal/Clone tool, enable lens corrections and the Transform tool, adjust in the basic panel for color and toning (if the image is shot poorly you can fix this first), mask areas with local adjustments/brushes and, lastly, apply sharpening and noise reduction in the details panel. We have a well-balanced image out of camera for color and light, so let’s strike the Q key to open the Heal/Clone tool. We are manipulating pixels, so build a 1:1 preview, work from RAWs and toggle 1:1 view. Build that 1:1 preview in the file menu bar or simply zoom to 1:1, and it will build automatically. I build at import so I can quickly start editing. In the navigator panel, click 1:1 and toggle the Z key to zoom to fit the image.
With the Heal/Clone tool open, we will need to toggle these options to deal with skin blemishes. Hold Shift and strike the T key to quickly toggle these tools. Hold the space bar and click and drag the image zoomed at 1:1. These shortcuts are simple and save so much time. You can change the size of the brush multiple ways: Use the square-bracket keys, hold Option and Command, click and drag the brush or, if you are using a touchpad, scroll up with two fingers to increase brush size and down to decrease. I am doing this without a mouse. Editing should be fast, simple and mobile.
After removing the major blemishes, I use the Visual Spots option in this tool to fix unwanted spots on the skin and any dust sensor spots. This basically inverts the image, converting it to monochromatic (black and white) so you can view white spots where you will apply the Heal/Clone brush. Toggle the A key to turn this on and off to work faster. The last thing we want to do is remove beauty or birth marks. Doing that typically gets you into trouble unless the bride requests it. I turn Tool Overlay to Never so I can hide all the outlined work and focus on the skin. Strike the back slash (\) key to toggle before and after previews to check your work. My last changes after I am happy with the skin is to remove veins in the eyes and stray hairs on the face. That was pretty easy.
Correct the Color & Tone
For corrective adjustments, I focus on the face for temperature, tint and exposure. Adjusting Color Profile is helpful. Adobe Color is too saturated and has a slightly harsh contrast. You can explore the included color profiles or buy third-party prebuilt ones. Find one that you like and apply it in the Develop module before making any other corrective or creative adjustments. Next, I correct the color and light with white balance and exposure. To fine-turn color, I use the target adjustment tools for HSL, especially when I want to reduce redness or orange skin tones or brighten these colors.
Hold Shift, Option and Command while striking the H, S, or L key to open this tool. Click and drag up to increase sliders or down to decrease. This is a time-saving tool that grabs only the colors in the area I am clicking. Hue adds some green undertones for red skin to balance it out; saturation pulls out orange tones; and luminance brightens the face. We can even adjust the lipstick here, but this tool adjusts color in the entire image. We can control areas of the image with Local Adjustments.
Local Adjustment Brush Work
Hot Spots can be such a pain to deal with in post. Use the Heal/Clone tool again to replace areas of the skin and use the opacity slider to blend. Brush over an area with the heal tab selected, click and drag the source selection to a closely matched part of the skin and lower the opacity slider to blend the healed area. This isn’t a perfect tool, so you have to finesse the opacity and feathering to make this look right. Nonetheless, it’s a great tool for fixing hotspots.
Next, we want to brush on some softening to reduce harsh tones and make our bride’s skin look its best. Access the Adjustment Brush by striking the K key. When you want to paint in an area that has a consistent tonal or color range, use Range Masking within the Adjustment Tool. Paint over the area with a medium brush. Strike the O key to see the mask. I like to change the mask color to green for skin. Go to Tools in the menu bar at the top of the screen, hover your cursor over Adjust Mask Overlay and click green.
Click Off in the Range Mask section at the bottom of the Adjustment Tool panel. For skin, choose Color to mask only skin tone colors. Select a color or range of colors by selecting the eyedropper and clicking on the brightest part of the skin. The mask gets refined pretty close to where we want it but we need to expand our selection. Holding the Shift key while clicking on the shadows of the face expands our mask for the skin tones. In doing this, the subject’s hair is being softened as well; we can remove this easily by removing the mask from this area. Click back in the space where we grabbed the eyedropper so we can select the brush. Hold Option and click to paint out the unwanted areas with the erase brush, including the eyes, eyebrows, lips and hair. This is useful for all the Local Adjustment tools.
The last thing to do is to apply skin softening by either choosing a prebuilt effect or manually adjusting the sliders. For realistic skin softening, we want to lower the clarity settings into the negative values and increase the sharpening to keep details intact. I start with –50 clarity and +25 Sharpening and increase as needed. Lowering the highlights and lifting the shadows evens out the skin. We can dodge and burn to exaggerate the lighting on the face. Here is what I like to do with the lighting.
Create a new adjustment brush, lower exposure and click in the Color section below Defringe. Choose something close to the skin tone where the lighting blew out the colors on the edge of the bride’s face. Start with subtle adjustments so we can build up if needed. The same goes for dodge and burn to accentuate the highlights and shadows on the face. I want to deepen the tonal range with a controlled technique of dropping shadows and blacks to burn and lift highlights and whites to dodge. Once you paint in the burn adjustments, lessen the effect and duplicate the pin by right-clicking on it. Apply a different adjustment to control the lighting on the face.
Start with a feathered brush and set the flow to around 30. With a small brush, paint in an area, increase the brush size to almost double, paint again and repeat one more time. This creates a natural blended look, a subtle approach to dodge and burn. You can increase this effect by lifting the flow in the brush settings before painting more. Lastly, by painting a new mask with clarity, you can dial in some creativity. Add some clarity to enhance your beauty portrait. Let’s not forget about the eyes.
Enhancing and sharpening the eyes is vital to a portrait. I use the prebuilt preset Iris Enhance to paint on the iris and increase exposure as needed. Since I’ve already cloned the veins, we can apply some sharpening, clarity and drop noise to sharpen the eyes. We can now paint in some saturation, highlights and whites for the lips.
Attention to Details
This is where I like to add some creative tonal shifts with the Tone Curve panel. I limit the black levels and flatten these tones and the whites. Then I create a subtle S-curve to bring in some dimension. There are tons of ways to apply tonal effects to the entire image. Find one that fits your taste or brand. Let’s move into the Details panel and apply some global sharpening. Press Option while moving the Sharpen sliders to dial in your details. This is an important final touch.
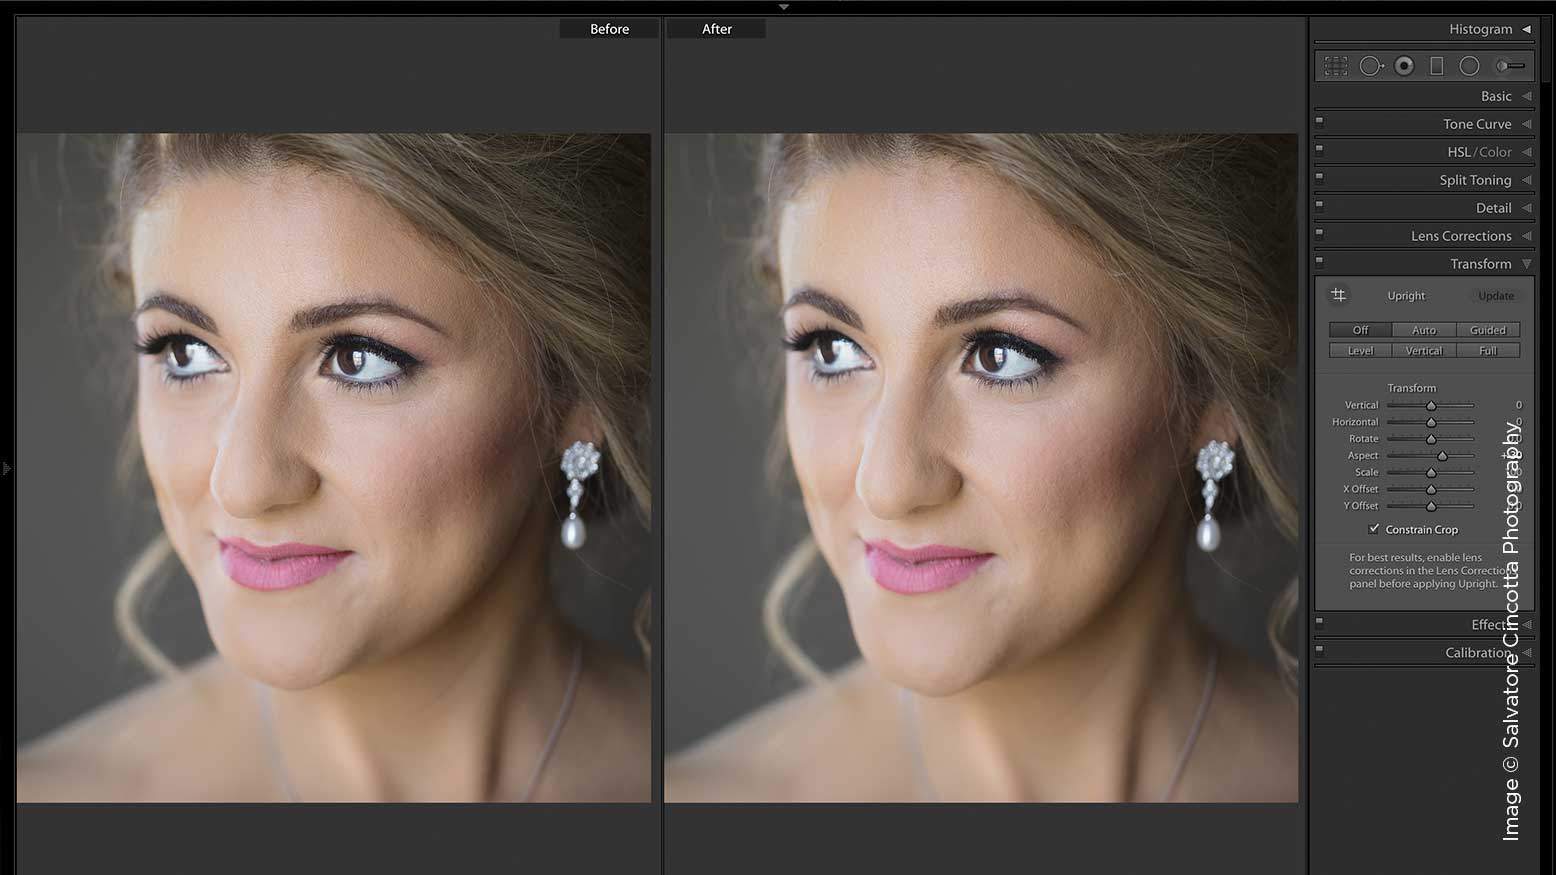
I stay away from Liquify and body shaping unless requested by the client, but you can thin the face/body quite simply in Lightroom. Use the Transform tool with the Aspect slider moved to the right to thin the face. Check Constrain Crop before you start moving these sliders to reduce white edges. This adjustment is subjective and needs to be thought through.
Now we have quite a nice portrait done all in Lightroom.
The Results
A lot of this is typically done in Photoshop by most retouchers, but you have flexibility in touching up your portraits. Don’t be afraid to push the limits of Lightroom. Get to know the brush settings and hotkeys. Knowing how and when to use these tools will save you a ton of time by helping you edit efficiently and avoiding having to rework. Results are everything, and your client won’t care what programs you use.


