
High-Volume Photography with Matt Kemmetmueller
High-volume photography is one aspect of the industry that seems both intriguing and daunting to a lot of photographers. When I am meeting new photographers at conventions, they always have a million questions about how to start in this genre. In this article, I will go over why I want to photograph it, the basics of setting up team and individual images, and how to organize your day and files as you jump headfirst into one of the most profitable dollar-to-hour segments of photography out there. I promise, it’s not as hard as you think it is!
WHY I GOT INTO THIS
Before we get too far, let’s break down why I found myself in the high-volume world. High-volume photography isn’t typically seen as creative, and it certainly doesn’t lend itself to playing around with new lighting/posing/editing techniques. What high-volume photography does is provide my studio an income that gives us a level of freedom we couldn’t achieve simply through traditional portrait sessions.
I started working for my father’s business full-time back in 2004, and at that time our studio was steeped in photographing weddings and high school seniors, just dabbling in team and individual sports photography. The studio would routinely have six to eight contract photographers on staff, and we would photograph between five and ten weddings a weekend. My personal peak was 2009, when I photographed 36 weddings myself, which led me to the decision that I wanted to start focusing my career on photography that didn’t require me to work every Friday and Saturday night during the summer. After working the numbers, I quickly realized that our team and individual sports division (which was pretty small) was by far our best dollar-per-hour revenue stream, and I became obsessed with changing our business focus to more work in this area.
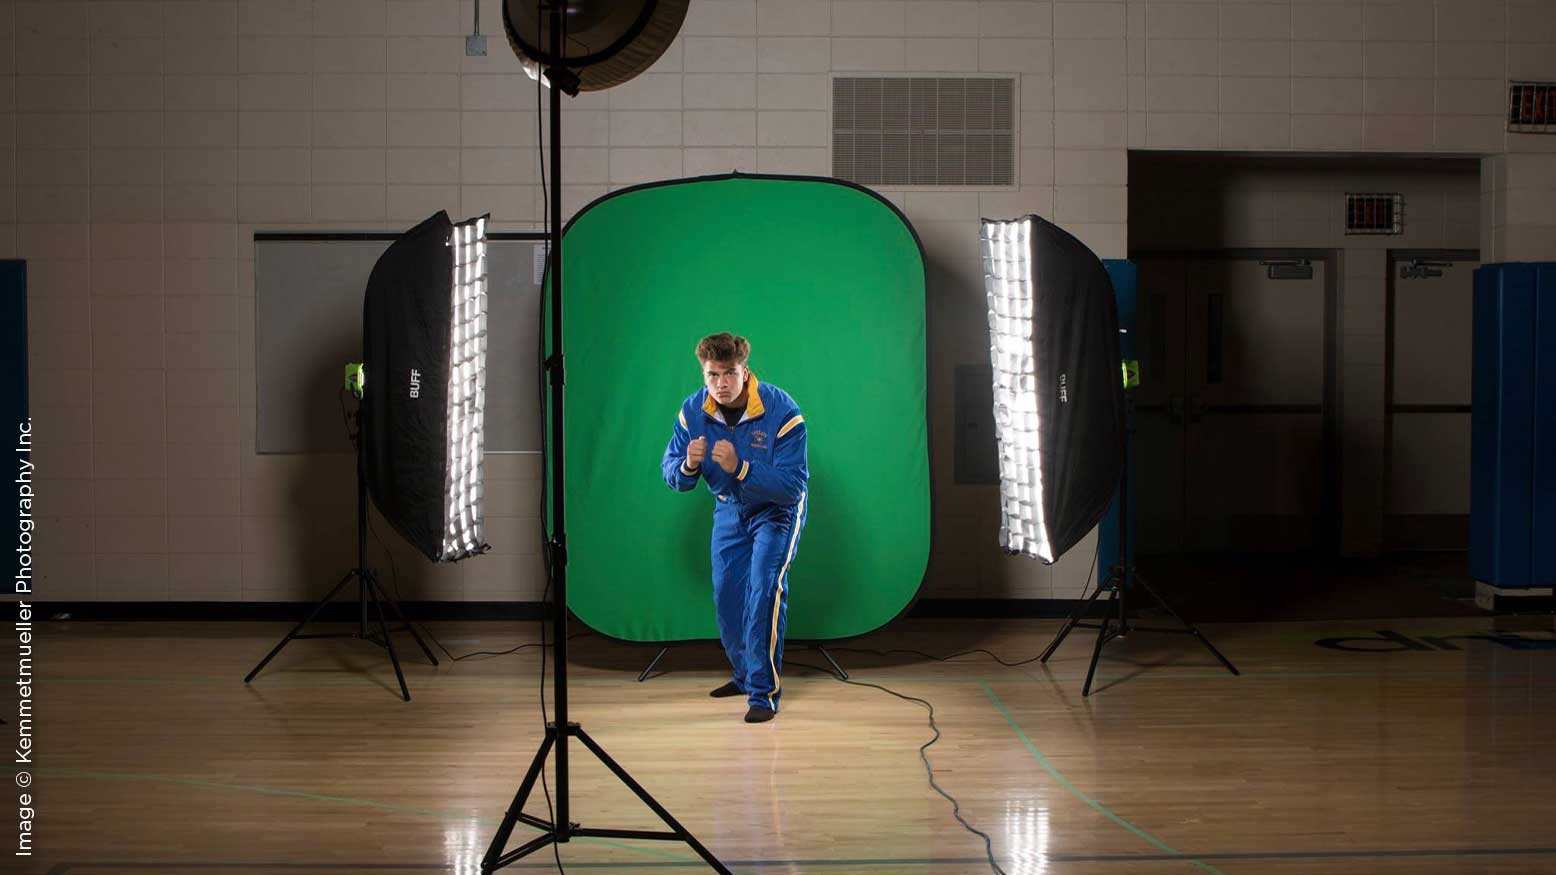
MY SETUP
The trick to being great at high-volume photography is creating a very streamlined system that quickly produces high-quality images and that is repeatable. Once you have that, you are on easy street!. One of the best things I’ve done to help with this is creating our “magic carpets.” We had been struggling with keeping our images consistent from photographer to photographer and year to year. So we set up a station in our studio and measured out distances between all the lights, power and modifiers, then had a 36”x120” custom vinyl banner printed from Signs365 indicating where each item should go. Now, when any staff photographers or I show up in the gym to photograph athletes, we tape the magic carpet down using gaff tape, and it instantly shows us exactly how the station should be set up, and even shows where to place the subject. This has been a huge game-changer for us, taking our consistency to a new level, speeding up our setup time, and removing the stress that one of our contract photographers might go rogue and set up a new lighting scheme.
When we photograph individuals indoors, we use the DigiBee 800s from Paul C. Buff, a large beauty dish as our main light, and two larger strip boxes that have grids on them. The rim lights have a great effect on the final image, and this type of lighting is not something that can be easily reproduced, so it also makes our work stand out a lot from the natural-light-only parent team photographers.
Many times, the most intimidating part of photographing teams and individuals is the team part, and I totally can understand how this scares off photographers just starting out. We have a pretty easy system, though, that works with teams of up to 50 kids. We aim to have three rows, with the first row sitting criss-cross apple sauce, the second row kneeling, and the third row standing. It sounds easy, but the trick to having a good team photo is having perfect windows. This means that if the first row has an even number of subjects, the second row must have an odd number, and the back row even again. If your first row has an odd number, then the middle row has to be even, and the back row odd again, like the front.
For example, if there are 21 people in a group photo, and you make 3 rows of 7, you will either have heads right on top of each other or the rows will be off-balance. If you place it with 6 in the front row, 7 in the middle row and 8 in the back, you end up with the spacing required to get everyone their own slot while keeping everything balanced. If it was 22 people, you would go 7, 8, 7 to maintain that balance. Once I understood this concept, it became a much faster and less intimidating task to set up these photos. In the spirt of keeping fast and duplicatable, I made a chart that shows me the row breakdowns that we carry to all of our shoots.
A lot of sports are photographed outside, and this does affect our lighting. For shooting individuals outside, I am in love with the Godox AD200. This small (and inexpensive) flash produces enough light for us to overpower the sun for one subject at any time. Taping or staking the large magic carpet to the Astroturf at a high school is not a feasible option, but I still need a way to ensure all of the kids stand in the exact same places. To do this, we produced the mini magic carpet, which is a simple 24×24 heavy-gauge vinyl mat with weights sewn into the pole pockets.
One thing I love providing my schools and clients with is large team composite banners. Banners drive excitement and energy for picture day, while increasing customer retention and providing us with more images and products to sell at the same time.
We use green screen photography to capture these images individually, and then do extractions and create a composite. This method opens the door to be more creative and show off your artistry. One of the first things you need to do is figure out how to extract your images from the backgrounds. A lot of people choose to outsource this step and use Reboku or Retouch Up, but I don’t like leaving my timelines in the hands of another business. For the do-it-yourselfers, Photoshop CC has a really cool “select subject” tool that works OK, and there are a ton of actions that work great as well, like Ben Shirk’s Game Changer Green Screen Remover. I’m currently leveraging a website that uses artificial intelligence to remove subjects from anywhere, Remove.bg. This is a web-based service that allows bulk uploading and downloading of images and decreases active working time dramatically.
PICTURE DAY ORGANIZATION
Now that you know why we photograph teams and individuals and have a basic understanding of how to set them up, you need to start working on what do when you actually show up to photograph and how you are going to keep everything sorted out and well-organized. The world of a high-volume photographer centers around checklists. These checklists cover who’s working, what gear is needed, workflow for setup, and what is needed from the league.
When shooting your first teams, it’s always a good idea to be over-staffed and give yourself more time than you need to make sure the day goes well. Then, you can make necessary adjustments each year until you have it running perfectly. After refining our process for years, we have found that our optimal capacity for youth leagues is 24 teams an hour. In that scenario, each player on every team gets photographed three separate times (team, individual, green screen), but I wouldn’t recommend attempting that until you’ve gotten a few years of practice under your belt.
Tracking images and linking them to orders is one of the most daunting tasks when taking on team and individual photos. There are several software solutions out there, including GotPhoto and Flow by Photolynx. GotPhoto is a great system that allows you to photograph a lot of different poses and upload them into secure galleries for parents to view and order from. From there, the orders are submitted to your lab for printing, and it cuts out a lot of backend work. The drawbacks are that there are not a lot of ways to show different products to families, and if you don’t have email addresses from the league, participation can be really low. Flow from Photolynx offers you the ability to photograph, produce and print various templates with an insane level of customization, but you do need to photograph tethered.
Ultimately, one of the most critical steps in volume photography is finding a good lab to partner with, and there are a ton of options. Richmonds, H & H, and WHCC all have very robust sports photography programs, but the lab we have partnered with is Millers. Millers has an insane amount of knowledge, products and capacity. It doesn’t matter if we photographed one team or 180 teams, Millers always has it printed and at my door in two days! I would advise anyone who is looking at getting into this type of photography to reach out to your lab (or a few labs) to see what they offer and what they recommend as the best steps for starting out with them.
STAY UP TO DATE
One way that I have managed to stay up to date on trends and techniques is through continuing education and social media. There are tons of great conventions, online workshops and Facebook groups surrounding volume photography. I will be back at ShutterFest again this spring, where we will go through hands-on demonstrations of how to execute these types of sessions as well as tips for marketing to new clients. I have also done several classes on CreativeLIVE, where we are able to get into much more detail, and I am the member of a very active Facebook group called “School and Sports Photography: Cranking the Volume to 11.”


