
How to Create Color Profiles With Adobe Camera Raw with Dustin Lucas
I continually try to push creative image editing to its limits. There are so many ways to tweak an image, to get that dialed-in look and feel that you envisioned when you photographed it. Since the change from Camera to Color Profiles in Adobe Camera Raw and Lightroom, the creative possibilities expanded and became so simple to use, adding them to the Basic panel and allowing users to adjust the amount it’s applied.
We all know this limits standard and third-party Camera Profiles because they are applied as an all-or-nothing type of adjustment. There is no Amount slider or any way to customize these profiles. In Adobe Camera Raw, you can create Color Profiles and load them into Lightroom. It doesn’t just end with applying Camera Profiles—you can apply develop settings as well to customize the profile. This opens endless creative possibilities.
Create a Color Profile in Adobe Camera Raw
We start by opening a Raw file into Photoshop, which opens it in Camera Raw. To save a Color Profile, click on the Presets tab, hold Option and, in the lower right corner, click the Save Preset icon. A New Profile dialog box will open allowing you to choose several settings, which we will circle back to. Let’s apply some settings in the Basic panel we’d like to use to enhance the image.
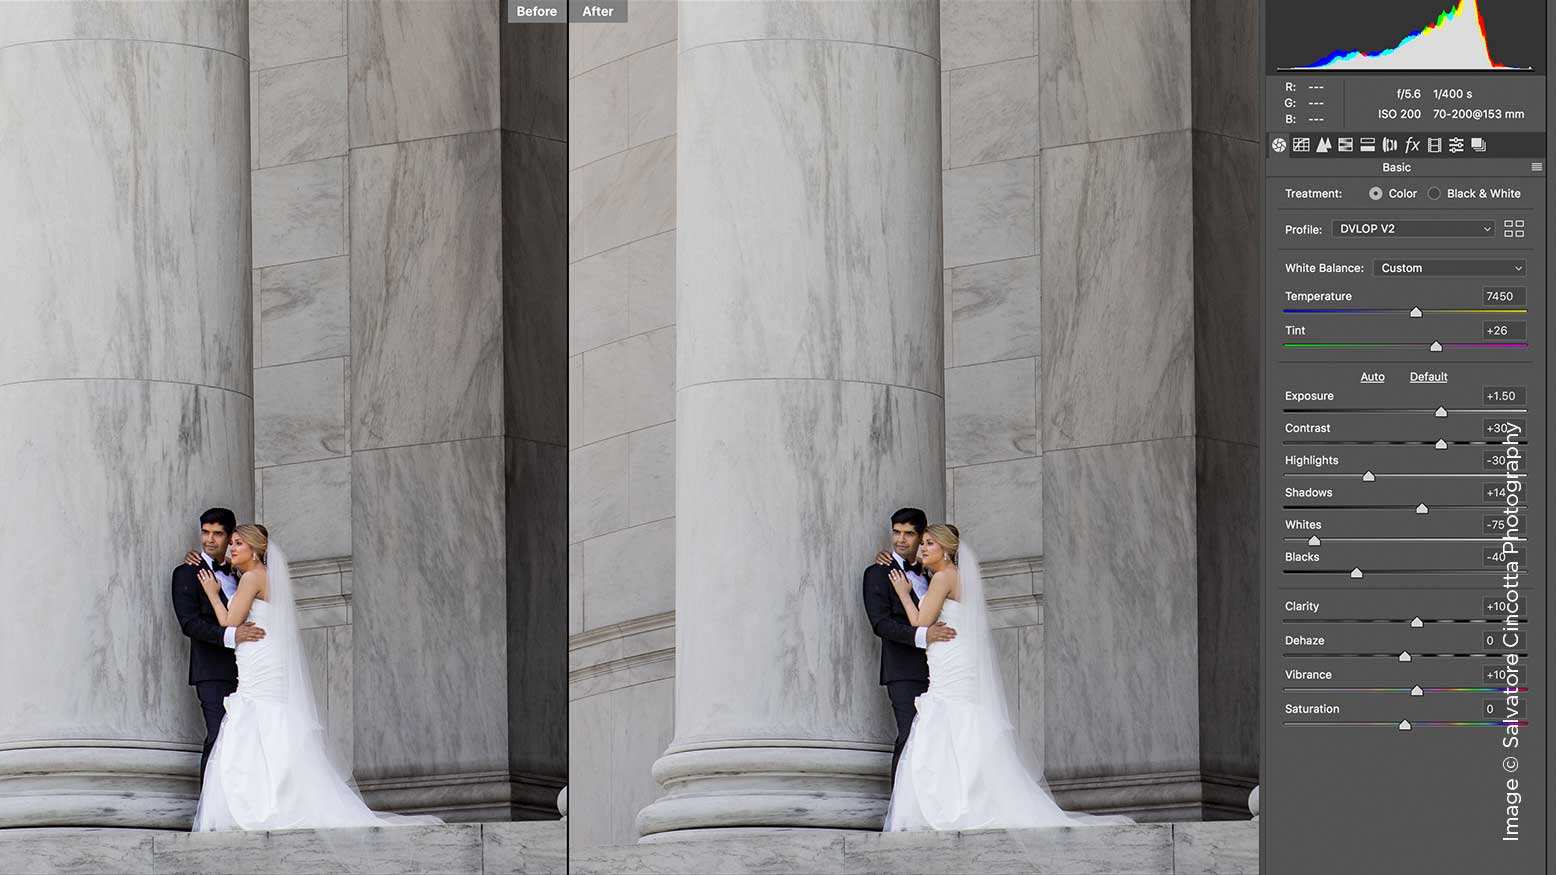
So our first decision is to apply a Color Profile other than Adobe Color to our image. This is where applying a third-party profile and saving a custom Color Profile gives you the flexibility of an amount slider. That is just one way to utilize this tool. I can apply DVLOP II to the image and begin adjusting other tools to customize the look and feel. I want to stay away from white balance and exposure because these settings would be custom per image. Remember, we will not have the slider adjustments for this profile later; this is not like a preset.
I want to create a more cinematic look with this profile, so let’s drop the contrast and lift the clarity, vibrance and saturation. I use Tone Curve to flatten the black and white points with an S-curve to add tonality. To add a color grade to this image, we can simply choose a specific RGB channel and start to apply color shifts to tonal ranges. You can create a subtle warming look to the highlights and cooler tones in the shadows. Moving into the HSL panel, we can get rid of any colorcasts or shift the image further for a more creative look.
I like to lift the orange and red luminance to brighten the faces and drop saturation to reduce unflattering skin tones. To take this a step further, we can add Split Toning to isolate the highlights from the shadows. Keep in mind that for Color Profiles, things like Lens Profiles, Sharpening and Noise Reduction are not included, so we are ready to create our profile. Go back into the Presets tab, hold Option and click on the Create a Preset icon.
Now we see the Develop settings that are applied automatically, and we can uncheck them as we see fit. Under Advanced Settings, there is a setting for tone map strength we can toggle between low (normal), medium and high. These will be important settings down the road when we’re editing the tonal sliders in the Basic panel. If we choose the high setting, this makes the highlights and shadows sensitive, which allows us to increase the dynamic range. Pushing this too far creates an unrealistic look, not something we want for this edit.
The next sections are dependent on whether you applied a Camera Profile already, which we did for the DVLOP II profile and a Color LUT, or lookup table. This becomes important if you have a LUT to load to apply a video color grade to your image. Photoshop comes with a few, and this is where we could load any .cube files. We can circle back to this in a later article for cinematic color grading. The last thing you need to do is name and choose which profile set this will save to.
That’s it for creating the Color Profile.
Apply the Color Profile in Lightroom Classic CC
Depending on how you have Lightroom set up with third-party profiles, we should be able to open a catalog and apply the profile. If it is missing, there is a workaround to locate the new profile in the library Lightroom folders where your settings are stored. I found this to be too cumbersome, so I forced Lightroom to find the profile. Once you reset an image and apply the newly created profile, you can save an .xmp file. Then go into Lightroom where that same Raw file is, and choose Read Metadata From File. This automatically applies the profile and loads it to the User folder. That was much easier than messing with system folders.
Once you start applying Develop settings like white balance, exposure and tonal recovery, you can tweak the Amount slider for the profile as you see fit. This flexibility is important because you want to have as much control as you can with Color Profiles. Then you can apply your lens correction, sharpening and noise reduction. This profile can even become part of your routine workflow and added to a preset to save time and apply creative adjustments in Lightroom.
Another interesting aspect of this newly created profile is the recovery capabilities of the tone map strength. You can push the image tone with much smaller adjustments to the highlights and shadows. Be careful not to make the image look too unrealistic. Once you find a happy medium with adjustments, you are done.
The Results
Color Profiles can add a quick creative touch to your images with one click. Take this a step further, and you can fully customize a Color Profile to dial the look and feel to your taste. Like presets, these are not an end-all, be-all adjustment. You will need to make some adjustments to the Develop module to ensure everything looks consistent. Take the time to build a Color Profile today. Push the limits of your Raw images and create something new.


