
Let There Be Light: Create Your Own Lighting in Photoshop with Dustin Lucas
Photographers are constantly battling with light to capture an epic moment, especially when the sun is hiding behind clouds or is out of the frame, causing distracting glares across the client’s face. It can be a nuisance, but Photoshop can help create an epic scene, no matter where the sun is.
In this article, I demonstrate how to add light rays in an image to give you a more dramatic look that leaves your clients in awe. You may not be a fan of post-process lighting, but if the light happened naturally, you would take it in an instant. So who cares how you do it? Let’s look at some techniques for creating light rays and using brushes for efficiency.
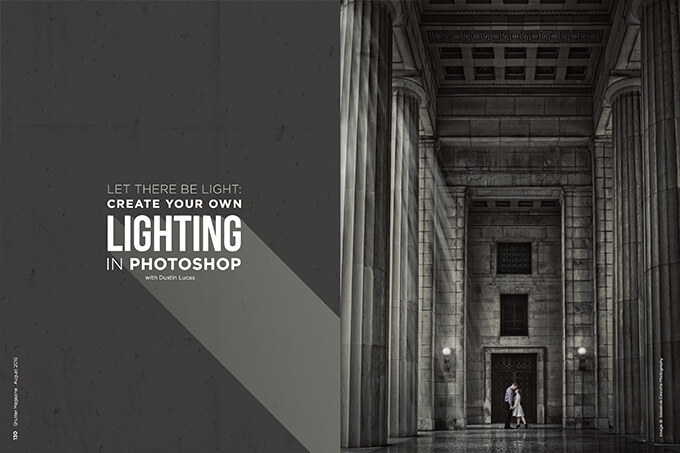
Once you have processed the color correction and made some local adjustments, you are ready to set up your plan of attack for this new light. Remember that we need to use the direction of the natural light for this effect. It looks like it’s coming from the left-hand columns. This is important for creating a photorealistic effect.
Basic Light Rays
Create a new layer and name it Light Rays. Make sure you have the foreground color selected as white and the background as black. With the Light Rays layer selected, navigate to your top menu bar and click Filter < Render < Clouds and click Enter. (1) Your layer will fill with this filter effect. Now you need to adjust the threshold of this layer. In the menu bar, select Image < Adjustments < Threshold and click Enter. (2) No need to make any adjustments, just click the OK button. So far we have a patchy black-and-white layer that we need to create our directional light rays. (3)
We now need to add a blurring effect to this layer. Let’s use the radial blur tool. In the menu bar, select Filter < Blur < Radial Blur and change the settings accordingly. A good middle ground setting is 80 to 90. The blur method is key because it replicates the linear effect we want with light rays. Change this to Zoom, and the Blur Center preview changes accordingly. For quality, choose Best. We are now ready to examine our light source direction. (4) Since the lighting is coming from the left in the image, we can click in the center of the preview and drag the center radiating lines to the upper left corner. This gets us close to our ideal direction of light. (5) After clicking OK, we need to adjust the layer effects. (6)
Change your layer’s blending mode to Soft Light and begin adjusting the opacity and/or fill. (7) I have dropped the opacity down to 75% so there’s no distraction. Now we are ready to start masking out the unwanted areas and lessening the effect in others. (8) That was pretty simple, and we could make an action for this for increased efficiency. The only custom part is the direction of light; this can be easily done by recording all the steps and keeping the Radial Blur dialog box toggled on. (9) This allows all the steps leading up to the radial Blur to automate. You can change the direction of light, click OK, and the remainder applies.
Leading Lines With Light Rays
You may need a more customized lighting; you need to paint in specific strokes for this. Let’s look at how to get this more dialed-in artistic approach.
With our previous Light Rays layer turned off, create a new layer called Light Rays 2. Instead of adding a filter, I want to brush the light rays into the image. I will paint multiple dots in the image where the light rays need to be coming from and going to. First, choose a foreground color again; for a color image, choose something that matches your sunlight. This image is desaturated, so white will work fine.
Select your brush tool and open the brush settings panel. Currently we have single brush strokes set up with a soft edge. (10) We want to be able to vary the sizes of the dots, space them out accordingly and randomly scatter them as we drag the brush around. First, click on the Shape Dynamics settings and slide the Size Jitter to 100% and Minimum Diameter down to 0%. (11) Spacing will be an issue for the dots; we can change this with the Brush Tip Shape settings. Move the Spacing slider to around 70 and the Hardness to 40%. (12) Now, we need to check the Scattering option. Check Both Axes, move the Scatter slider to 1,000% and begin painting the area where you want the light rays to be. (13)
Your layer is now ready to have the Radial Blur applied at 100% to maximize the length of each ray of light. (14) If we zoom in, you will notice some grain. We can soften this again by striking Command and the “F” key. (15ab)
Selecting different layer blending modes greatly lowers the effect; leaving it at Normal works for this image. You can increase the effect by simply duplicating the layer; hold Option, Command and the “J” key. (16) This doubles the effect, allowing you to lower the opacity as needed. To move and change the size of this layer, hold Command and the “T” key. This allows us to maneuver the angle of the rays to be slightly more realistic and lead those lines right to the couple. (17)
Fine-Tune Your Lighting
Attention to detail is very important. I need to bring back some sharpness and tone into these hazy light rays. I can sharpen the light rays by selecting the layer and navigating to Filter < Sharpen < UnSharpen Mask. Set the amount between 150 and 200. The radius can stay at 1. (18) This provides some definition to the light rays. Now let’s get some of our dark tones back. Make a Levels adjustment layer and drag the left slider toward the edge of the histogram. (19) This effect can be added by duplicating the levels layer, or lessened by dropping opacity. Be aware that darkening effect is applied to the entire image, so mask out the areas the light ray does not affect. (20)
To create your own light rays, adjust brush opacity when painting. You may also adjust the scattering amount and build up your light rays rather than make a single one for the entire image. As you see, I should separate the light rays with the columns. (21ab) Lowering the radial blur amount helps, along with hardening your brush edges.
Final Results
Now that we have masked out the subject and brought back some definition, this image is starting to look much more dramatic. We could also turn on the two circular lamps to complement the light rays. Turning on the lights is very popular as well. I recommend you adjust the settings I have used, and play around with these tools.
Although this look is not for everyone, make it your own. That’s the point, after all. If you do try this out on your next edit, always follow the natural light direction and work on separate layers.


