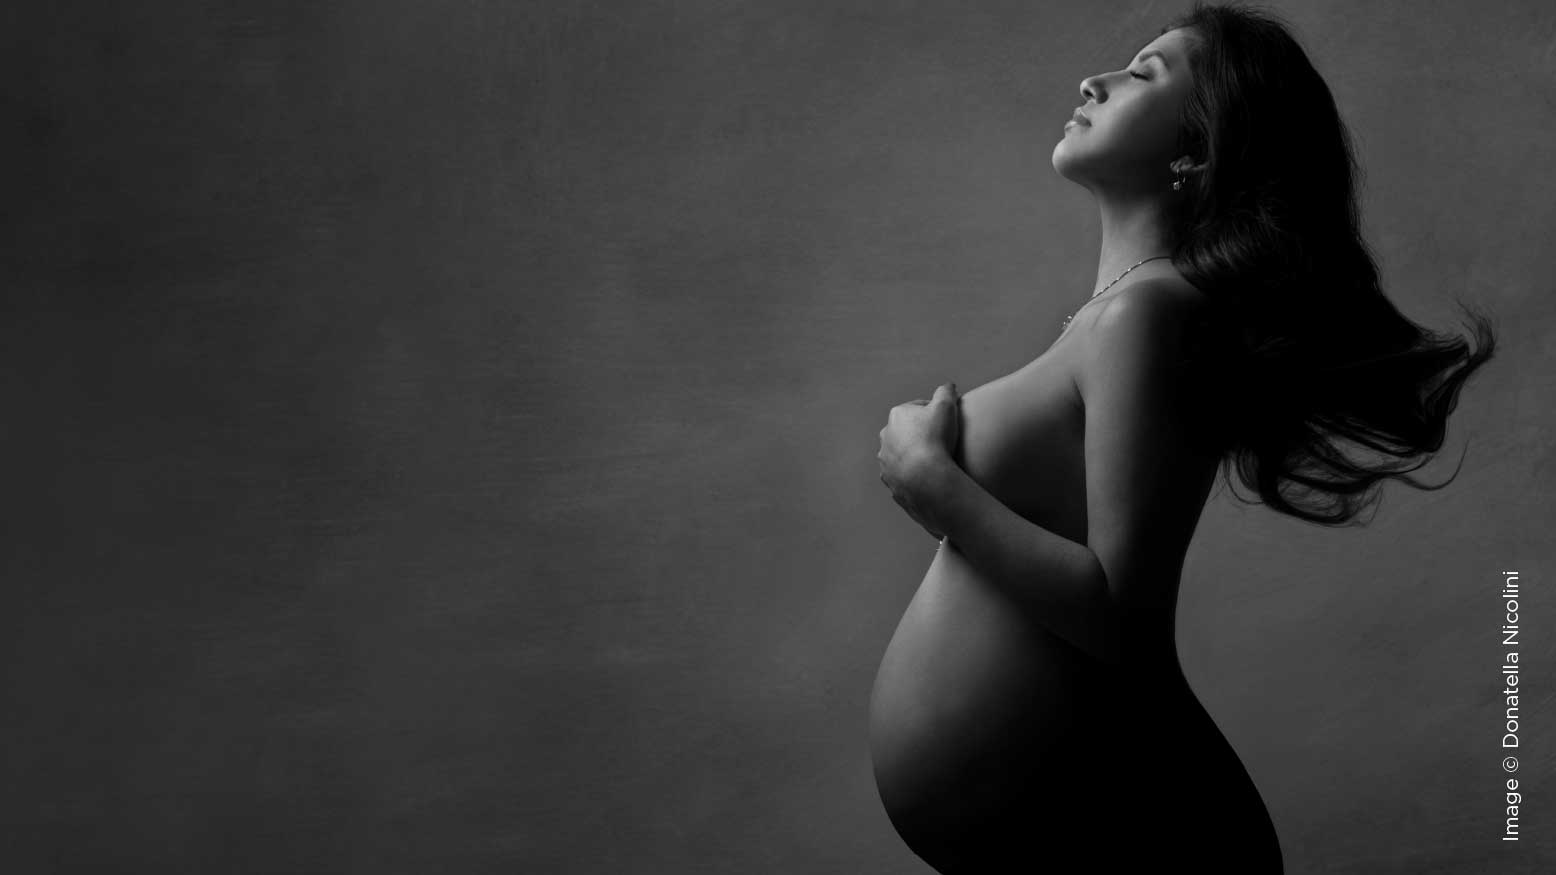
Lighting to Flatter the Female Form with Donatella Nicolini
I see the nude female form as the most elegant and timeless subject for portraits. Specializing in maternity photography challenges me every day to find creative ways to celebrate the miracle of pregnancy in tasteful and interesting ways. The women I photograph are not professional models. I get to work with real women who are facing all the changes that becoming a mother brings: stretch marks, weight gain and swelling, just to name a few. My job is to show my clients how beautiful and powerful they are, even when they can’t see it anymore when looking in the mirror. When I look at a pregnant body, I perceive fierceness, power, strength and incredible beauty.
The use of light is crucial to bringing my vision to life because my models can see what I see and be empowered by it. Depending on the physical appearance of my subject, I choose the light schemes that make her look the most gorgeous and flawless, enhancing her best features and concealing her weak points. I want to emphasize the baby bump, but also make sure that my client looks her best. After all, we are creating images that will be cherished forever and become some of the most precious memories for the entire family.
Creating a light scheme that makes my subject look beautifully shaped right in camera allows me to save a lot of retouching time. This way I can also show a few photos directly on set during the shoot, let my client see the magic in the making and get her even more excited to proceed with the rest of the session. The confidence boost is incredibly helpful, empowering and attitude changing.
Here are some of the light setups I use the most during photo shoots. I hope they help you create stunning maternity images.
FACE TOWARD THE LIGHT, BODY AWAY FROM THE LIGHT
One rule that works well for both thin and large figures is to keep the face toward the light and the body away from the light. Putting the body in shadow hides some critical issues that are typical during pregnancy, such as skin imperfections on the belly, stretch marks and swollen legs. Whatever falls into the shadow appears smaller, and that can be used in our favor to shape the body the way we desire.
This kind of lighting allows you to achieve a delicate and tasteful look. Even though the model is naked, she’s not showing private parts in any way that would make her or the viewer feel uncomfortable. The goal is to create images that can be displayed as works of art anywhere in the client’s home.
HIGH-KEY SILHOUETTES
When working with a beautiful body shape, I like to enhance it by creating gorgeous high-key silhouettes. The basic concept behind a silhouette is to put your model in front of a light source and set the exposure for the background. We want the background to be completely white and the subject to be very dark. I achieve this look in the studio using two Profoto B1’s, but any studio flash or speedlight will do—angled slightly toward a white seamless backdrop and diffused with rectangular softboxes to control light spills on the model.
First, make sure the backdrop is correctly exposed to be pure white, then add the model and check that the body is dark and she’s getting just a tiny bit of light on the edges of her body and face. The distance between the subject and the backdrop plays a big role here. I usually place my model far enough from the backdrop so she doesn’t get burned out by the light reflected from the white paper.
With high-key silhouettes, there’s no need to spend much time editing the skin since it is dark and you don’t see every single imperfection. It’s even easier to do it with natural light since you only need to place your subject in front of a big window with white curtains for diffusion. With the right posing, this lighting setup is elegant and one that’s loved and requested by clients.
LOW-KEY SILHOUETTES
For larger women, flatter the body with a low-key silhouette. The beauty of this light scheme is that the photographer can decide how much of the body to show and the viewer can’t really tell how much has been left out or where the body ends. This way there’s no need to liquefy the body shape to make it smaller, and you can control exactly how big she is going to look right in camera.
It is very simple to achieve. All you need is one light and a black backdrop. I recommend using a rectangular softbox as a modifier for better control of your light source, positioned behind the subject, angled slightly toward her, on one side.
This can be done using natural light too. Just place two black boards (V-flats) to the side of a window, and you’ll be amazed by the beautiful results.
Seamless black backdrops are not my top choice for this kind of picture because black paper reflects light. This increases your editing time because you’ll be darkening the backdrop to make it completely and evenly black.
To avoid this issue, try using black velvet. Black velvet absorbs all the light and is perfect for the job. Get self-adhesive velveteen paper or a plain piece of velvet at any fabric store, which is even cheaper and easier to apply. I use mine attached to a 2×1-meter board. It’s my favorite for creating low-key silhouettes.
For an interesting variation of this setup, add a second light source on the other side of the model.\
SOFT FLATTERING LIGHT
With this setup, my aim is to avoid harsh shadows that would point out, with no mercy, all the wrinkles, stretch marks, body hair, cellulite and skin imperfections. To get the softest light, I start building my lighting scheme using one strobe with an XL Deep Umbrella with white diffuser set at minimum power and placed right behind me. This first layer of light fills in and softens all the shadows.
Next, I add a second strobe that will be my main light on one side of the model, set at a slightly higher power and feathered, pointing at a 2×1-meter white board that works as a reflector. The light is three-dimensional and super soft, making every subject look stunning.
Lighting is a tool that flatters the female form, but it needs to match with the right posing, composition and connection to create a valuable image. Don’t be afraid to play with your lights, make mistakes, explore the infinite lighting possibilities and, most importantly, have fun while doing it.