
Managing Your Raw Files in Lightroom Classic with Dustin Lucas
There is nothing simple about digital asset management. It is easy to get hung up on equipment, shooting and editing, but managing Raw files is the most neglected part of my workflow. When I’m in a hurry, I drag my Raws in a file browsing application from the memory card to some random folder to get started editing. I feel like I always rush to import my Raw files, bypass backup and fail to organize my photos in Lightroom so I can start editing immediately. That has to stop.
As soon as you corrupt/crash a hard-drive or lose your originals altogether, you are screwed. There is no excuse you can give to your client, and you will have to reshoot for free. In this article, I show you how to manage files simply from a single session and archive this session catalog into a master catalog where all your work should live before you prep files to deliver.
First, we need to establish a game plan. Open Lightroom, create a catalog and save it to a local hard drive. You will save your Raw files on a separate hard drive while the Lightroom is saved locally.
Importing
Let’s start in Lightroom. Open the new catalog and click the Import Images button to begin ingesting Raw files from your memory cards. Having a multiple SD card reader is handy for weddings, but for this engagement session, we have a single card. Select the proper source and begin choosing import options. Since we are not going to keep the files on the memory cards for obvious reasons, we have to copy our images to a new destination. I will forgo Copy as DNG since this makes no sense for converting our Raw files. On the right side of the Import module, let’s go through each panel to determine the best ingesting options.
It is important to choose the right destination folder for these Raw files. This folder is where the catalog is connected to your Raw files. Many photographers have some sort of DAS or NAS system for their Raw files; this article is not going to get into which one is right for you, but it’s worth researching if you have no clue. I have a simple multi-bay DAS where a main and secondary disk are mounted as RAID1. Basically Lightroom writes to the main disk and the RAID1 software mirrors this data to the secondary one. This is not a method for backup, and I do not treat it as such. We will get to the backup settings in the File Handling panel later.
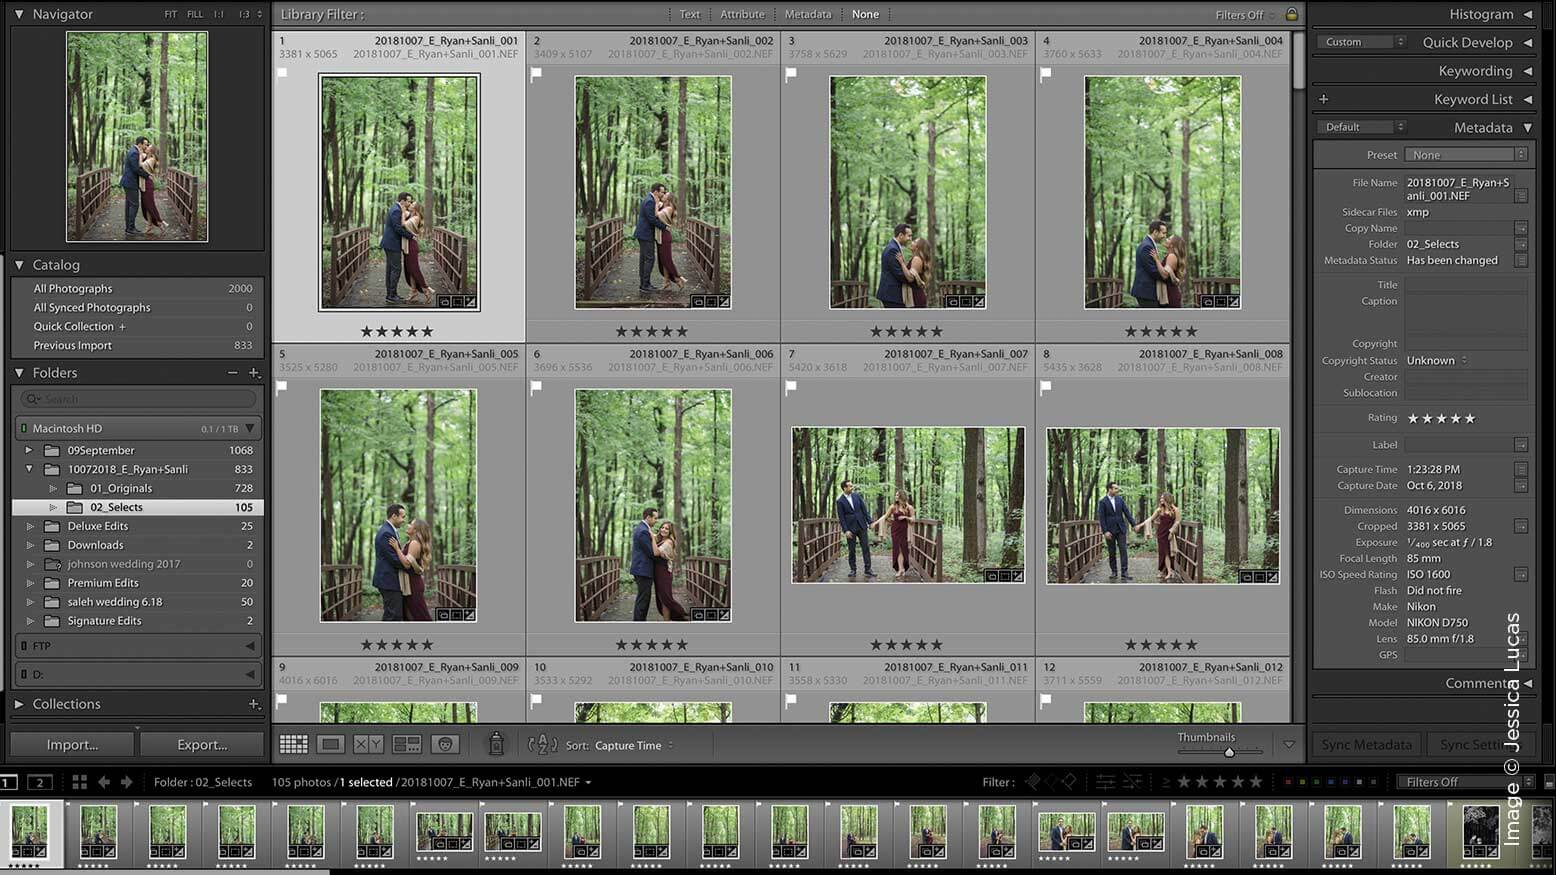
I use folder naming to organize my Raw files. I need the date and client name to refer to later, so here is my name structure: yearmonthday_event_clientname. An engagement session my wife photographed last October would be named 20181007_E_Ryan+Sanli. This is the main folder that will contain multiple subfolders named as such: 01_Originals, 02_Selects, 03_Lightroom, 04_Export, 05_Creative, etc. I create these folders after I am in Lightroom, and I create the 01_Originals folder for my Raw file import.
In the Apply During Import panel, we apply develop and metadata presets to cut time. Using keywords for who, what and where you photographed as well as adding additional attributes like photography-related terms helps build an arsenal for us to search images later. This two-step process creates a preset for all your standard image data like copyright, owner permissions and general keywords. In the Keyword field below, type any event info, and it will be added to your images as well. Apply develop settings to your images at import. I import without develop applied, but this is up to you. Renaming files is another option I skip because I rename files after I cull my images.
File Handling is our last panel, and this includes options for building previews. I am not going to get into the pros and cons of these, but must stress the importance of Build Smart Previews—check this box. For the time being, I leave the Build Previews setting at Minimal; do your research on these options if you are unsure. Backup is hidden in this panel and easy to forget since it’s unchecked at default. Use a separate external drive to create a second copy or, in my case, a third. You should have three storage options, two on site and one off site. Cloud storage is a popular option for off site that you can sync with an external drive in your studio to run hourly.
Now click Import and go have a coffee.
Get Organized in Grid Mode
Once your images are fully imported and your Smart Previews have finished building, we are ready to cull the images. I make sure my Lightroom preferences are set for a speedy selection. Another handy tip for culling like a champ in Lightroom is to turn on your caps-lock key and use flags. Flagging images is simple: Strike “p” to keep an image, and Lightroom auto-advances to the next photo; strike “x” to cull one out and “u” to unflag an image. This speeds up your culling time. Once you finish culling, start to create new folders in the Grid/Library module.
The best way to do this is to filter out all unflagged and rejected photos to select all the images remaining. On the left side in the Folders panel, right-click the 01_Originals folder, select Show Parent Folder, select the parent folder and click the “+” button at the top of the panel. Choose Add Subfolder so this new folder stays in the same folder tree as 01_Originals. This is how you keep things organized. Enter the new folder name as 02_Selects and check the box to include Selected Photos. Click Create to move the Raws into the 02_Selects folder so you still have a version to work from.
At this stage, we don’t want to rename files just yet in the event we cull more images while we edit them. We can finish adding the remaining folder to prepare for our export and creatives later. I like to Custom Order the images, especially when I’ve synced the capture time and I want to break up the detail shots, bride and groom getting ready, etc. To move files around, select and click an image to move it to a different spot. If you are working in a folder that doesn’t allow Custom Sorting, you can add all the images to a new collection. Select all images and click the “+” button in the Collections panel. Include selected photos and click Create. Now you can click and drag individual or groups of images to Custom Sort.
Now we are ready to edit in the Develop module.
Work Smart in Develop With Smart Previews
Culling is fast because standard previews are being built before you start reviewing. For editing in Develop, it’s all about smart previews. Set your preferences to utilize these instead of Lightroom relying on the Raws to load per image. Another useful option in Lightroom is to create virtual copies of your images for things like black-and-white edits and creative edits. This can be done in Develop or Grid mode simply by selecting one or more images, holding Command and striking the apostrophe key. Quickly convert all these virtual copies to black and white with the “v” key. Then apply presets to push your images into different styles.
For smaller sessions like this, I apply my standard starting-point preset and tweak the HSL settings on the first image to dial back any unwanted green tones in the images. When this image looks right, I select the remaining images and globally sync the Color Adjustments settings only. For sessions where I have more than one photographer with me, I choose an image from the beginning of each sequence and/or lighting change per camera. To make sure I choose each actual camera, I choose the Library filter: Camera Serial Number. This is a personal preference for making sure I balance each camera consistently from the start. Spending more time doing this means I can quickly sync large batches of images per camera and quickly dial in each image.
Along with presets, this is a great time saver for editing.
Last Step: Archive Your Catalog
Now that we are ready rename and export our images, we need to archive this session-specific catalog into our master catalog. This is where I do all my final file adjustments. Don’t worry—this is the easiest part of the process. Open the master catalog in Grid mode, find the session-specific catalog file in your file browsing application, and drag and drop it into the opening catalog. After the Import From Catalog dialog box loads, you can see that New Photos are loading and you can click Import to add them. That is it.
Now that the newly edited session is in the master catalog, rename the Raw files based on the folder names we created earlier: 20181007_E_Ryan+Sanli_0001, 20181007_E_Ryan+Sanli_0002, etc. In the Filename Template Editor, create a preset for this naming structure to recall for future orders. This speeds things up and maintains consistency job to job. It is important to rename the Raws before exporting files because if you rename only the exported JPEGs being delivered, it is difficult to match files later. This also sets you up to dump unkept Raw files after a certain period of time since you’ve already delivered the files.
The Results
Now that we’ve gone through the process of ingesting our Raws and archiving the final catalog, we’re all set. This is a simple start to how you want to manage your own Raw files. There are a lot of options for storage management, and they all have their pros and cons. Use Lightroom to copy and back up files, and back up your files off site as well. Set up a plan you can follow and stick to it. Consistency is the most important part of the process. Keep it simple and repeat.


